All forms can trigger Ragic's server-side JavaScript workflow engine to execute complex business logic, such as calculating costs and releasing inventory balances. Essentially, any complex business logic that Ragic's existing features cannot cover can be implemented through server-side scripting. The scripting engine is based on the standard Nashorn Java scripting engine, which is included in the Java platform.
Nashorn supports ECMAScript 5.1, so it's best to avoid using ECMAScript 6 syntax. Additionally, data handled and passed by Java to JavaScript (such as arrays) may be subject to certain limitations, preventing the direct use of JavaScript methods like join, map, etc. However, if you define a JavaScript array directly within the workflow and store data in it, these JavaScript methods can be used normally. Likewise, browser-specific APIs such as setTimeout, setInterval, alert, document, etc., cannot be used here.
var query = db.getAPIQuery(pathToForm);
var entry = query.getAPIResult();
var values = entry.getFieldValues(fieldId); // Returns an array

var str = values.join(','); // Not usable, will cause an error

var ary = [];
for(var i = 0; i < values.length; i ++) {
    ary.push(values[i]);
}
var str = ary.join(','); // Usable
Ragic's spreadsheet design interface can handle most of your data management work, such as creating, editing, and querying records without much problem. On the other hand, manual data maintenance can be a bit time-consuming and routine after a while. This is the time when Ragic users will start thinking of ways to automate these processes. Inside Ragic, there is a pretty powerful scripting engine where you can write Javascript that runs on the server-side, to retrieve data you have on your spreadsheet, make modifications, or even create many records with one click. Typical usage includes updating inventory, creating a new record based on another (creating a sales order from a quote, creating a contact from a sales lead), or doing record validation based on database data.
There are 5 main ways to run your Javascript workflow:
And there is a Global Workflow where you can place common Javascript function definitions shared by more than one of your workflow scripts.
In the workflow, several specific terms frequently appear. We define these terms as follows: Suppose a data entry in our form has the URL https://www.ragic.com/testAP/testForm/1/3
| Term | Definition |
|---|---|
| APName | testAP, the name of the user's database |
| Path |
/testForm, the tab where this form is located; the leading slash is required |
| SheetIndex | 1, the index of this form within the tab |
| pathToForm |
/testForm/1, which is the combination of Path and SheetIndex, commonly used as a parameter |
| rootNodeId, recordId |
3, the ID of this data entry (also referred to as a record); it can also be obtained through getNewNodeId(keyFieldId) or getOldNodeId(keyFieldId) |
| Key field |
The primary key of this form; keyFieldId is the ID of the primary key field, which can be found in the database field definition document, or obtained using entry.getKeyFieldId() |
| Field |
A field, with fieldId being the field's ID and fieldName being the field's name. The fieldId can be found in the database field definition document, or by selecting the field in design mode and going to "Field Settings" => "Basic"; the seven-digit number under the field name is the fieldId |
| Subtable |
A subtable, which can be imagined as a form beneath another form; it also has its own keyFieldId, fieldId, and rootNodeId |
| subtableId |
The ID of the subtable, which can be found in the database field definition document. It can be imagined as the subtable's keyFieldId |
| subtableRowIndex | The index of the subtable data, usually specified using a loop |
| subtableFieldId |
The ID of the subtable's field, which can be found in the database field definition document. It can be imagined as the subtable's fieldId |
| subtableRootNodeId |
The ID of the subtable record, which can be obtained using getSubtableRootNodeId(subtableId, subtableRowIndex). It can be imagined as the subtable's rootNodeId |
You can display a message in a pop-up like this. Please note that Action Buttons do not support setStatus('CONFIRM').
response.setStatus('WARN');
response.setMessage(message);
Additionally, since the workflow does not support JavaScript commands like console or alert, if you want to debug, you can use log.setToConsole(true) and log.println(message) to display messages.
var message = "hello ragic";
log.setToConsole(true); // Display the console block
log.println(message); // Print "hello ragic"
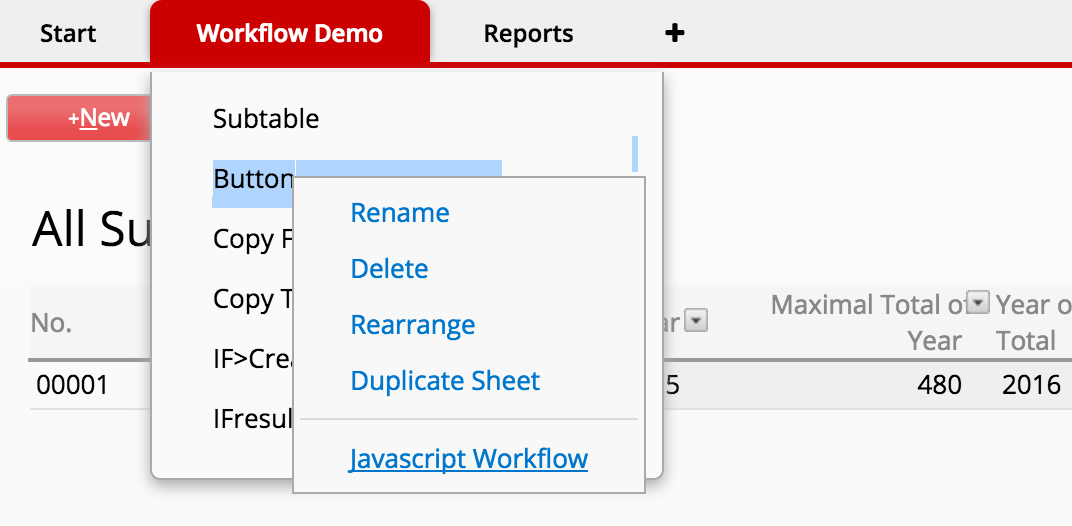
This is the most common and cleanest way to run Javascript workflow, and generally our first recommendation. You can write your script in the installed sheet scopeof your sheet, and configure an action button to execute the script when the user clicks on the button that will be displayed in the "Actions" panel on the lower right side. To add an installed sheet scope script, just right-click on a sheet, and choose Javascript Workflow:
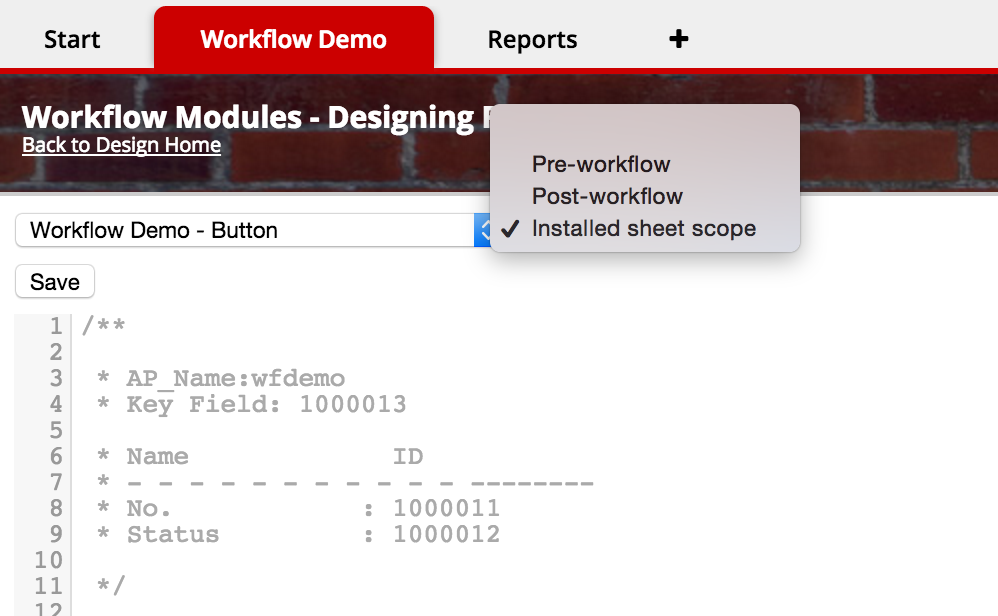
And choose installed sheet scope from the top dropdown:
You can then go to the form page of your sheet design, add an Action Button of the type JS Workflow, and refer to the Javascript function that you have written.
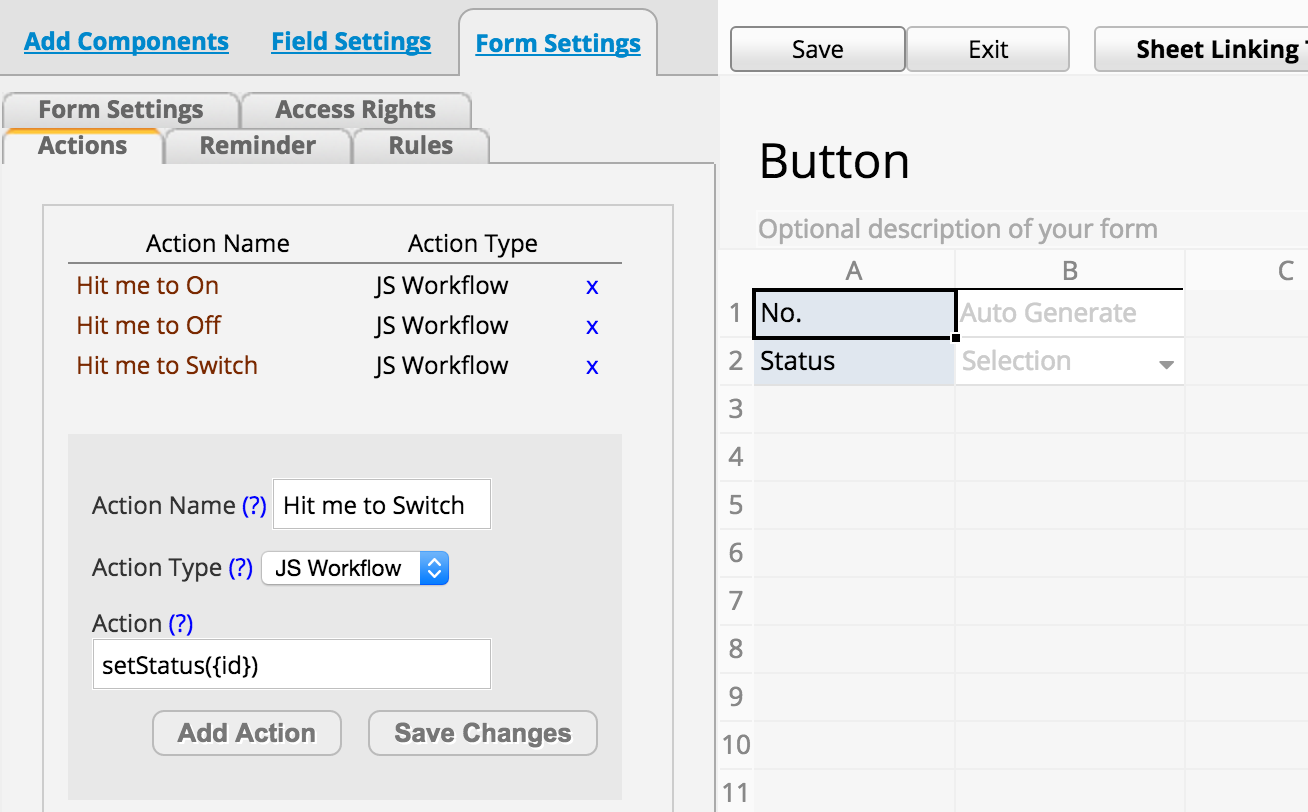
Note that you can pass the record id of the current record by using {id} in the argument for the function call like:
setStatus({id})
Of course, we will talk more about how to write these functions in the following sections.
Post-workflows are executed immediately after a record is saved. With post-workflow, it's very convenient to automate changes that you would like to make on the record that you just saved that cannot be done with formulas. Or you can make modifications to records on other related sheets, like updating inventory balance. To add a post-workflow, just right-click on a sheet, and choose Javascript Workflow:

And choose Post-workflow from the top dropdown. A typical post-workflow would look something like this:
var recordId = param.getNewNodeId(keyFieldId);
var query = db.getAPIQuery(pathToForm);
var record = query.getAPIEntry(recordId);

// do what you would like to do with the record retrieved
See our API references and other sections of this document for the list of things that you can do. Also, please note that post-workflow will not be executed if you modify entries on the listing page.
Pre-workflows are executed before a record is saved, so it can be used as a way of validation to check the data entered against data in the database. It can also block saving by using response.setStatus('INVALID') or response.setStatus('ERROR'). Generally, most validation can be done with our front-end regular expression checks, or the unique checkbox for free text fields. But for more complex backend checks, sometimes pre-workflow will be needed. To add a pre-workflow, just right-click on a sheet, and choose Javascript Workflow:

And choose Pre-workflow from the top dropdown. There is a simple example: Suppose we have a list,
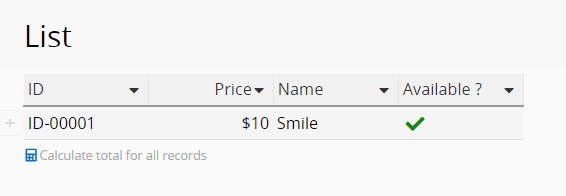
and we want to ensure the price we want to save is not negative.
/**

* Key Field: 1000004

* Field NameField Id
* - - - - - - - - - - - --------
* ID : 1000001
* Price: 1000002
* Name : 1000003
* Available ?: 1000005

    */
function showMsg(str) {
    // set status 'INVALID' or 'ERROR' to cancel the saving.
    response.setStatus('INVALID');
    response.setMessage(str);
}

function ifThePriceIsNegative() {
    // get the price we trying to save.
    var newPrice = param.getNewValue(1000002);
    // change the newPrice string to integer.
    if(parseInt(newPrice) < 0) {
        return true;
    }
}

// if the price is negative, don't save it.
if(ifThePriceIsNegative()) {
    showMsg('Price is negative !!');
}
And now we try to save a negative price, we would get
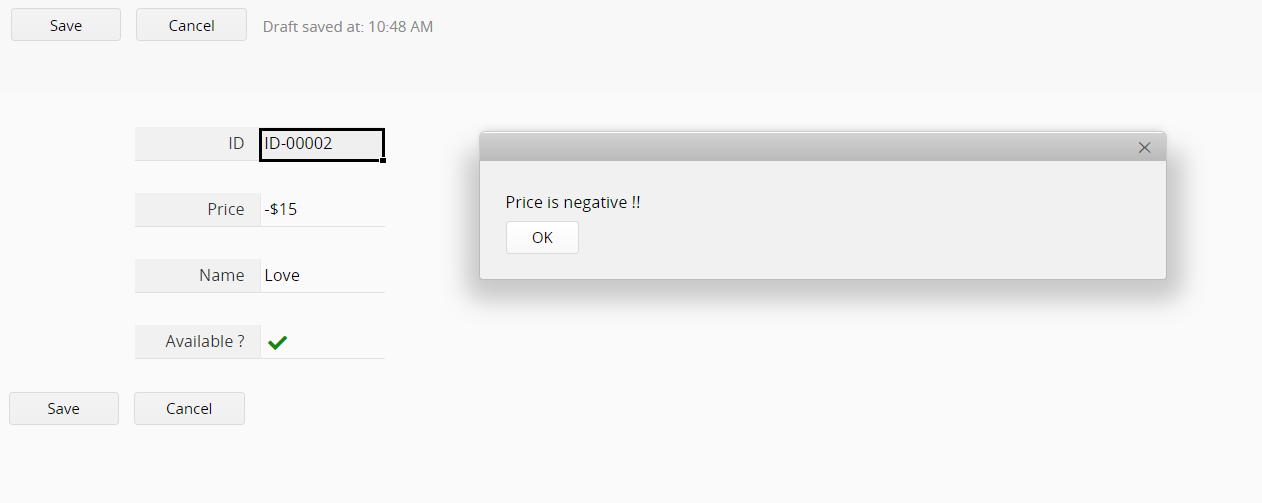
It is noteworthy that we couldn't use entry.getFieldValue while writing the pre-workflow in Ragic (since Ragic hasn't saved it). Try to use the param to get the old value and the new value instead.
The daily workflow runs on a daily basis. It's useful for doing modifications that need to be refreshed every day. Like updating the results of the formulas based on the current date. To add a daily workflow, just right-click on a tab, and choose Global Javascript Workflow:
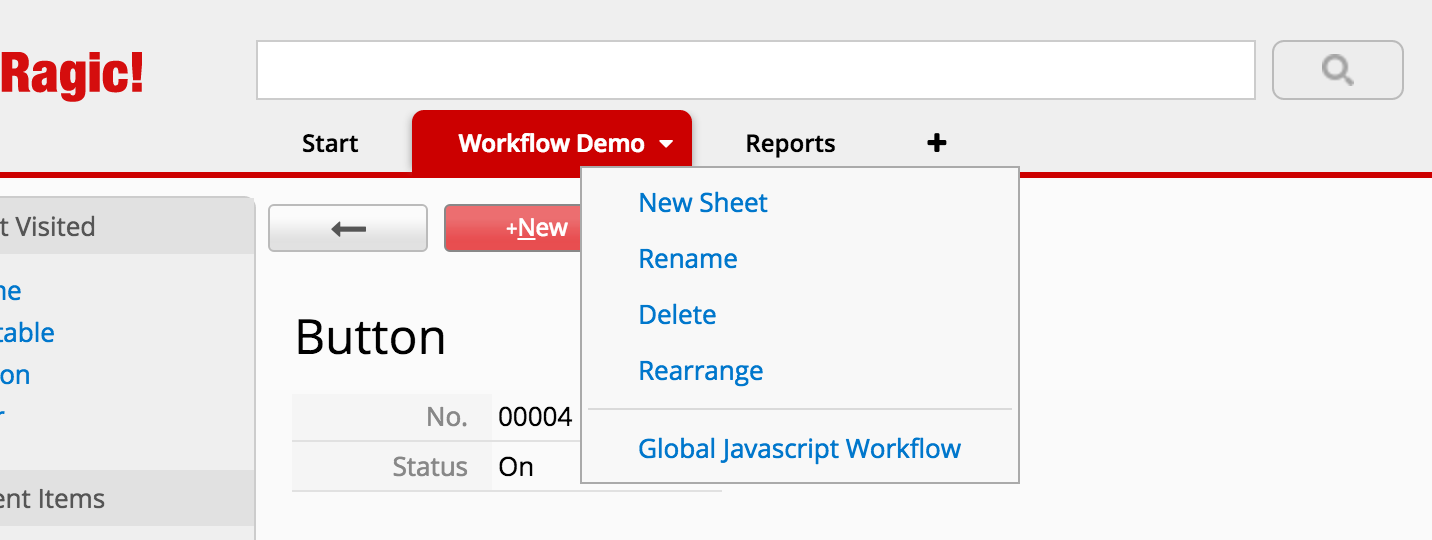
And choose Daily Workflow at the first top dropdown.
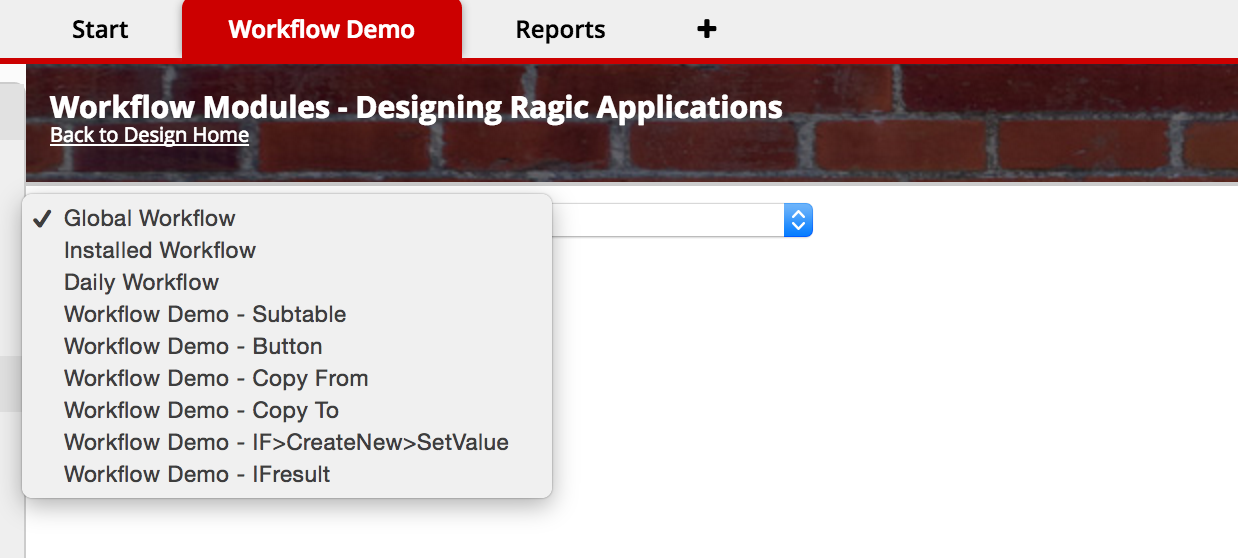
By default, the daily workflow runs at 19:00 UTC. You can change the Default Job Schedule Execution Time and Company Local Time Zone in the Company Settings. To set a different execution time specifically for Daily Workflows, adjust the settings directly in Job Schedules.
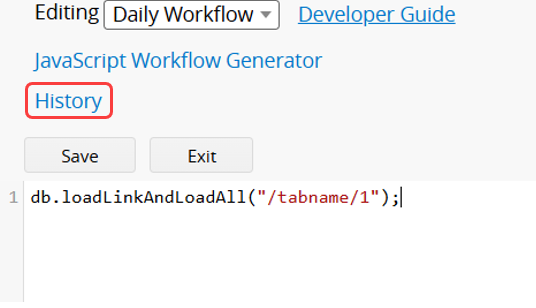
Click History to view the workflow modification history.
Approval Workflows are executed immediately after an approval is created/approved/rejected/canceled/finished. To add a post-workflow, just right-click on a sheet, and choose Javascript Workflow:

And choose Approval Workflow from the top dropdown. You can get the record id by:
var recordId = approvalParam.getEntryRootNodeId();
approvalParam is a predefined variable in the approval workflow scope.
And you can fetch the approval action by:
var action = approvalParam.getApprovalAction();
After you get the above data, you can customize your requirements like this:
var query = db.getAPIQuery(pathToForm);
var entry = query.getAPIEntry(recordId);
if (action === 'CANCEL') {
    entry.setFieldValue(STATUS_FIELD, "approval is canceled!");
}else if (action === 'FINISH') {
    entry.setFieldValue(STATUS_FIELD, "approval is completed!");
}else if (action === 'CREATE') {
    entry.setFieldValue(STATUS_FIELD, "approval is created!");
}else if (action === 'REJECT') {
    entry.setFieldValue(STATUS_FIELD, "approval is rejected!");
}else {
    entry.setFieldValue(STATUS_FIELD, "approval is approved!");
}
entry.save();
The global workflow is where you can write Javascript workflow modules that other workflow functions can reference. It will not be executed by itself but can be referenced in any type of workflow listed above. It's a great place to put scripts that you might need to duplicate across multiple sheets otherwise. To add a global workflow, just right-click on a tab, and choose Global Javascript Workflow:

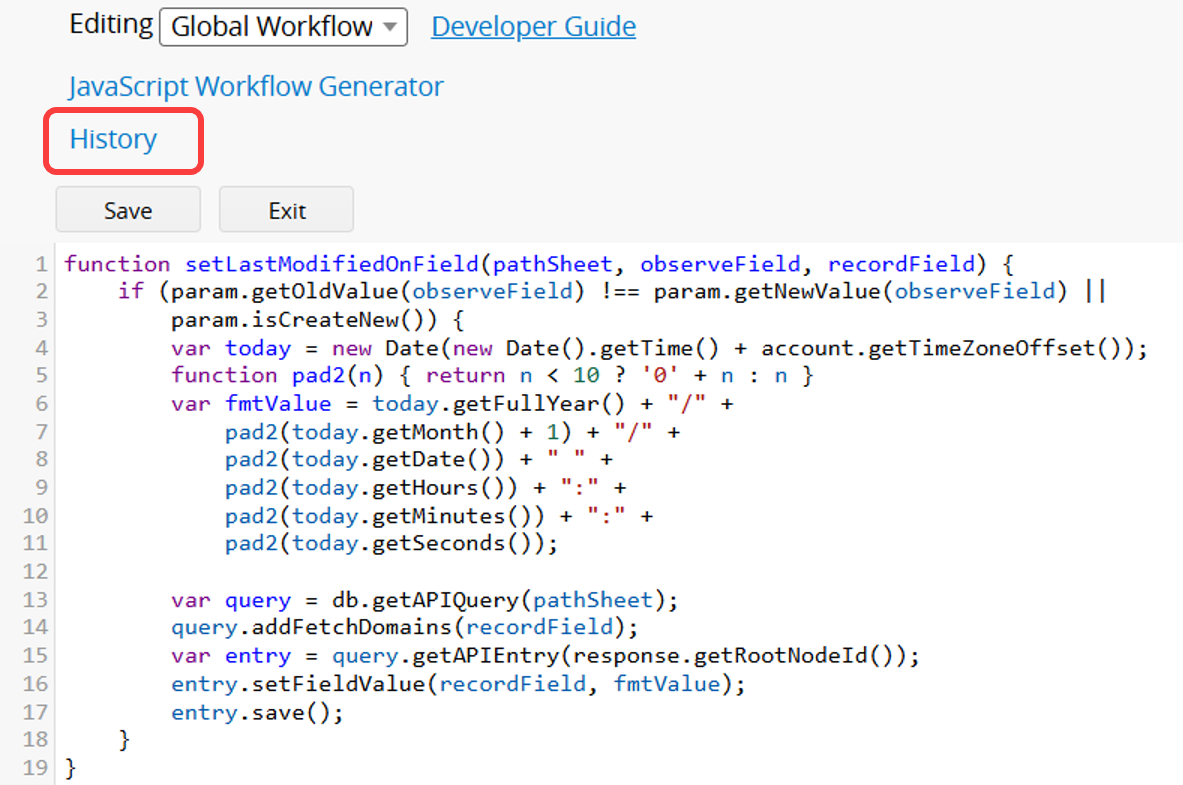
Click History to view the workflow modification history.
There are two different ways to get the current record that the user is viewing (for action buttons) or the record that the user has just saved (for pre-workflow and post-workflow).
The form page action button works by configuring an action button to call a function you defined in the install sheet scope. When you define the function that the action button calls, you can pass a parameter {id} which is the id of the record where you click the action button to function in the workflow. You can see the example at Action Button workflow.
You can get the record id by:
var recordId = param.getNewNodeId(keyFieldId);
param is a predefined variable, you can use it in pre-workflow and post-workflow.
After you get the record id, this is how you get the record (entry):
var query = db.getAPIQuery(pathToForm);
var entry = query.getAPIEntry(id);
For post-workflow, you can use either the above method just like with pre-workflow. But also there is a convenient method to retrieve the record that was just saved:
var entry=param.getUpdatedEntry();
If there are masked fields on the form page, you will get masked values by default. You can get unmasked values by:
var query = db.getAPIQuery(pathToForm);
query.setUpdateMode();
query.setIgnoreAllMasks(true); // Unmask all masked fields.
var entry = query.getAPIEntry(id);
You can use query.addIgnoreMaskDomain(fieldId_of_the_masked_field) instead of query.setIgnoreAllMasks(true) to unmask only specific fields.
There is more introduction about how to update records in the following section. If you would like to filter out multiple records, please refer to the section on filtering.
If you want to get more than one record by filtering: You can add filters to query by addFilter(fieldId, operator, value), and call getAPIResultsFull() to get the list of records. Here's the list of operands that you can use:
| Operand Name | Operand Value |
|---|---|
| Equals | = |
| Regular Expression | regex |
| Greater or equals | >= |
| Less or equals | <= |
| Greater | > |
| Less | < |
| Contains | like |
Use addFilter once to filter records that meet the condition
var colA = "1000002"; // Field A
var query = db.getAPIQuery("/workflow-demo/1");
query.addFilter(colA, '=', 'Green');
var results = query.getAPIResultsFull(); // results contain all records where Field A is Green
var entry = results.next();
while(entry) {
    // do something
    entry = results.next();
}
Use addFilter multiple times to filter records that meet all conditions
var colA = "1000002"; // Field A
var colB = "1000004"; // Field B
var query = db.getAPIQuery("/workflow-demo/1");
query.addFilter(colA, '=', 'Green');
query.addFilter(colB, '=', 'Yes');
var results = query.getAPIResultsFull(); // results contain all records where Field A is Green and Field B is Yes
var entry = results.next();
while(entry) {
    // do something
    entry = results.next();
}
Use addFilter multiple times to filter records that meet any of the conditions
var colA = "1000002"; // Field A
var query = db.getAPIQuery("/workflow-demo/1");
query.addFilter(colA, '=', 'Green');
query.addFilter(colA, '=', 'Red');
var results = query.getAPIResultsFull(); // results contain all records where Field A is Green or Field A is Red
var entry = results.next();
while(entry) {
    // do something
    entry = results.next();
}
var colA = "1000006"; // Field A
var query = db.getAPIQuery("/workflow-demo/1");
query.addFilter(colA, '>', '20');
query.addFilter(colA, '<', '40');
var results = query.getAPIResultsFull(); // results contain all records where Field A is greater than 20 and less than 40
var entry = results.next();
while(entry) {
    // do something
    entry = results.next();
}
Please note that when you filter by date or date time, they will need to be in the following format: yyyy/MM/dd or yyyy/MM/dd HH:mm:ss
You can also use a full-text search as a query filter by calling setFullTextSearch(String queryTerm) instead of addFilter().
Let's start with a simple example that retrieves the current record as an object, updates its value with a button, and then saves it back to the database. Here is what the demo form looks like:
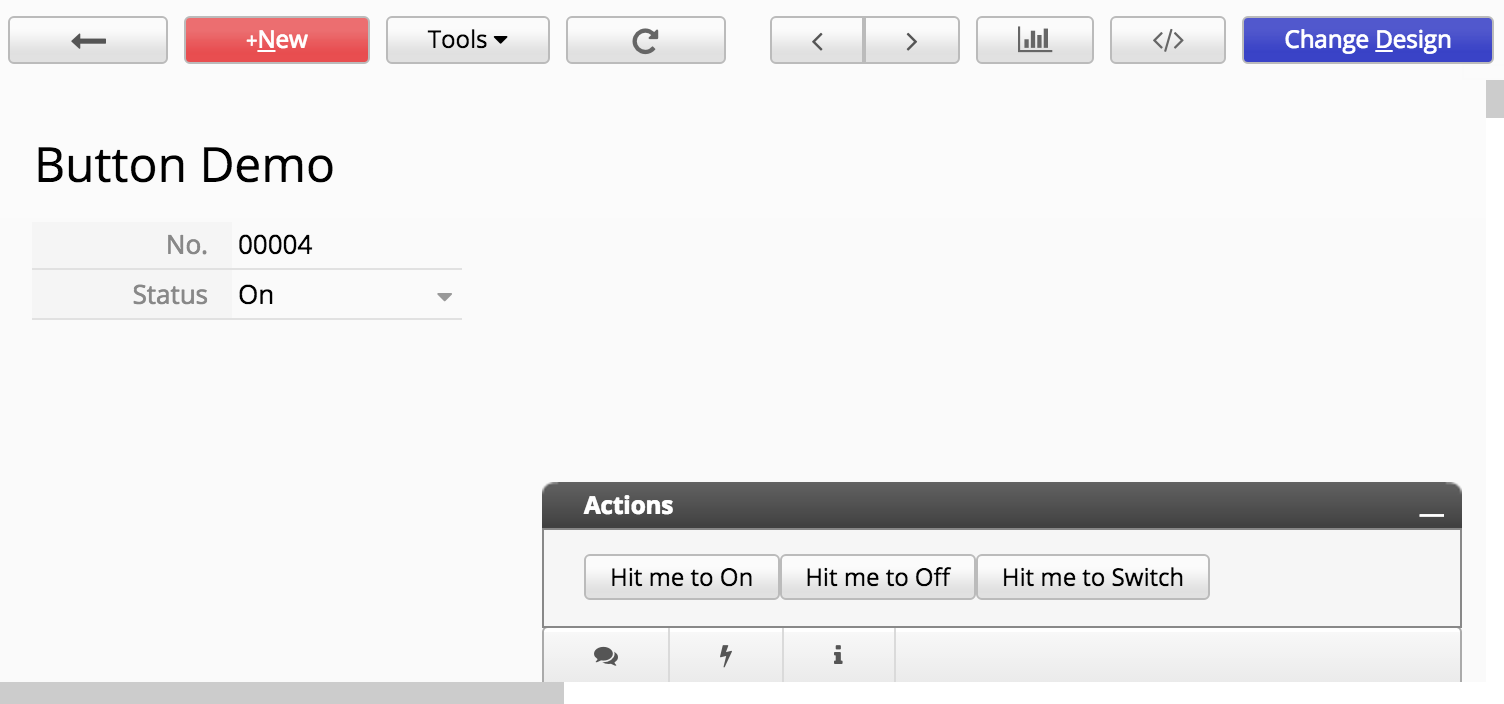
We would like to design some buttons that will change the value of our status field with the click of a button executing simple server-side Javascript workflow. Here's the code behind the button:
/**

    * AP_Name:wfdemo
    * Key Field: 1000013

    * Name ID
    * - - - - - - - - - - - --------
    * No.: 1000011
    * Status : 1000012

    */
function setStatus(recordId, status) {
    var STATUS_FIELD = 1000012;  //field id of the status field
    var query = db.getAPIQuery("/workflow-demo/2");  //get the query object for a sheet with path to sheet
    var entry = query.getAPIEntry(recordId);  //get the record object for the current record

    //set the status value for the current record to the object
    if (status) {
    entry.setFieldValue(STATUS_FIELD, status);
    }
    else {//for switching
    var newStatus = entry.getFieldValue(STATUS_FIELD) == 'On' ? 'Off' : 'On';  //get the current value of a field
    entry.setFieldValue(STATUS_FIELD, newStatus);
    }

    //save the record back to the database
    entry.save();
}
When writing Javascript workflow, the variable db is predefined. You can refer to it anywhere. Generally, we call the method getAPIQuery(pathName) to retrieve the query object for a sheet. Then you can retrieve a record with its record id on the sheet object with getAPIEntry(recordId), and call setFieldValue(fieldId,value) to set the value to a field, or getFieldValue(fieldId) to retrieve value from a record. Please note that when adding date values, it must be in one of the following formats:
yyyy/MM/dd
yyyy/MM/dd HH:mm:ss
HH:mm:ss
If you're retrieving a value from a multiple selection field, where there may be multiple values, use getFieldValues(fieldId) to retrieve all the values in an array. You can also call setFieldValue(fieldId,value,true) with an extra true argument at the end to specify that you're "adding" an option to the current list of values, not overwriting the existing ones. Note that these operations are only suitable for multiple selection fields. If you want to copy a multiple selection field value and overwrite the value in another multiple selection field, you couldn't just use getFieldValues(fieldId) and setFieldValue(fieldId,value,true). Here's the code that you can refer to:
var multipleSelectionFieldValue = entry.getFieldValues(1013251); // 1013251 is a mutiple selection field
var targetMultipleSelectionField = "";

for (var i = 0; i < multipleSelectionFieldValue.length; i++) {
    if (i == 0) {
    targetMultipleSelectionField = targetMultipleSelectionField + multipleSelectionFieldValue[i];
    }
    else {
    targetMultipleSelectionField = targetMultipleSelectionField + "|" + multipleSelectionFieldValue[i];
    }
}

entry.setFieldValue(1013252, targetMultipleSelectionField, false); // 1013251 is another mutiple selection field
Please note that you need to retrieve every option and format those options with a vertical bar character (|) like what you will do while importing existing data from Excel or CSV files. If you're setting values to a file upload field, you can use setFieldFile(int fieldId, String fileName, String fileContent) to create a file with the fileName and with the fileContent you provided. Ragic will then save this file to this field so that the file is available for download on the user interface. After you're done, just call save() on the record object to save it back to the database.
Creating records is very similar to updating records. Instead of calling query.getAPIEntry(), call query.insertAPIEntry() instead. Like getAPIEntry(), it will also return a record where you can setFieldValue to add field values. The record will be created after calling entry.save(). A simple modification of the record update demo like this will create a new record instead:
/**

    * AP_Name:wfdemo
    * Key Field: 1000013

    * Name ID
    * - - - - - - - - - - - --------
    * No.: 1000011
    * Status : 1000012

    */
function setStatus(recordId, status) {
    var STATUS_FIELD = 1000012; //field id of the status field
    var query = db.getAPIQuery("/workflow-demo/2"); //get the query object for a sheet with the path to sheet
    var entry = query.insertAPIEntry();//create a new record object

    //create the new record to the database
    entry.save();
}
If you have subtables in a sheet, you can also use our API to retrieve data from it or make edits like the following example. The form looks like this:
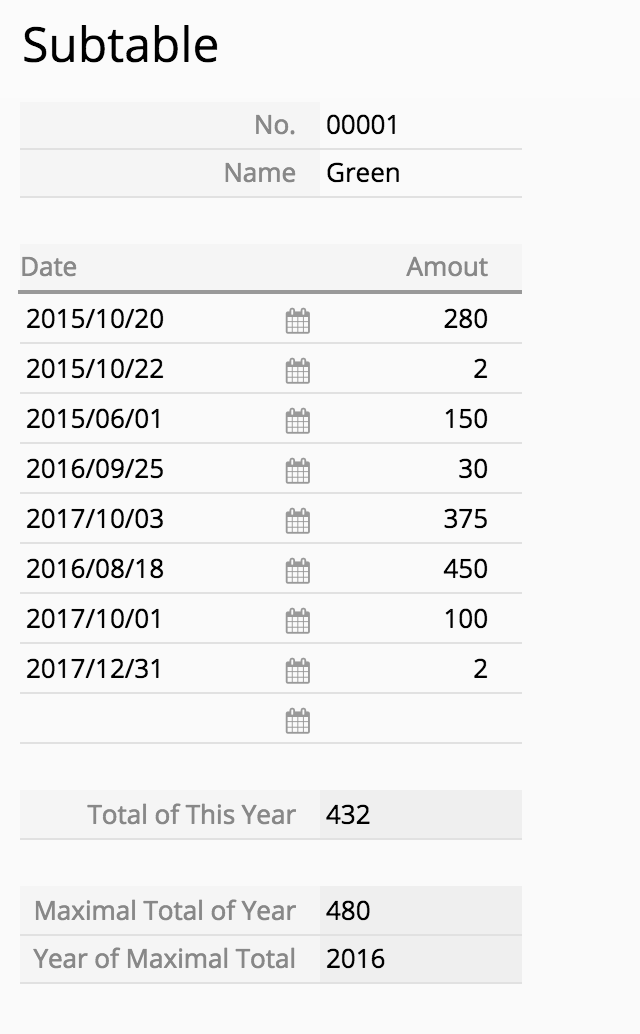
The workflow will walk through each row in the subtable, and find the total amount for this year (according to the date field in the subtable), the total for the year with the most amount, and identify which year has the highest total. This is designed as a post-workflow, so the three read-only fields will be filled by workflow after the record is saved.
/**

    * AP_Name:wfdemo
    * Key Field: 1000006

    * Date subtable key: 1000007

    * Field Name Field Id
    * - - - - - - - - - - - --------
    * No. : 1000001
    * Name: 1000002
    * Date: 1000003
    * Amout : 1000004
    * Total of This Year: 1000010
    * Maximal Total of Year : 1000009
    * Year of Maximal Total : 1000008

    */

var KEY_FIELD = 1000006;
var AMOUNT_SUBTABLE_ID= 1000007;
var DATE_FIELD= 1000003;
var AMOUNT_FIELD= 1000004;
var MAX_YEAR_FIELD= 1000008;
var MAX_TOTAL_FIELD = 1000009;
var THIS_YEAR_TOTAL_FIELD = 1000010;

var query = db.getAPIQuery("/workflow-demo/1");

var entry = query.getAPIEntry(param.getNewNodeId(KEY_FIELD));
var subtableSize = entry.getSubtableSize(AMOUNT_SUBTABLE_ID);

var yearTotal = {}
for (var i = 0; i < subtableSize; i++) {
    var year = parseInt(entry.getSubtableFieldValue(AMOUNT_SUBTABLE_ID, i, DATE_FIELD).substr(0, 4));
    var amount = parseInt(entry.getSubtableFieldValue(AMOUNT_SUBTABLE_ID, i, AMOUNT_FIELD));
    if (year in yearTotal) {
    yearTotal[year] += amount;
    } else {
    yearTotal[year] = amount;
    }
}

var maxYear;
for (var year in yearTotal) {
    if (!maxYear || yearTotal[maxYear] < yearTotal[year]) {
    maxYear = year;
    }
}

entry.setFieldValue(MAX_YEAR_FIELD, maxYear);
entry.setFieldValue(MAX_TOTAL_FIELD, yearTotal[maxYear]);
entry.setFieldValue(THIS_YEAR_TOTAL_FIELD, yearTotal[new Date().getFullYear()]);
entry.save();
The basic idea is to use getSubtableSize(subtableId) to get the number of rows for a record, and use getSubtableFieldValue(subtableId,subtableRowIndex,subtableFieldId) to retrieve their values. You should be able to find subtable id, and field id information in the auto-generated comments when you start editing workflow scripts. You can also use setSubtableFieldValue(subtableFieldId,subtableRootNodeId,value) to set values to a subtable. The subtableRootNodeId is used to specify which subtable row that you're referring to. To find a subtableRootNodeId for an existing subtable row, you can use the following call getSubtableRootNodeId(subtableId,subtableRowIndex) which will return an integer containing the subtableRootNodeId. If you need to add a row to the subtable, you can use a negative subtableRootNodeId like -100, this way all values set to the same negative subtableRootNodeId will be applied to the same new subtable row, and values set to a different negative subtableRootNodeId like -101 will create a different row in the subtable with this different set of values.
If you want to get values in pre-workflow and post-workflow, try following this example:
var list = param.getSubtableEntry(AMOUNT_SUBTABLE_ID);
var arr = list.toArray();
response.setStatus('WARN');
for (var i = 0; i < arr.length; i++) {
    response.setMessage('Date : '+arr[i].getNewValue(DATE_FIELD)+', Amount : '+arr[i].getNewValue(AMOUNT_FIELD)+'\r\n');
}
Currently, we provide two methods for you to traverse through each record in a query: getAPIResultsFull and getAPIResultList.
| Method Name | Description |
|---|---|
| getAPIResultsFull | Uses a while loop to retrieve data one by one, has lower memory usage and is suitable for processing large amounts of data. |
| getAPIResultList | Loads all data into memory at once, more intuitive but has higher memory usage. |
    //getAPIResultsFull example
    var query = db.getAPIQuery("/workflow-demo/1");
    var results = query.getAPIResultsFull();
    var entry = results.next();
    while(entry) {
    // do something
    entry = results.next();
    }

    //getAPIResultList example
    var query = db.getAPIQuery("/workflow-demo/1");
    var results = query.getAPIResultList();
    for(var i = 0; i < results.length; i ++) {
    var entry = results[i];
    // do something
    }
In this section, we will have an example to show how to use setLimitSize and setLimitFrom. In this example, we have 20 entries total and want to take 6 for each count and show the message.
/**

* Field Name Field Id
* -------------------
* ID : 1000009
* Money : 1000010

*/
function limitFromExample() {
    var apiQuery = db.getAPIQuery('/entrycopier/3');
    // remember the offset
    var fromNumber = 0;
    apiQuery.setLimitFrom(fromNumber);
    // take 6 for each count
    apiQuery.setLimitSize(6);
    var resultList = apiQuery.getAPIResultList();

    while(resultList.length > 0) {
        var msg = '';
        for(var i = 0;i < resultList.length; i++) {
            var entry = resultList[i];
            msg += entry.getFieldValue(1000009);
            if(i != resultList.length -1) msg += ',';
        }
        response.setMessage(msg);
        // update offset
        fromNumber += resultList.length;
        // refresh apiQuery
        apiQuery = db.getAPIQuery('/entrycopier/3');
        apiQuery.setLimitSize(6);
        apiQuery.setLimitFrom(fromNumber);
        resultList = apiQuery.getAPIResultList();
    }
    response.setStatus('WARN');
}
Entries
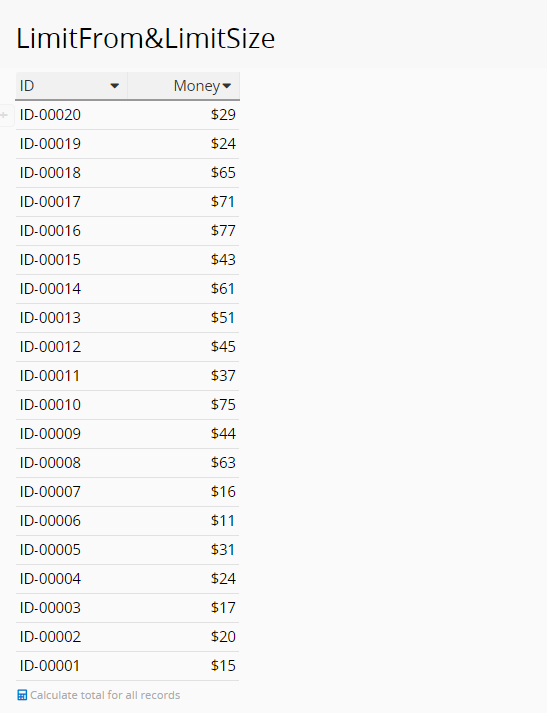
Result

Link to example:
Copy From and
Copying records is one of the most common workflow programs we encounter. We have written a pretty simple function to simplify this type of operation. Let's say we would like to see a record on this sheet:
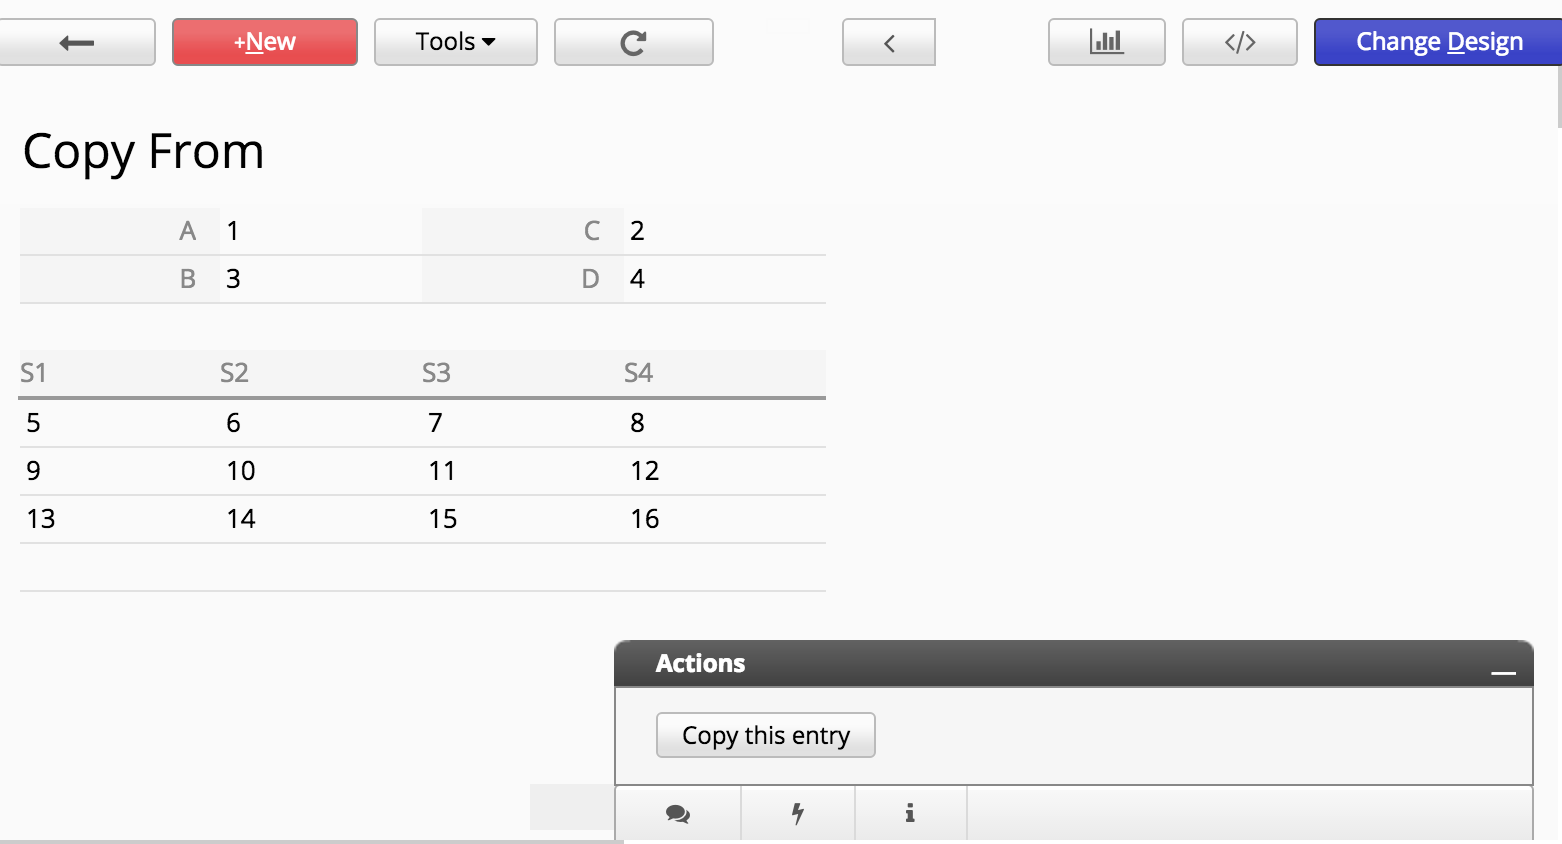
With the click of the button, generate a record on this sheet:
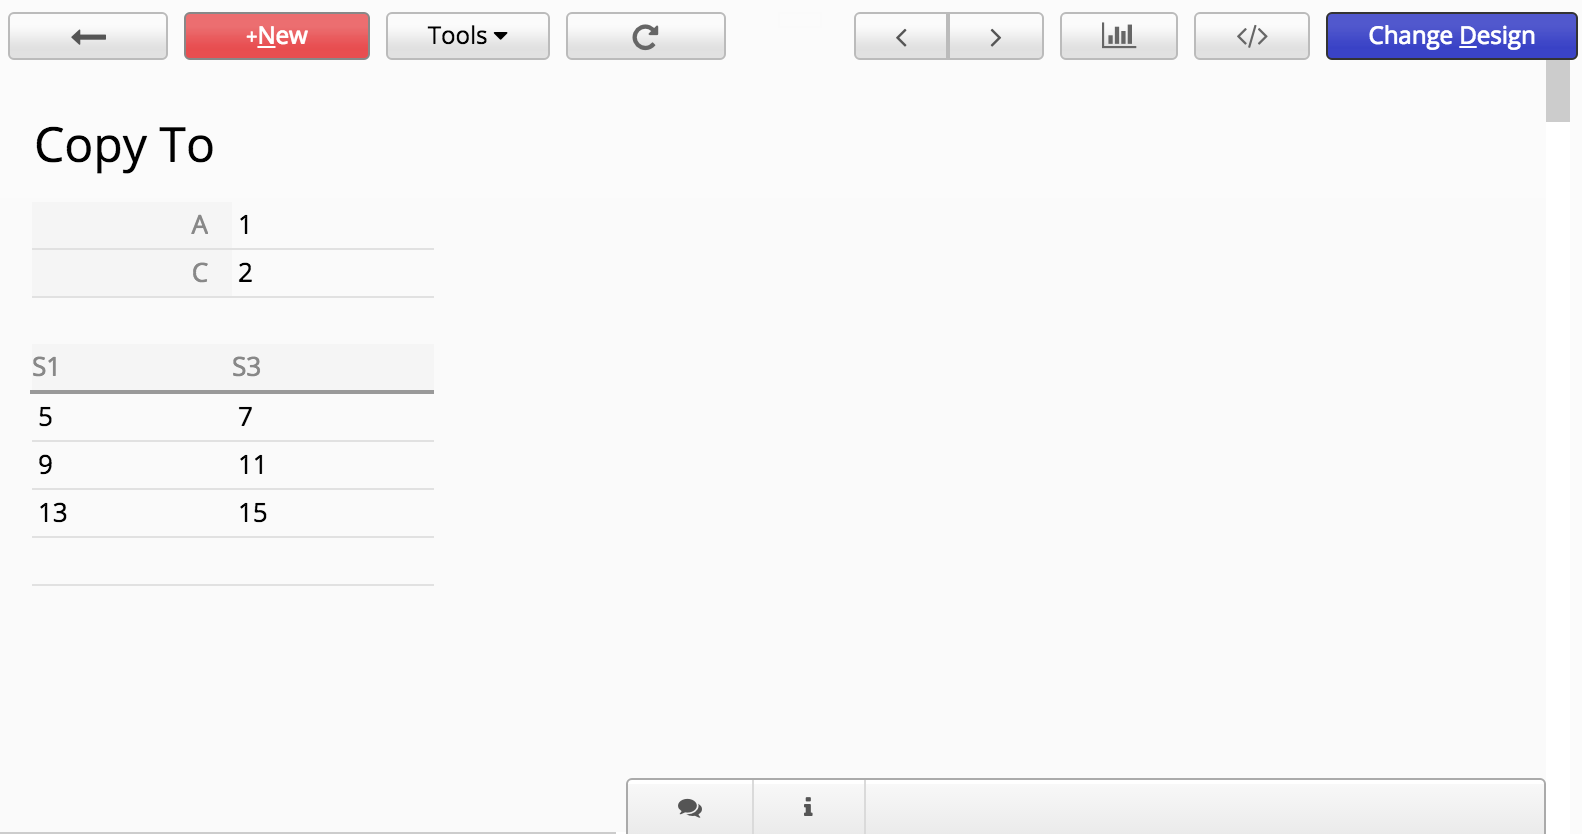
Here is the code for this action button:
/**

    * AP_Name:wfdemo
    * Key Field: 1000022

    * S1 subtable key: 1000023
    * T1 subtable key: 1000029

    * Field nameField ID
    * - - - - - - - - - - - --------
    * A: 1000014
    * C: 1000015
    * B: 1000016
    * D: 1000017
    * S1 : 1000018
    * S2 : 1000019
    * S3 : 1000020
    * S4 : 1000021
    * T1 : 1000024
    * T2 : 1000025
    * T3 : 1000026

    */

function copyEntry(nodeId) {
    db.entryCopier(JSON.stringify({
    THIS_PATH:"/workflow-demo/3",
    THIS_NODEID:nodeId,
    NEW_PATH:"/workflow-demo/4",
    COPY:{
        1000030:1000014,// A
        1000031:1000015,// C
        1000032:1000018,// S1
        1000033:1000020 // S3
    }
    }),response);
}
Here you can see we can do the copy with one simple function call to entryCopier. entryCopier takes a JSON string as its parameter. Just put down the source sheet, target sheet, the record that we're copying, and most importantly, which field should be mapped to which field. When the mapping is complete, you can create action buttons to copy records from one sheet to another very easily.
Let's take a look at another example. Here, we want to copy Lin from "CopyFrom" to "CopyTo" and set the status to new. In addition, we'd also like to record the created date (please disregard the use of $DATE field for this example).
/**
    * field namefield id
    * - - - - - - - - - - - --------
    * From-ID: 1000001
    * From-Name: 1000002
    * To-ID: 1000004
    * To-Name: 1000005
    * Status : 1000007
    * RegisterDate : 1000008
    */

function copyEntry(nodeId) {
    db.entryCopier(JSON.stringify({
    THIS_PATH:"/entrycopier/1",
    THIS_NODEID:nodeId,
    NEW_PATH:"/entrycopier/2",
    COPY:{
        // to:from
        1000004:1000001,
        1000005:1000002,
    }
    }),response);
    //get the rootNodeId of the entry we copied before.
    var newEntryRootNodeId = response.getRootNodeId();
    //we need to create an ApiQuery to search the '/entrycopier/2'
    var toApiQuery = db.getAPIQuery('/entrycopier/2');
    //get the entry we copied before
    var newEntry = toApiQuery.getAPIEntry(newEntryRootNodeId);
    newEntry.setFieldValue(1000007, "New");
    var current = new Date();
    newEntry.setFieldValue(1000008, current.getFullYear()+'/' + (current.getMonth()+1) + '/' + current.getDate());
    newEntry.save();
}
Next, set up the Action Button and save it.
Then, simply click the Action Button to display the result.
You can use query.deleteEntry(nodeId) to delete records. If you need to delete multiple records, you can traverse through the entire query using query.getAPIResultList() to delete data.
    var query = db.getAPIQuery(pathToForm);
    query.addFilter(1000001, '=', 'To Be Deleted'); //Filter out all records where value of 1000001 is 'To Be Deleted'
    var results = query.getAPIResultList();
    for(var i = 0; i < results.length; i ++) { //Delete all filtered records
    var entry = results[i];
    query.deleteEntry(entry.getRootNodeId());
    }
If you need to delete more than 1000 records, you must use setLimitSize as query can only process 1000 records at a time by default.
    //Suppose there are 3000 records to delete

    var limitSize = 1500; //Limit for each query
    var query = db.getAPIQuery(pathToForm);
    query.addFilter(1000001, '=', 'To Be Deleted'); //Filter out all records where value of 1000001 is 'To Be Deleted'
    query.setLimitSize(limitSize); //Optional, this sets the maximum limit for query, default is 1000
    var results = query.getAPIResultList();

    while(results.length > 0) {
    for(var i = 0; i < results.length; i ++) {
        var entry = results[i];
        query.deleteEntry(entry.getRootNodeId());
    }

    //Fetch query again after every 1000 records
    var query = db.getAPIQuery(pathToForm);
    query.addFilter(1000001, '=', 'To Be Deleted');
    query.setLimitSize(limitSize);
    results = query.getAPIResultList();
    }
You can do some conditional processing based on which groups the user who will be executing the script is in. A user can be in multiple user groups, so usually, we can do a user.isInGroup(groupName) call to determine if the user is or is not in this user group. A typical use would be as follows, the following code is designed to be a pre-workflow, but a user object and isInGroup call can be used in all types of workflow except daily workflow which is triggered by the system.
if(!user.isInGroup('SYSAdmin')){//check if the user is a SYSAdmin
    response.setStatus('INVALID');//if they are not, do not save the record
    response.setMessage('You do not have the access right to do this.');//and display a message
}
Sometimes you would like to send e-mail notifications based on a set of conditions, or you would like to really customize your notification message content. You can write server-side Javascript workflow for this purpose. Here is the script that you will use to send out an e-mail, it's really simple:
//omitted...retrieve record object first

var name=entry.getFieldValue(1001426);
var email=entry.getFieldValue(1001428);
var title=entry.getFieldValue(1001386);

mailer.compose(
    email,  //to
    null,  //cc
    'support@example.com',  //reply to
    'Acme, Inc.',//displayed from
    title,
    'Hi ' + name + ',we have received your sales order \n'+
    'and will be processing your order very soon.\n' +
    'You can see your order details at https://www.ragic.com/example/1 \n' +
    'Thanks. \n\n\n' +
    'Best Regards, Sophia, Sales Manager Acme, Inc.'
);

//mailer.attach(myURL); //you can use .attach to attach content from a URL

mailer.send();
Note that if you would like to send an e-mail to multiple recipients, just separate each e-mail address with commas. For attachments, you can use mailer.attach(myURL); to attach a record on Ragic by using the record's URL. For example, if the record URL on Ragic is https://www.ragic.com/wfdemo/workflow-demo/2/9 (always ignore the URL after the hash), you can use the following version of the URL:
Here is its PDF version URL:
https://www.ragic.com/wfdemo/workflow-demo/2/9.pdf
Here is its Excel version URL:
https://www.ragic.com/wfdemo/workflow-demo/2/9.xlsx
You can also use a Mail Merge URL like this, the cid being the id of the Mail Merge, you can get the cid in the URL when trying to download the Mail Merge document:
https://www.ragic.com/wfdemo/workflow-demo/2/9.custom?rn=9&cid=1
We do enforce some limitations on how many e-mails you can send. So send reasonably! If you have some questions on e-mail sending quota, send us an e-mail at support@ragic.com.
You could start or cancel a record’s approval by adding the post-workflow script to your sheet. First, we set the approval step in design mode.
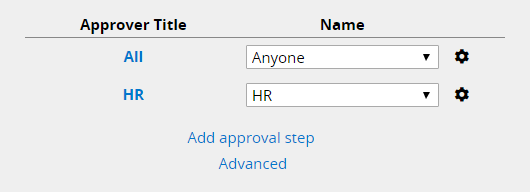
and now set the approval detail in the post workflow
function autoStartApprover() {
    var signers = [];
    signers.push({
    'stepIndex':'0',
    'approver':'kingjo@ragic.com',
    'stepName':'START'
    });
    signers.push({
    'stepIndex':'1',
    'approver':'HR0000@hr.hr',
    'stepName':'HR'
    });

    approval.create(JSON.stringify(signers));
}

autoStartApprover();
result

{
    'stepIndex':'0',
    'approver':'kingjo@ragic.com',
    'stepName':'START'
}
is the parameter format you should provide.
stepIndex : Used to know which approval step to set, starting from zero.
approver : Used to know who could sign this approval step.
stepName : Used to set approval step name.
Your approval would not be created if there was something wrong in the
parameter format or if the approvers you provided didn't follow the rule you
set in the design mode.
In this example, if you give the second step parameter like the following:
{
    'stepIndex':'1',
    'approver':'kingjo@ragic.com',
    'stepName':'HR'
}
If that's the case, it would fail since kingjo@ragic.com was not in the HR group. We also provide 3 special formats for deciding your approvers dynamically according to your company tree. You could see
for further information.
$DS : The approver will be set to the user's direct supervisor.
$SS : The approver will be set to the user's supervisor's supervisor.
$DSL : The approver will be set as the supervisor of the previous
approver. The parameter format is like
{
    'stepIndex':'1',
    'approver':'$DSL',
    'stepName':''
}
You don't have to provide a non-empty stepName while using these special formats. Note: If the user in a special format didn't follow the rule you set in the design mode, this approver would not be created.
Other than e-mail notifications, you can also send a mobile app notification. It will be sent to the user if the iOS app or Android app has been installed on his mobile device. The e-mail refers to the user's e-mail address registered in your Ragic account. For example:
mailer.sendAppNotification("mike@example.com","test mobile notification");
If you would like the user to be redirected to the specified record when clicking on this notification. You should provide a path to the form that you would like to redirect to (ex: /forms/1 ) and the record id. The call should look like this:
mailer.sendAppNotification("mike@example.com","test mobile notification","/forms/1",12);
You can first issue the following command to the query object you get from db.getAPIQuery to include full record info:
query.setIfIncludeInfo(true);
and then you can get the approval information for a record like this:
entry.getFieldValue('_approve_status');//getting status of current approval
entry.getFieldValue('_approve_next');//getting the next person who should sign this record
entry.getFieldValue('_create_date');//getting the create date of the record
entry.getFieldValue('_create_user');//getting the create user e-mail of the record
The approval status will be F is approved, REJ for rejected, and P for processing.
You can send an HTTP GET/POST/DELETE/PUT request to an URL and get returned result:
util.getURL(String urlstring)
util.postURL(String urlstring,String postBody)
util.deleteURL(String urlstring)
util.putURL(String urlstring,String putBody)
The variable util is predefined. If you need to ignore SSL certificate validation for your current HTTP request, you can add the following code before sending the request:
util.ignoreSSL()
Also, you can call util.setHeader(String name,String value) to set HTTP headers. util.removeHeader(String name) to remove headers.
You can download a file from a URL and get the filename:
util.downloadFile(fileUrl)
//fileUrl: The source URL of the file.
//Return value of the method: The filename of the downloaded file.
After downloading the file to the database, you can use setFieldValue to fill in the filename in the file field, allowing you to preview the file in the form or download it to your local device.
var fileFieldId = 1000087;
var fileName = util.downloadFile(fileUrl);
entry.setFieldValue(1000087, fileName);
entry.save();
You can upload a file and get the filename:
util.postFile(sourceFileUrl, destinationUrl)
//sourceFileUrl: The source URL of the file.
//destinationUrl: The destination URL to which the file will be uploaded.
//Return value of the method: The filename of the uploaded file.
You can refer to this guide for methods on retrieving complete file and image links.
When using the workflow to modify data in other forms, the workflow for that form is not triggered by default. If you need to trigger the form's post-workflow or pre-workflow, you can use the following code:
var query = db.getAPIQuery(pathToForm);
var entry = query.getAPIEntry(recordId);
//do something...

entry.setIfExecuteWorkflow(true);
entry.save();
Pre-defined system global variables listed here can be accessed directly without defining them.
Retrieves the database name.
Retrieves the path of the form.
Retrieves the sheet index of the form.
Deletes records older than the specified number of days. For example, if today is 2025/07/10 and daysOld is 1, it will delete records created before 2025/07/09 00:00:00. This method deletes up to 500 records.
Deletes records older than the specified number of days. If hasTime is true, the comparison is based on the current time of execution. For example, if the execution time is 2025/07/10 21:00:00 and daysOld is 1, it will delete records created before 2025/07/09 21:00:00. This method deletes up to 500 records.
Recalculates all fields for all records in the specified form.
Recalculates specified fields for all records in the specified form. The second parameter onwards are FieldId names, which can be separated by commas to input multiple FieldIds.
Synchronizes all Link and Load fields in the specified form.
Set to True to display the execution time in the "Sheet Workflow Formula Recalculation Execution Time Log" which records the time taken to recalculate a form using the db.recalculateAll() formula..
Get first entry when iterate over the query
Retrieve the records from the query. Use the next() method to get the next record, and with a while loop, you can retrieve the records one by one.
Get array of entries of the query.
Get entry by node ID.
Retrieve the key field id of the sheet this query is on.
Get the field id of a specified name. If there is more than one field of the same name, the first independent field id will be returned.
Insert a new entry to the query, and the method returns the new entry.
Filtering entries by specified condition.
Set if ignore the fixed filter from target sheet.
Sort entries of the query by specified field field id and order direction, parameter orderDir is set to 1 if sort ascending, set to 2 if sort descending, set to 3 if secondary sort ascending, and set to 4 if secondary sort descending.
Delete entry by node ID.
Delete entry by node ID to recycle bin.
By default ScriptAPIQuery returns 1000 records per query, you can use setLimitSize to change the number of records returned per query.
However, we do not recommend returning too many records per query because it may take too much memory and have bad performance implications. We recommend using the next method setLimitFrom to do paging instead.
This method is for paging through all the records on a ScriptAPIQuery. Setting a limitFrom will tell ScriptAPIQuery to start returning records from an offset so that you can page through all the records of ScriptAPIQuery because ScriptAPIQuery returns 1000 records per query by default. You should check for the next page if the number of records returned equals the returned list size.
When set to false, the query will retrieve the user's email for select user fields instead of the user's user name.
Sets the field value retrieval mode. When enabled (true), field values retrieved via the API will return the nodeId of the linked record, instead of the displayed value. When disabled (false), the API will return the actual displayed value of the field (such as text, number, or date).
Configures how field values are retrieved when loading default values.
If you find that field default values do not behave the same as on the form page, or are not displayed as expected when calling loadAllDefaultValues or loadDefaultValue, you can use this method to change how field values are evaluated.
When enabled (true), field values retrieved through the API will include both the related record’s nodeId and the display value. During default value loading, the system can then determine whether a field should load its default value based on the presence of a nodeId, rather than relying on whether the field’s display value is empty or whether data has already been saved.
When disabled (false), only the actual field value (such as text, numbers, or dates) is returned when retrieving field values.
Get value of the field by field id. Subtable fields not included.
Get the field id of a specified name. If there is more than one field of the same name, the first independent field id will be returned.
Retrieve the key field id of this sheet.
Get value of the field by field name. Subtable fields not included. If there is more than one field of the same name, the first field value will be returned.
Get all the field values from a multiple select field as an array. Subtable fields not included.
Get root node ID of the entry.
Get the size of the subtable, specified by the root field id of the subtable.
Get the root node ID of the subtable, specified by its root field id and row number in the subtable.
Get a JSON representation of the whole record.
Set value to specified field. For subtable fields, you need to use setSubtableFieldValue();
Set value to a field which is a multiple select field, parameter appendValue need to be true. For subtable fields, you need to use setSubtableFieldValue();
For file upload or graphics field only. A file of the fileName you provided and the fileContent you provided will be created as a file upload and saved to the specified field. For subtable fields, you need to use setSubtableFieldFile();
To avoid overwriting the original file in the file field, parameter appendValue need to be true.
Set value to subtable field, you can get parameter subtableRootNodeId by method getSubtableRootNodeId.
Set value to subtable field which is a multiple select field, parameter appendValue need to be true.
For file upload or graphics field in subtable only. A file of the fileName you provided and the fileContent you provided will be created as a file upload and saved to the specified field.
To avoid overwriting the original file in the file field, parameter appendValue need to be true.
Delete the subtable row by its root field id and row number in the subtable.
Delete every row in specified subtable.
Delete subtable row by root field id and the root node ID of subtable.
Load all loaded fields for every Link and Load configuration in the entry.
Load all loaded fields for a specific Link and Load configuration in the entry.
Load a single loaded field in the entry.
Recalculate every field that contains formula in the entry.
Recalculate formula of specified field.
Note: If two or more fields share the same fieldId, please use recalculateFormula(int fieldId, String cellName) instead.
Recalculates formula of a specified field using with cellName parameter determining the field’s cell location (such as A1, C2, H21, etc). This method is used on sheets with two or more fields with the same fieldId.
Load value of every field that is set with a default value, parameter user is predefined.
Load default value of specified field, parameter user is predefined.
Lock the entry.
Unlock the entry.
Check if the entry is locked.
Save the entry.
Set if the entry need to create history.
Whether the entry is set to create history.
Set if executing the workflow (pre-workflow and post-workflow) of the entry is needed.
Set if checking not empty fields would be ignored.
If this sheet is created by a subtable of another sheet, or is referenced by another sheet, which means, this sheet has the parent sheet, then you can call this method to set if you want to recalculate the parent sheet or not.
Loaded values syncing will be triggered on the other sheet if that sheet links to this sheet, the source sheet. You should always add this method to the source sheet to trigger syncing on the other sheet, and make sure that “Keep loaded value sync with source” is enabled in the corresponding Link and Load configuration (please refer to this documentation).This method is only supported for action buttons. If you need to sync Link and Load fields in a post workflow, you can directly retrieve the entry that needs to be updated and use loadAllLinkAndLoad.
Checks whether the current field value retrieval mode is set to nodeId only.
Gets the status of the response. Either SUCCESS, WARN, CONFIRM, INVALID, ERROR.
Sets the status of the response. Either SUCCESS, WARN, CONFIRM, INVALID, ERROR.
Sets a message for display when script executed. This function can be called several times and all messages that have been set will show at the same time.
Returns the number of messages that has been set.
Redirects the user to the URL specified after saving the edit.
Configure whether the browser opens a new tab when opening an URL. Defaults to true.
Get user's email address.
Get user's full name.
Returns if the user is in this group with the name of groupName.
Compose an e-mail message for sending out. The to and cc parameter can contain multiple e-mail addresses. They just need to be separated by commas.
Send out the message that was just composed.
Send out the message that was just composed asynchronously. Note that sendAsync can only be called once per script execution.
Attach a file to the message. The URL should be a full URL with https://
Set the BCC (blind carbon copy) recipients. You can specify multiple BCC recipients by separating the email addresses with commas.
Set if the content should not be converted to HTML. Set this to true when your content is already in HTML.
Send a mobile app notification to this user if the user has installed a Ragic iOS app or Android app.
Send a mobile app notification to this user if the user has installed a Ragic iOS app or Android app. The user will be redirected to the specified record when clicking on this notification. "pathToForm" should be in the format "/forms/1", not including the account name, including the tab folder and sheet index.
Calls an URL with GET method.
Calls an URL with POST method.
Calls an URL with DELETE method.
Calls an URL with PUT method.
Downloads the file returned by fileUrl to the upload folder in the database.
Downloads the file returned by fileUrl to the upload folder in the database.
Sets an HTTP header that will be used in subsequent URL calls.
Ignore SSL certificate validation for your current HTTP request.
Removes an HTTP header from being used in subsequent URL calls.
Records a string text log message in the workflow log that you can find in the database maintenance page.
Downloads a file from the source URL and returns the filename.
Downloads a file from the source URL, uploads it to the destination URL, and returns the filename.
Get the full name of a user specified by the e-mail address.
Get the email address for the specified user name.
Purge all account-related cache when the script and reloads the page finishes executing.
Get time zone offset of this account in milliseconds.
Get time zone offset of this account in hours.
Post-workflow only. Returns the record that was just created or updated.
Returns the node ID (int) of given field after new value being written.
Returns the node ID (int) of given field before new value being written.
Returns the value of given field after new value being written.
Returns the value of given field before new value being written.
Similar to getNewValue, but can access multiple values at the same time, which is useful when dealing with multiple-selection fields.
Similar to getOldValue, but can access multiple values at the same time, which is useful when dealing with multiple-selection fields.
Returns a list of params that can manipulate each record in the subtable.
Return if the entry is newly created.
Post-workflow only. wfSigner is an array with specific JSON format objects in it.
    function autoStartApprover() {
        var signers = [];
        signers.push({
        'stepIndex':'0',
        'approver':'kingjo@ragic.com',
        'stepName':'START'
        });
        signers.push({
        'stepIndex':'1',
        'approver':'HR0000@hr.hr',
        'stepName':'HR'
        });

        approval.create(JSON.stringify(signers));
    }

    autoStartApprover();
Note that wfSigner should satisfy the approval you set in design mode. Say, if there is only one candidate "HR00@gmail.com" in step 2 in design mode, you should give a json with approver: HR00@gmail.com and stepIndex: 1 .
Post-workflow only. Cancel the approval in the entry.
Get root node ID of the entry.
Gets the action of the approval. Either CREATE, APPROVE, FINISH, CANCEL, REJECT.
 Thank you for your valuable feedback!