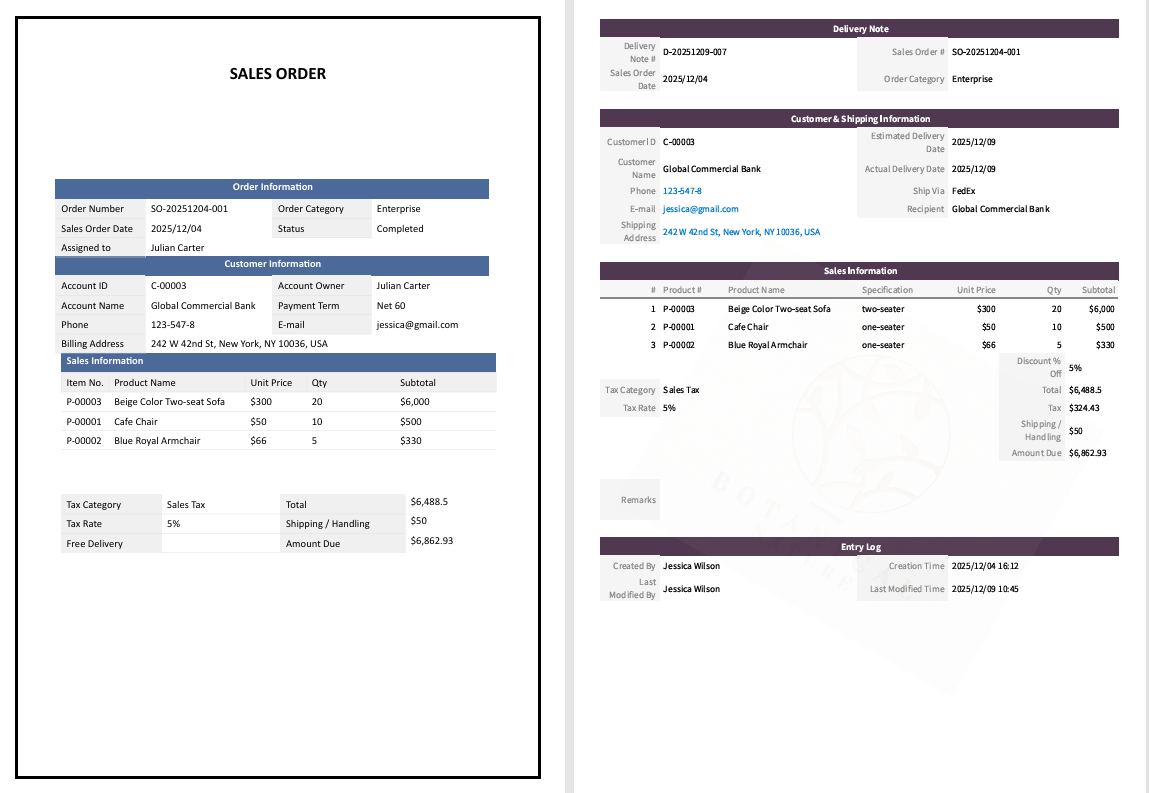
In Ragic, you can export records into custom formats, including PDF, DOCX, PNG, XLSX, and PPTX. For example, you can export "Sales Orders" into the PDF format your company commonly uses.

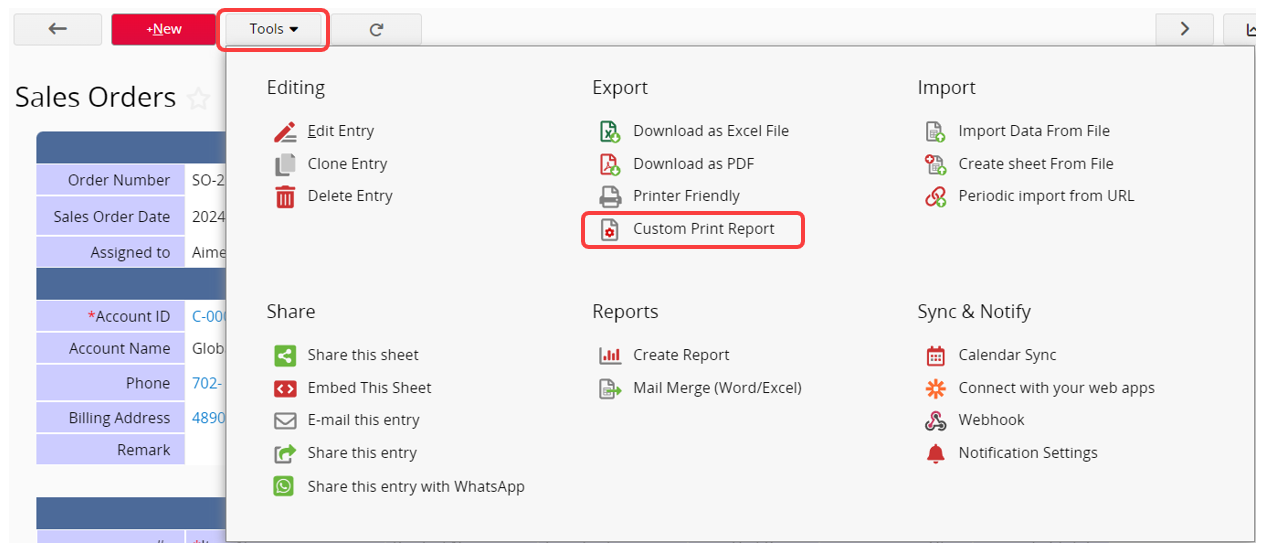
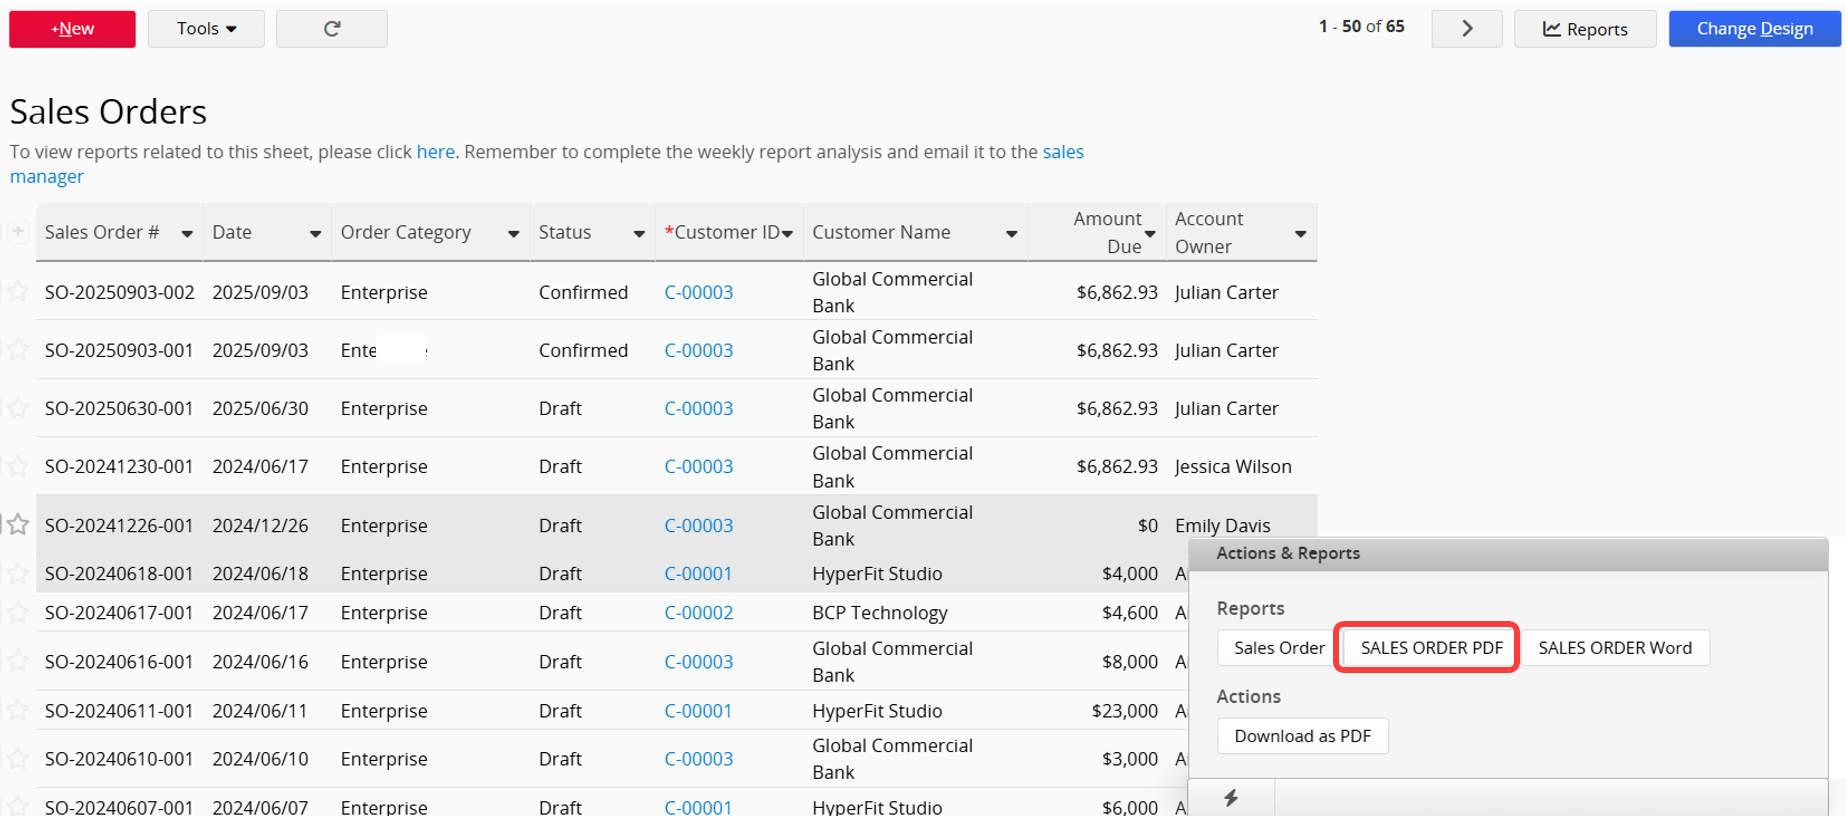
In the Listing Page or Form Page, select Custom Print Report from the Tools.
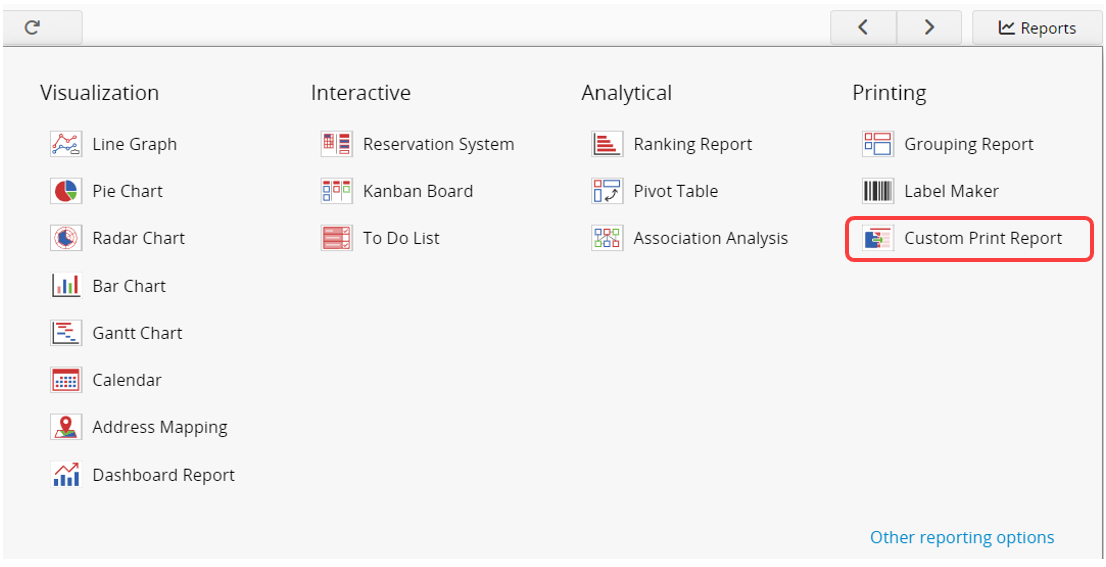
Alternatively, choose Custom Print Report from the Creating Reports step.
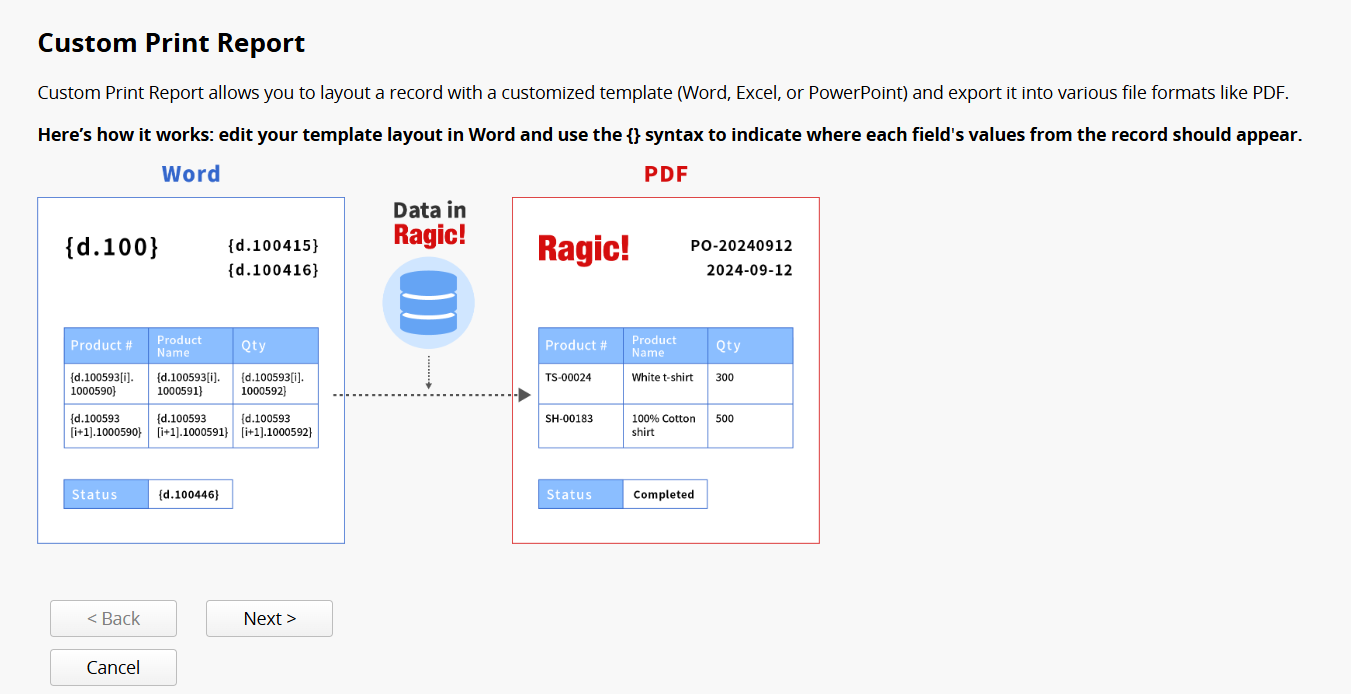
You will be directed to this page.
Follow the steps below to create a template.
Note: Only the SYSAdmin has access to create and configure Custom Print Report templates.
1. Checking for Template
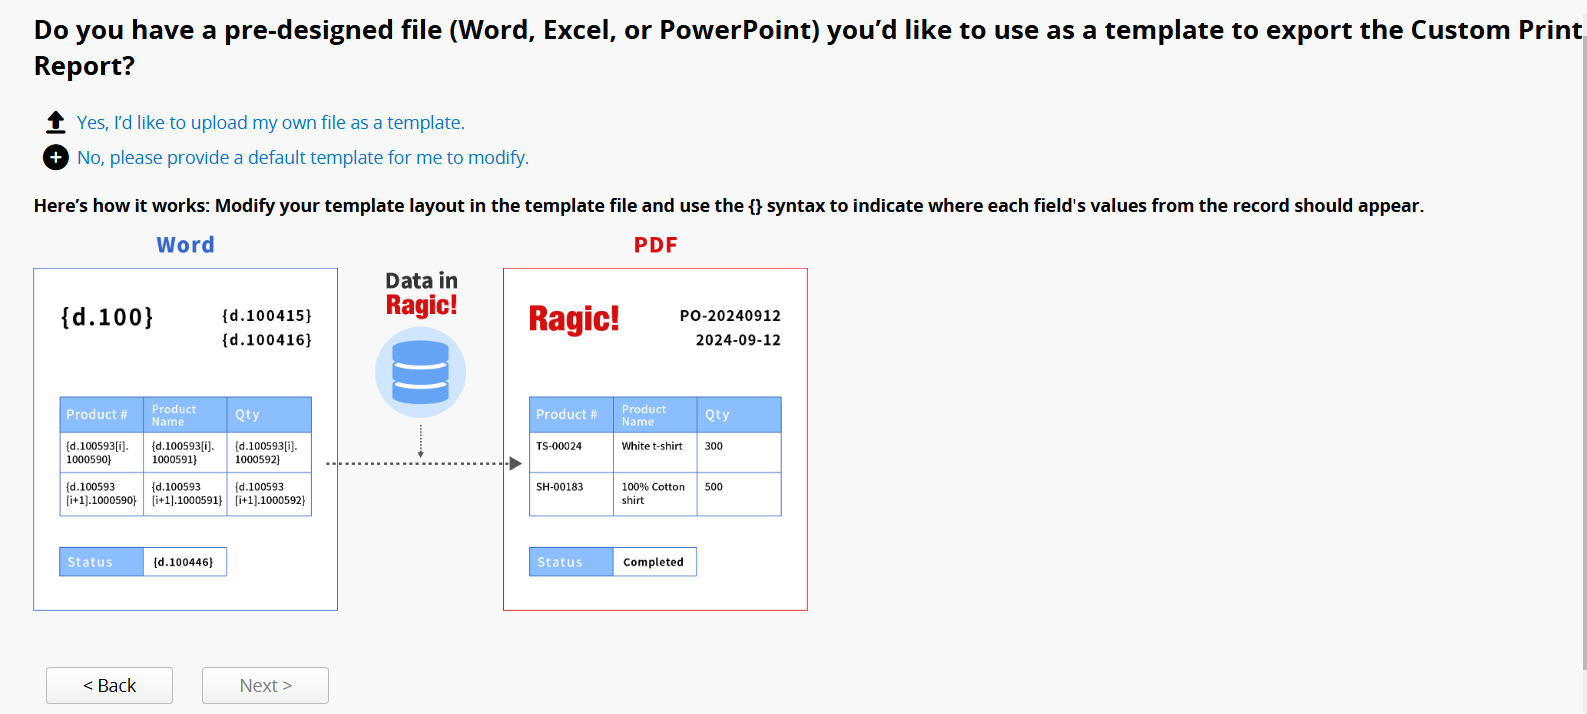
First, the system will check whether you already have a pre-designed file (Word, Excel, or PowerPoint) to use as a template.
If you have a template, select Yes, I’d like to upload my own file as a template. If you don’t have one, select No, please provide a default template for me to modify.
2. Downloading the Template
If you select " No, please provide a default template for me to modify", you will be directed to this page. Click Download to download the default template.
Note: Currently, only a default Word template is provided. You can use it as a base to modify and adjust it to your preferred report layout or file type, for example, Excel or PowerPoint. The downloaded Word template will automatically be reflected in the online Custom Print Report preview after you edit and save it on your computer, so there is no need to manually re upload. If you need to export an Excel or PowerPoint file, please upload the corresponding Excel or PowerPoint template separately.

3. Modifying the Template
Next, you can modify the template to your desired layout, add or remove fields as needed, or convert it into an Excel or PowerPoint format. For modification notes, please refer to this section.
Word Template
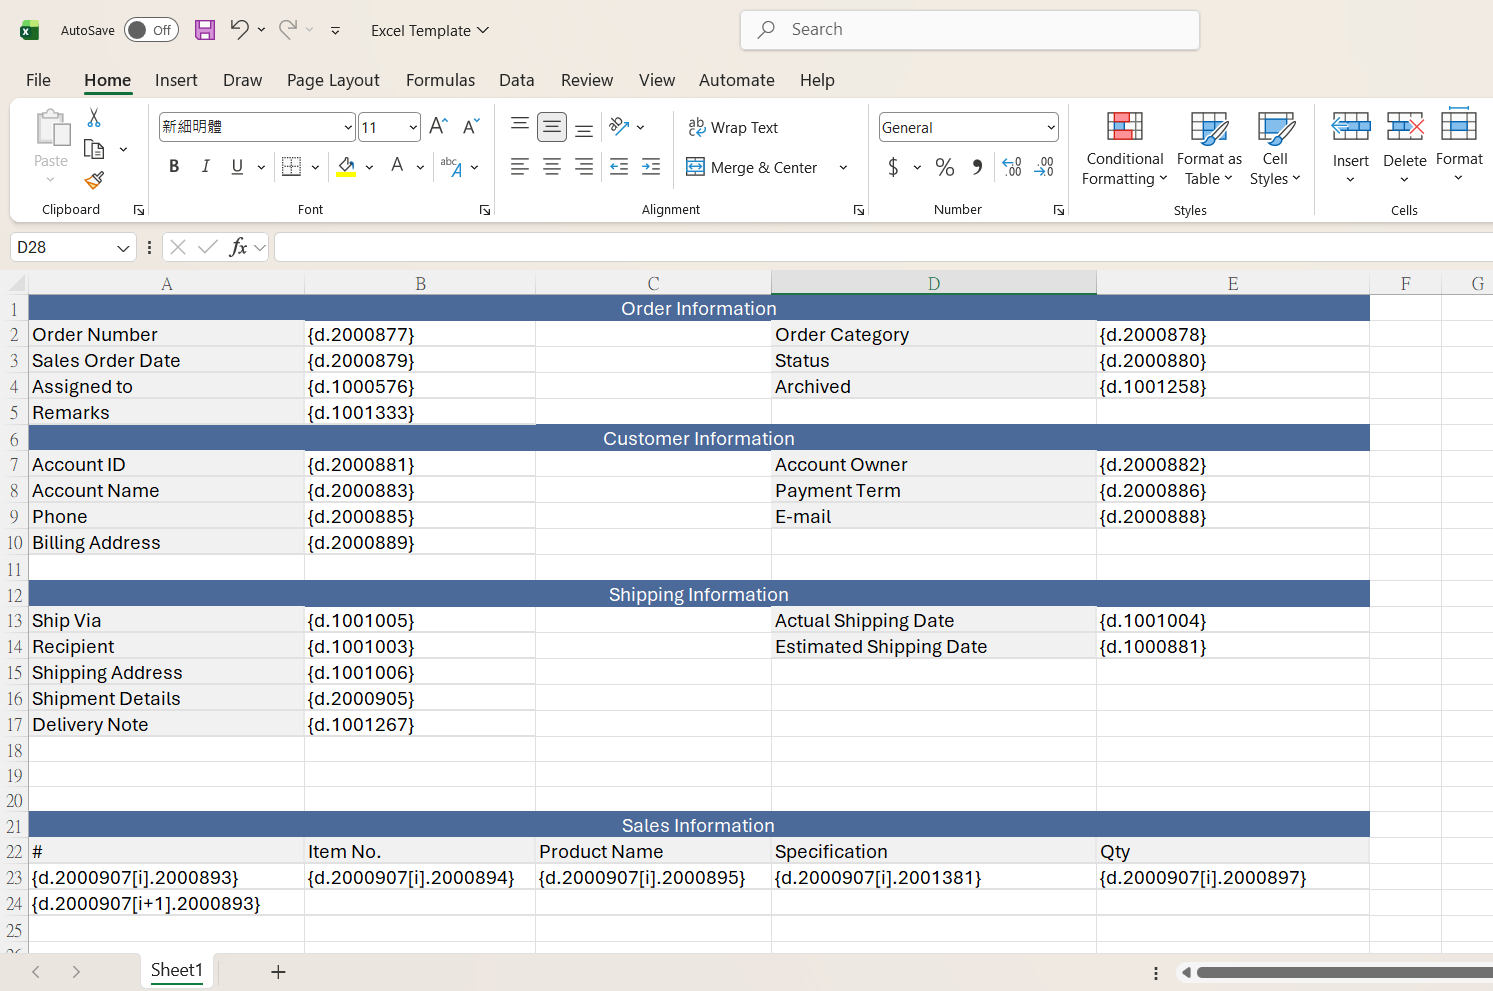
Excel Template
PowerPoint Template

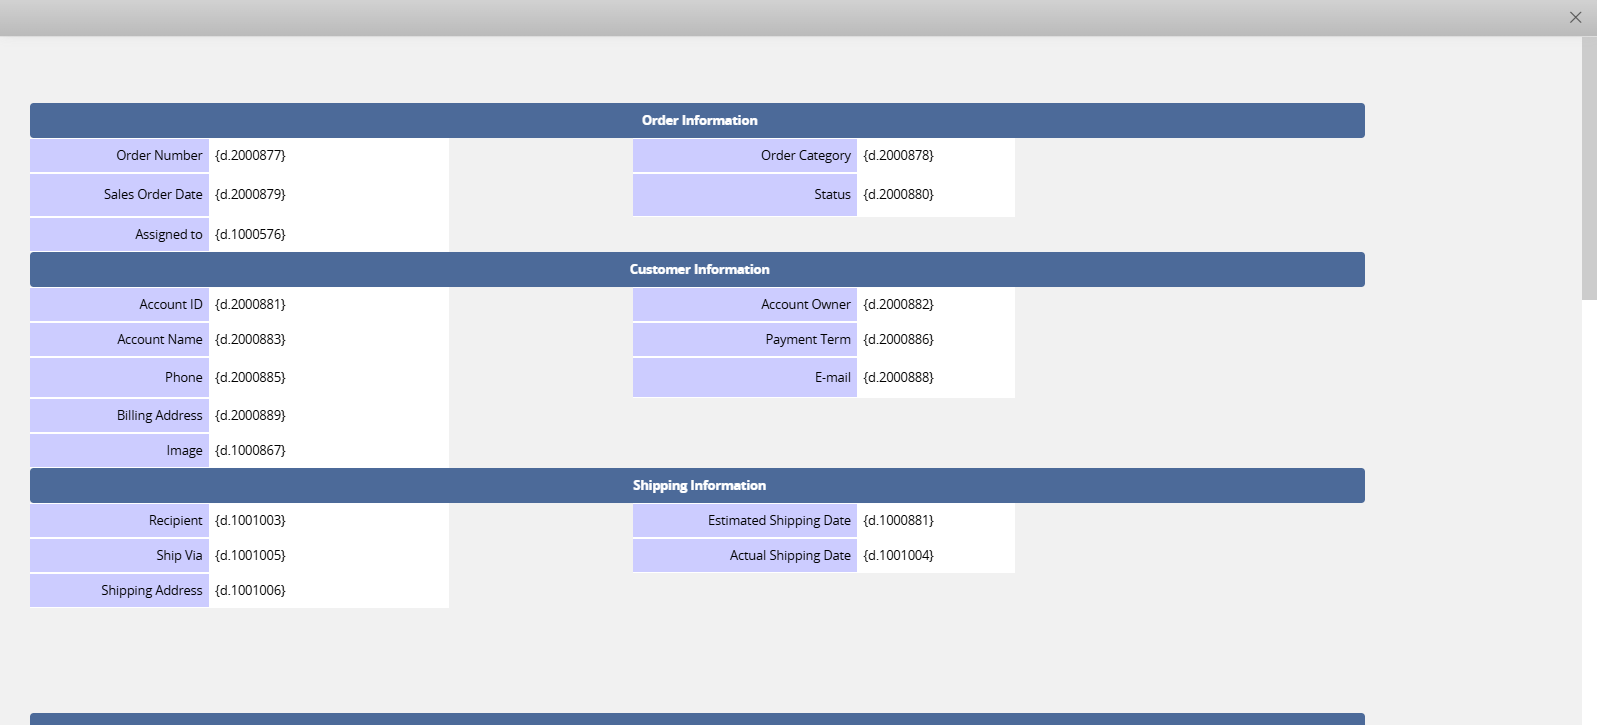
For general field parameters, refer to the Field Value Syntax Reference on the template upload page. For specific parameters, special formatting, or related examples, please refer to this section.
Clicking a field’s syntax will copy the parameter for quick pasting into your template.
Note: The syntax for independent fields and Subtable fields is different.
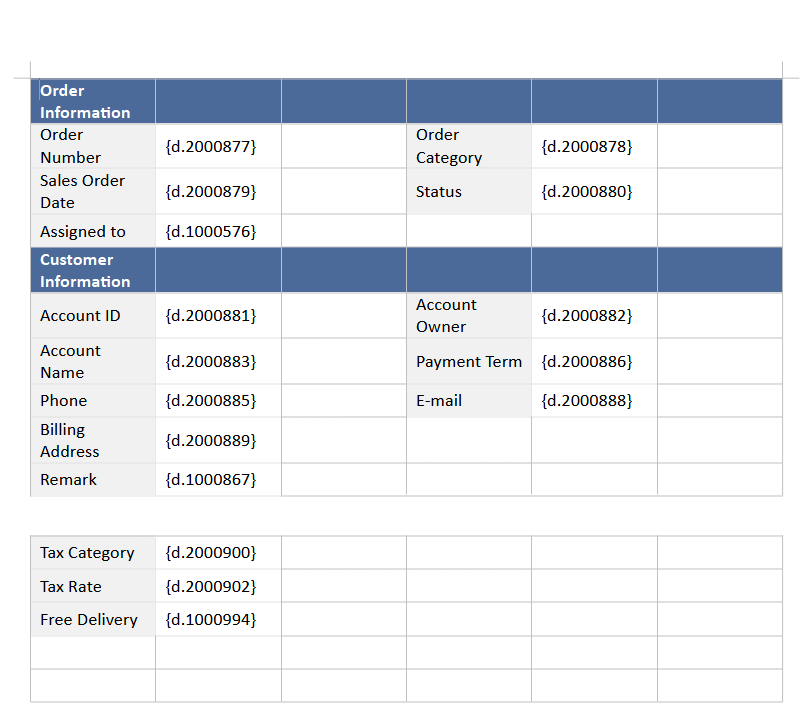
Independent Fields:

Subtable: Refer to the syntax in the figure below and add only the [i] and [i+1] rows. In the [i+1] row, adding the syntax for just one field will represent the entire row of data.

When a sheet includes multiple Subtables referencing the same source sheet, the system adds Subtable Positions to the field parameters for distinction. If you need to manually add a Subtable Position in the template, you can find it in the Field Value Syntax Reference or Field Info.

4. Uploading the Template
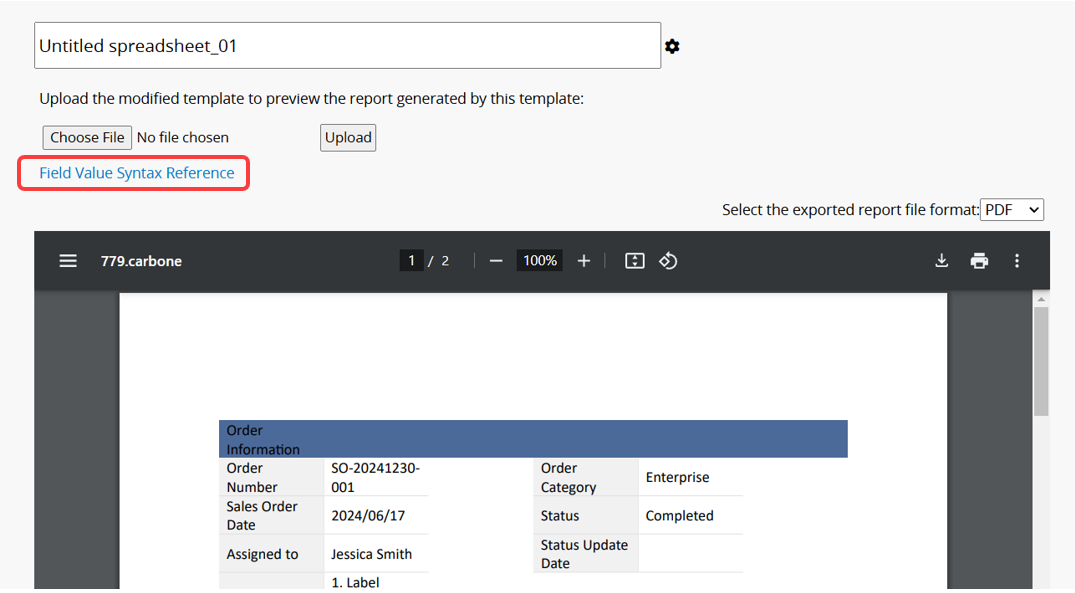
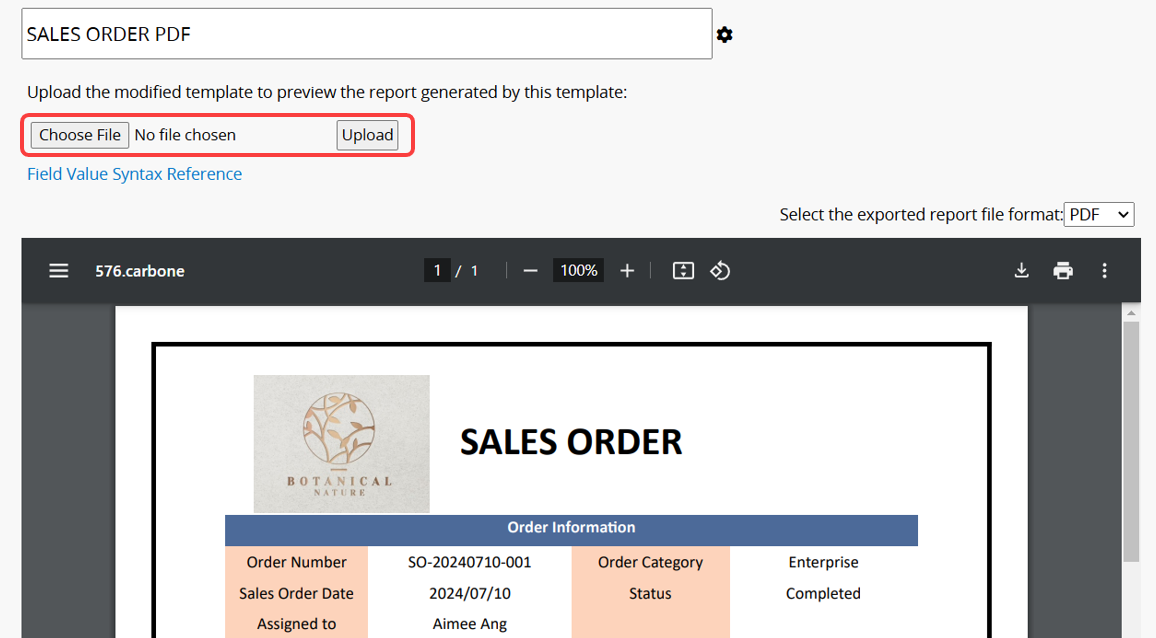
If you choose Yes, I’d like to upload my own Word file as a template or click Next after downloading the template, you will proceed to this page, where you can upload the modified template.
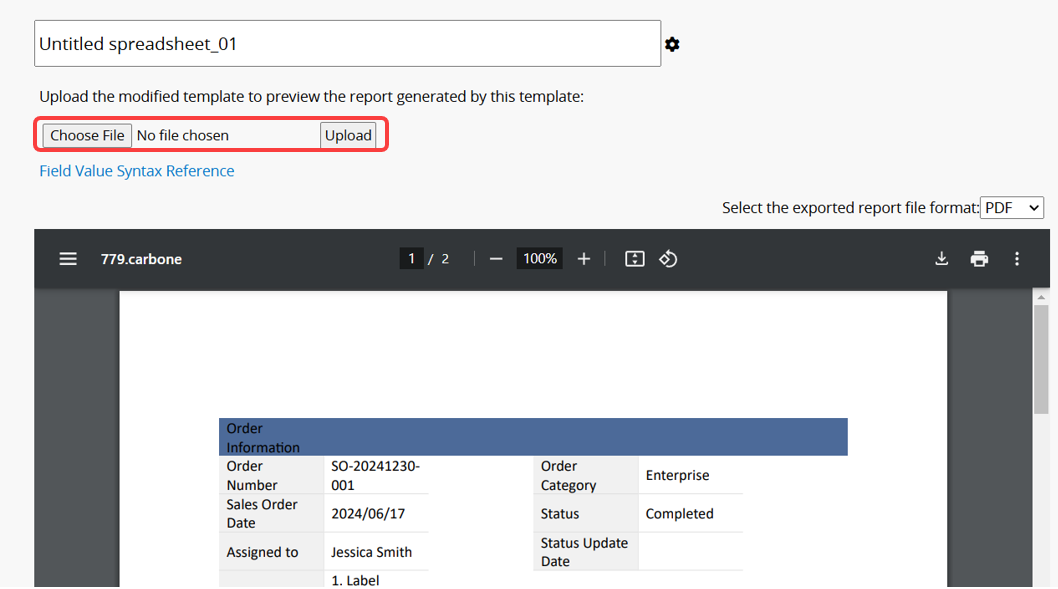
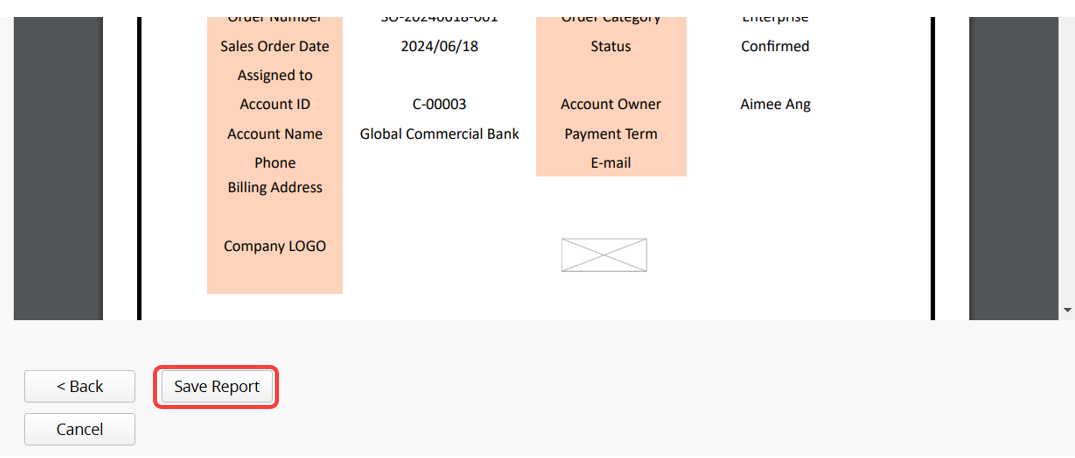
You can preview it from the window below.
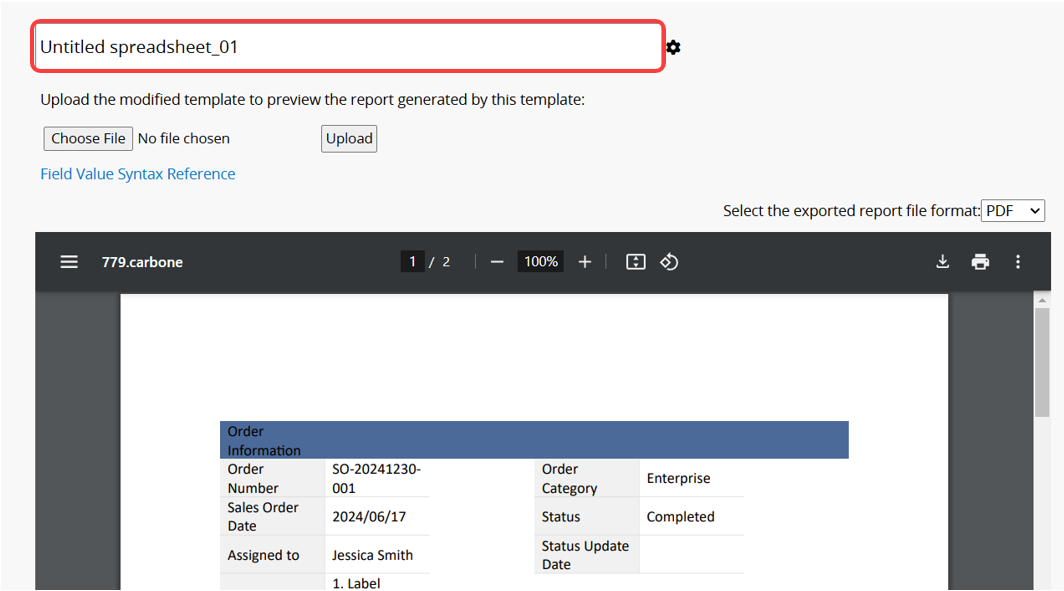
Name the Report: In the top corner, you can change the report name. Since there can be multiple versions of Custom Print Reports, use a simple and clear name for easy identification.
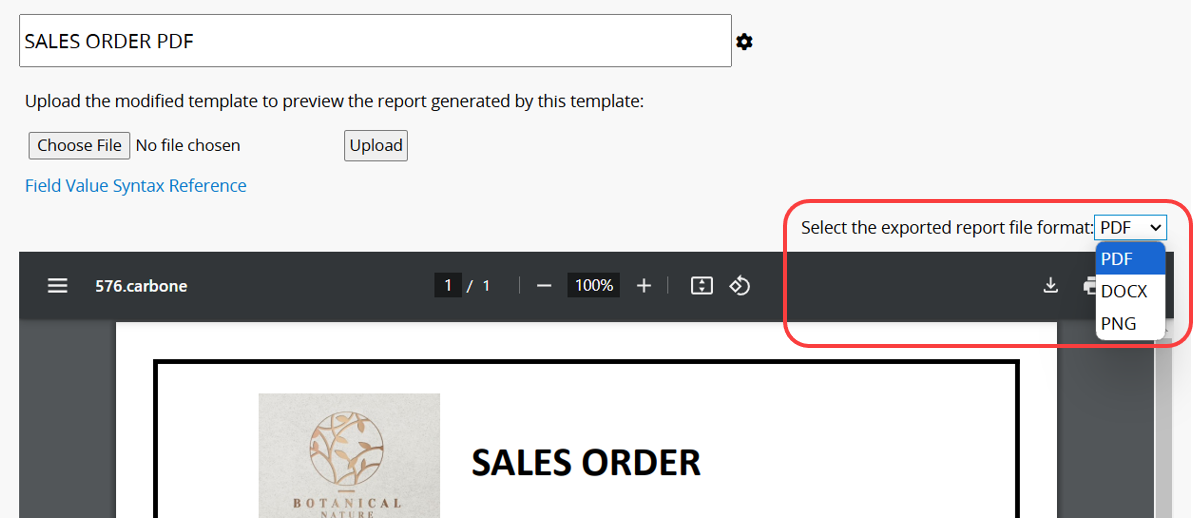
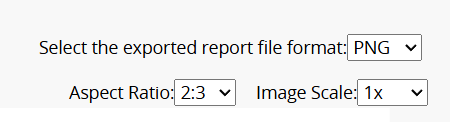
File Format: In the top-right corner of the preview window, choose the file format for download. You can download the report as a PDF, PNG image, or Word document.
The following lists the supported output file formats for each template format:
| Template Format | Supported Output Formats |
|---|---|
| Word Template | DOCX、PDF、PNG |
| Excel Template | XLSX、PDF |
| PowerPoint Template | PPTX、PDF |
Aspect Ratio and Image Scale: When exporting as PNG, you can customize the Aspect Ratio and Image Scale to adjust the output resolution and display quality. Larger scales provide higher resolution and clearer image quality.
The exported content will be adjusted based on the selected ratio. Make sure the template layout ratio matches the selected ratio to avoid display issues or content cropping.
After completing all settings, click "Save Report".
Note: For Advanced settings, please refer to this section.
It will lead to the following page.
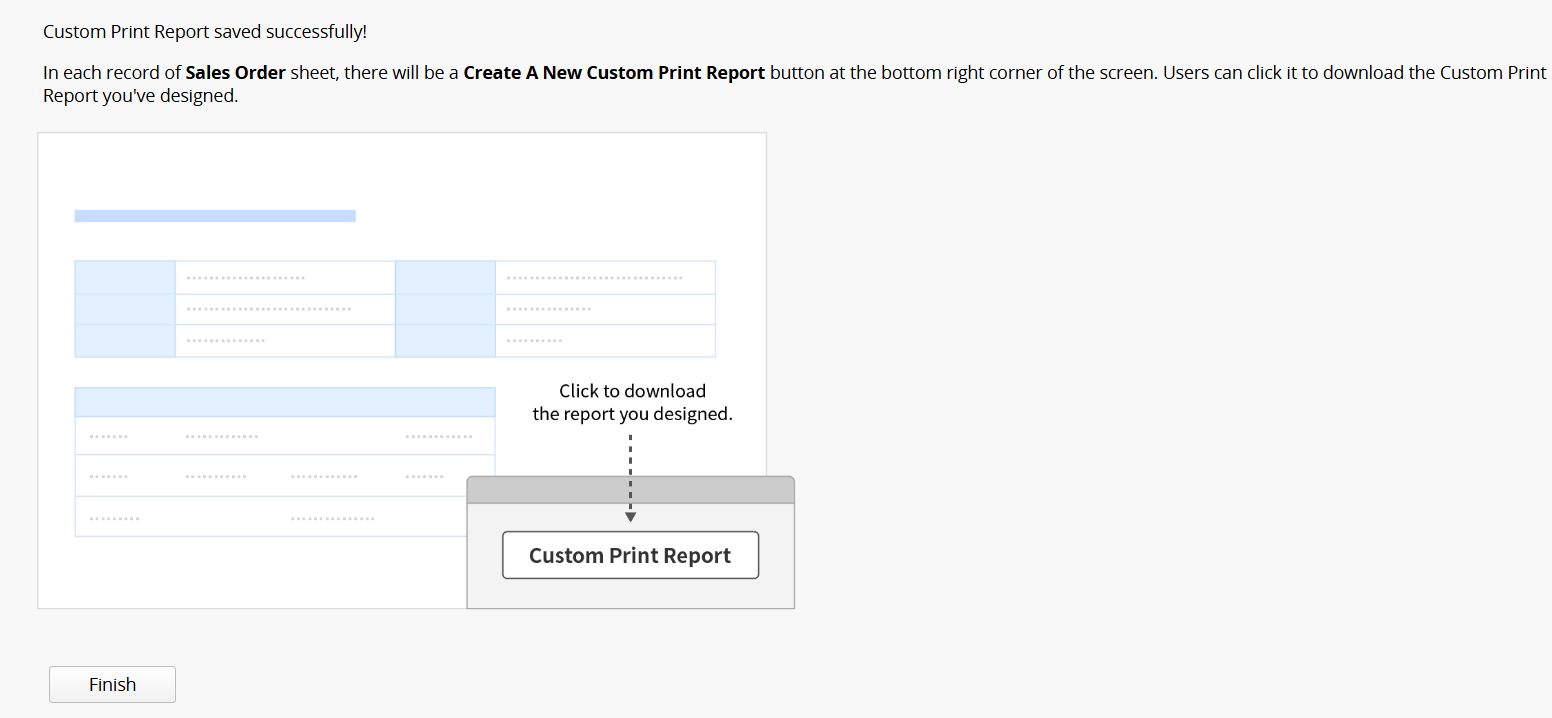
Click "Finish" at the bottom to see the report button added to the lower right corner, and you can start using the Custom Print Report.
For general field parameters, please refer here. The following section introduces specific parameters and related examples.
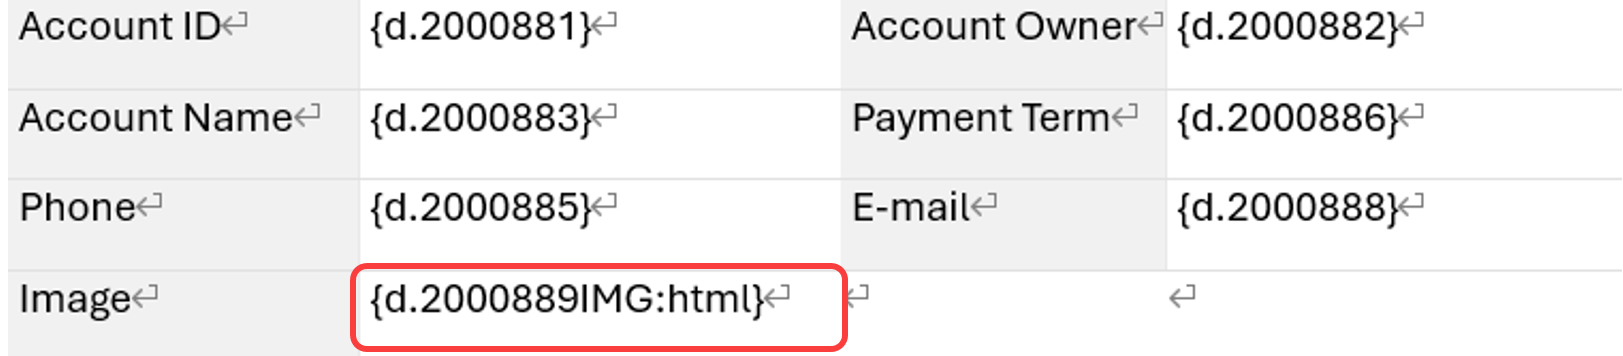
If the Image Upload field does not display correctly, you can re download the default template. If re downloading is inconvenient because you are using a customized template, you can instead add IMG:html after the field parameter.
Note:
1. Excel and PowerPoint format templates do not support this parameter. To output images in these formats, please refer to this documentation. This method only applies to single image fields; multi-image fields are not supported.
2. The output image size can be adjusted using "Max Height" and "Max Width". If needed, you can also refer to this documentation to adjust the image field template and control the output size. This method only applies to single image fields; multi-image fields are not supported.
3. If the image field has the Multi-images Upload option enabled and only one image is uploaded, the image will default to 300px × 300px when "Max Height" and "Max Width" are not specified. If specified, the image will be displayed according to the configured settings. When multiple images are uploaded, the system adjusts each image's size based on the total number of images to avoid layout issues. As a result, the more images uploaded, the smaller each image will appear, and the output size may not exactly match the specified dimensions.
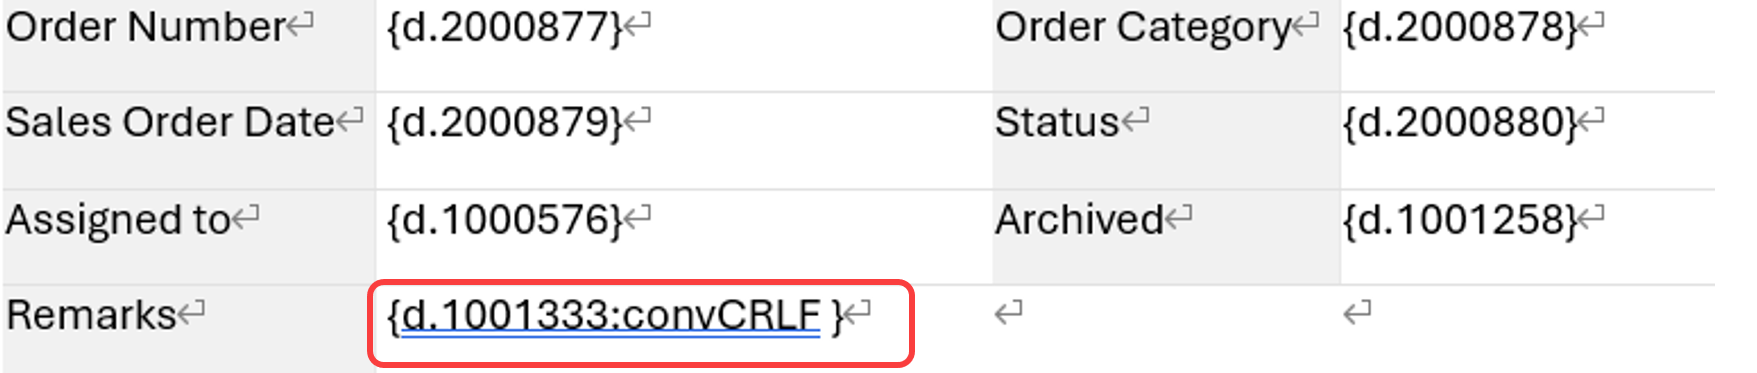
When using alt+enter to add line breaks in a Free Text field, you need to manually adjust the field syntax in the template by adding :convCRLF after the field syntax. This ensures that the field content is correctly displayed with line breaks in the downloaded file. (Excel templates are not supported.)
If you use BBCodes in a Free Text field or apply styles in the Rich Text Editor and want to retain the formatting when exporting, you need to adjust the field parameters accordingly. (Excel and PowerPoint templates are not supported.)
Please refer to the table below for the explanation of two available parameters:
| Parameter Format | html Format | html(inline) Format |
|---|---|---|
| Example | {d.1002578:html} | {d.1002581:html(inline)} |
| Supported BBCodes | br, b, i, u, s, li, ol, ul, img, url, color | b, i, u, s, color (Does not support URLs, images, or any BBCode that creates line breaks) |
| Suitable For | When full styling is needed and field values require line breaks (e.g., paragraphs, lists) | To display only basic styling and keep the field value on a single line due to specific layout requirements. |
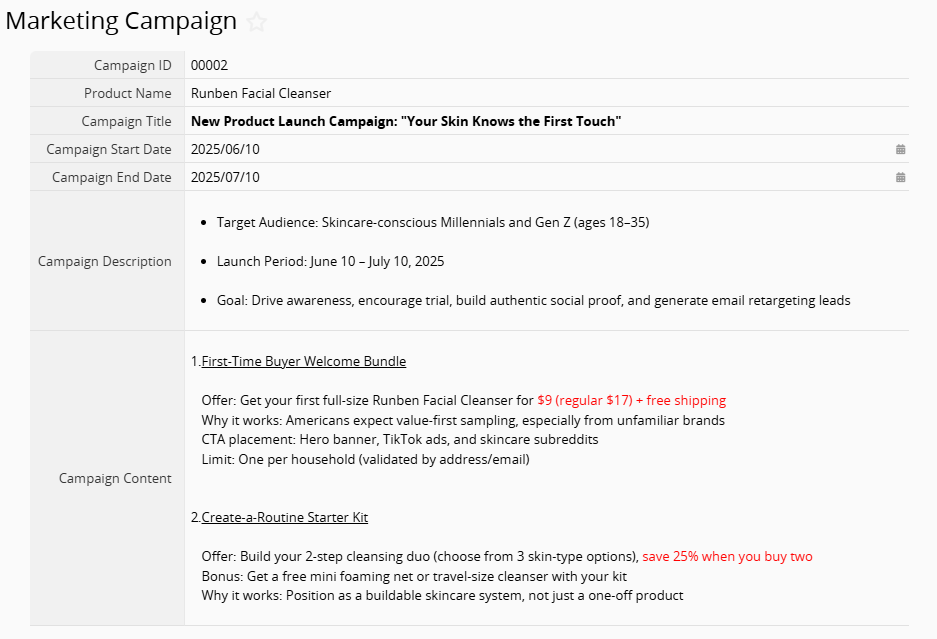
Example:
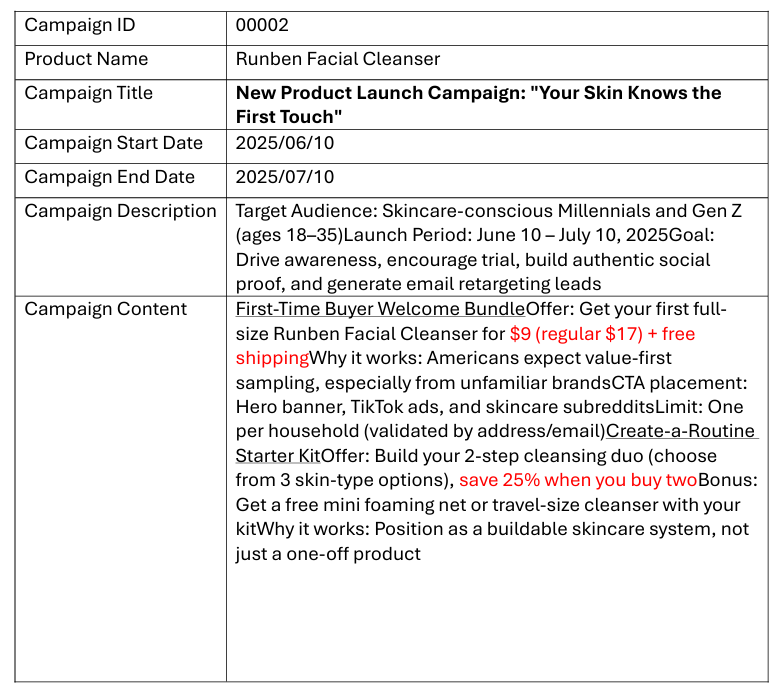
Export the record in the image below using two different parameter formats to produce the following output.
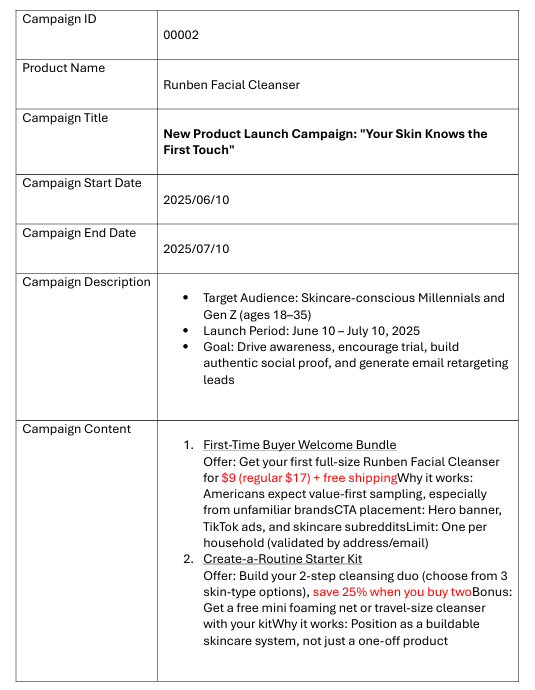
html Format
html(inline) Format
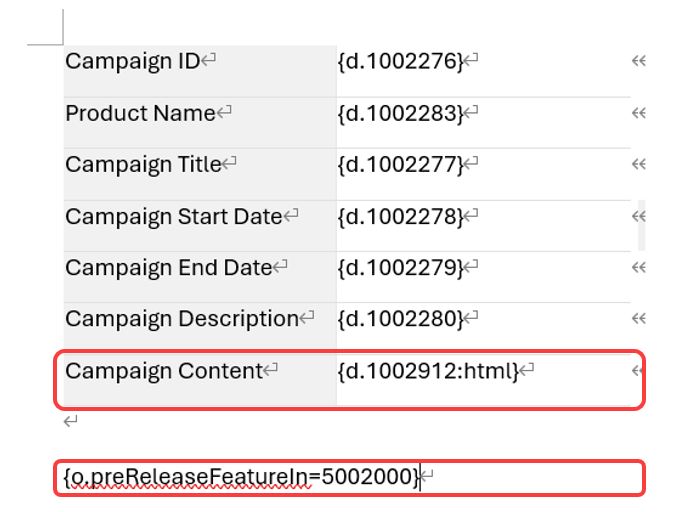
When using a Markdown field and wanting to retain the formatting when exporting, add :html after the field syntax. (Excel and PowerPoint templates are not supported.)
Notes:
1. If you use Headers (#) syntax, add {o.preReleaseFeatureIn=5002000} anywhere in the template.
2. Blockquotes syntax is currently not supported.
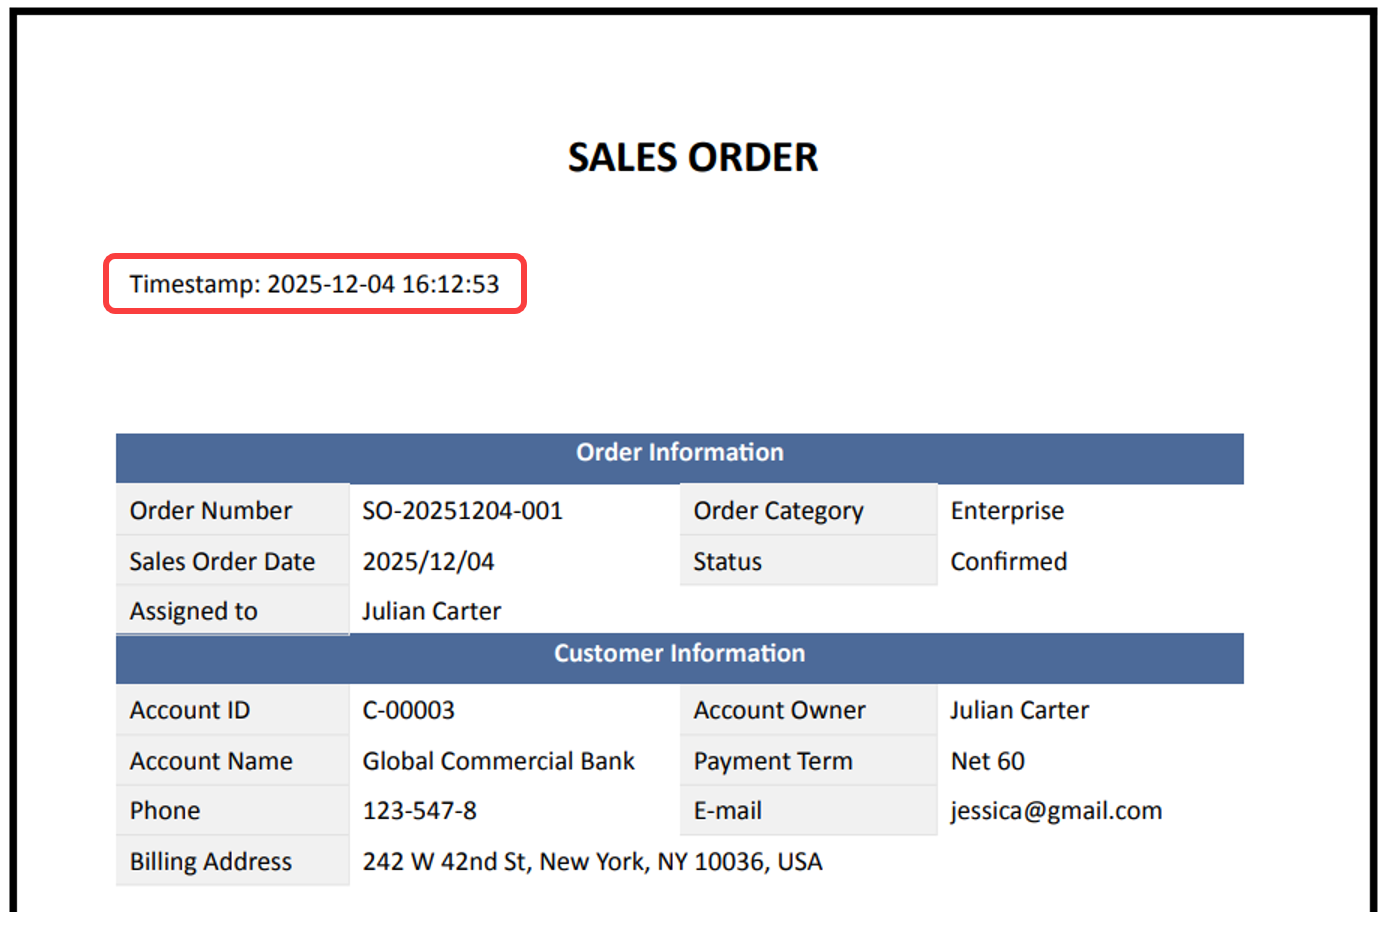
If you want the printed file to show the current date and time, add the following parameter to the template: {c.now:formatD('YYYY-MM-DD HH:mm:ss')} 。

Notes:
1. For available date and time formatting options in formatD(), please refer to this page.
2. Use "single quotation marks" in the parameter, and only use ', not ’.
3. The time will be displayed based on the time zone set in your Company Settings.
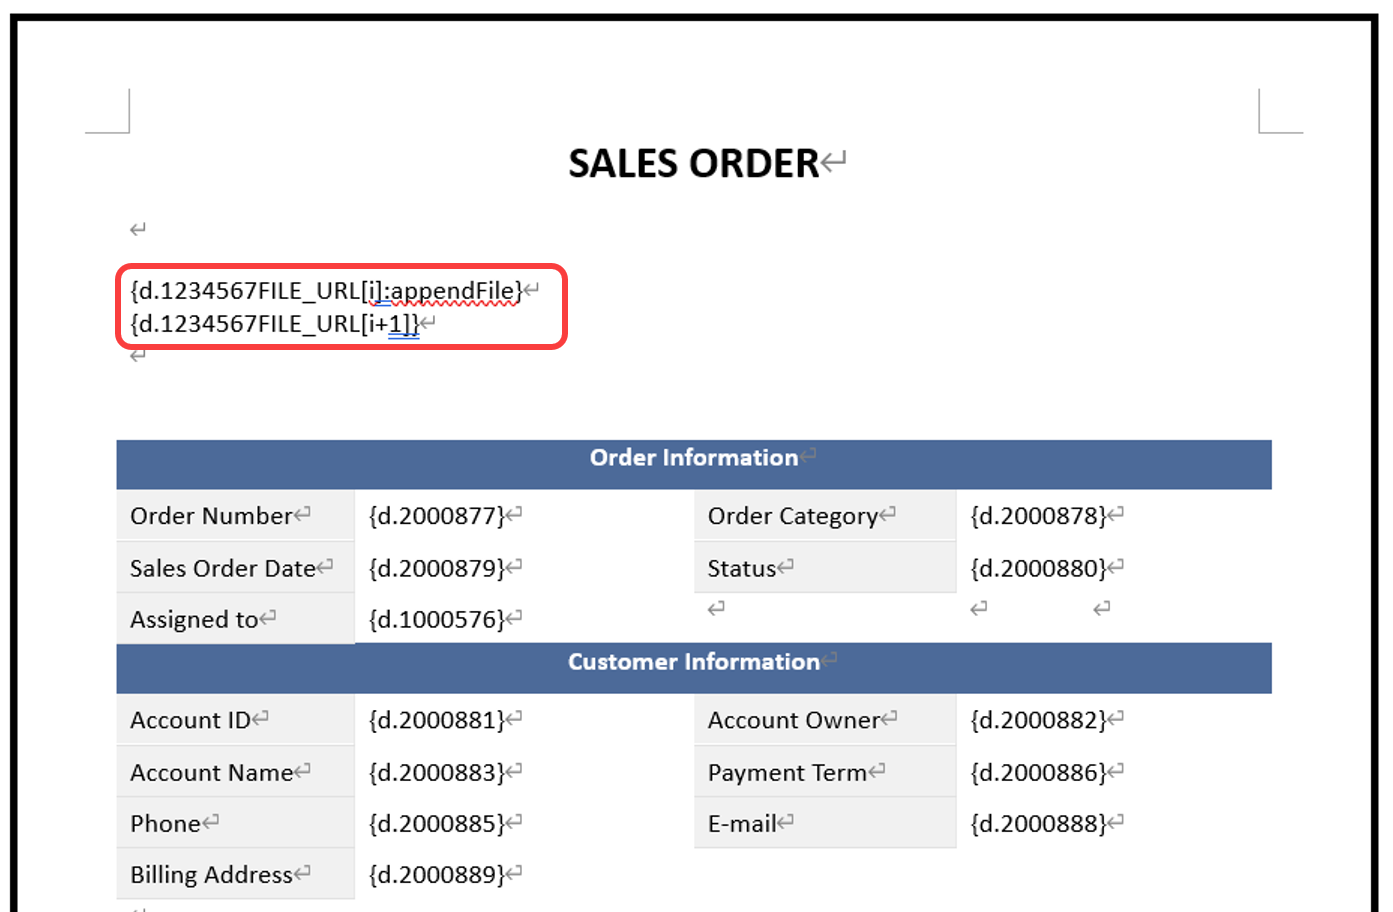
By adding specific parameters to your template, you can append the PDF files stored in designated File Upload fields to the final exported PDF document. You may choose to place the appended files at the beginning or at the end of the output. The following examples assume that the field parameter for the File Upload field is "d.1234567".
Append to the End
Add the following parameters at any position in the template:
{d.1234567FILE_URL[i]:appendFile}
{d.1234567FILE_URL[i+1]}
Append to the Beginning
Add the following parameters at any position in the template:{d.1234567FILE_URL[i]:appendFile(start)}
{d.1234567FILE_URL[i+1]}
After uploading the template with these parameters, all PDF files uploaded to the specified field will be appended to either the beginning or the end of the final document.

If your sheet includes multiple File Upload fields, simply apply the same parameter format to each field as needed. You may configure some fields to append their files at the beginning of the document and others at the end, depending on your requirements.
Note: The maximum file size after appending is 100 MB.
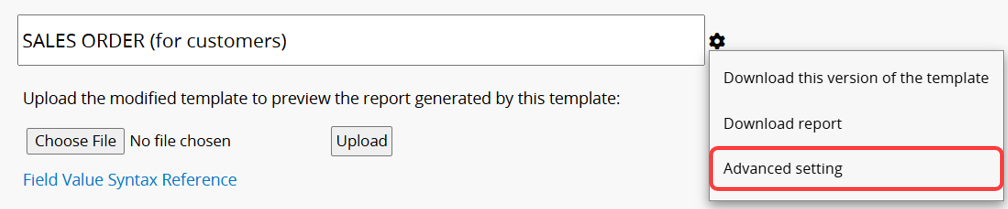
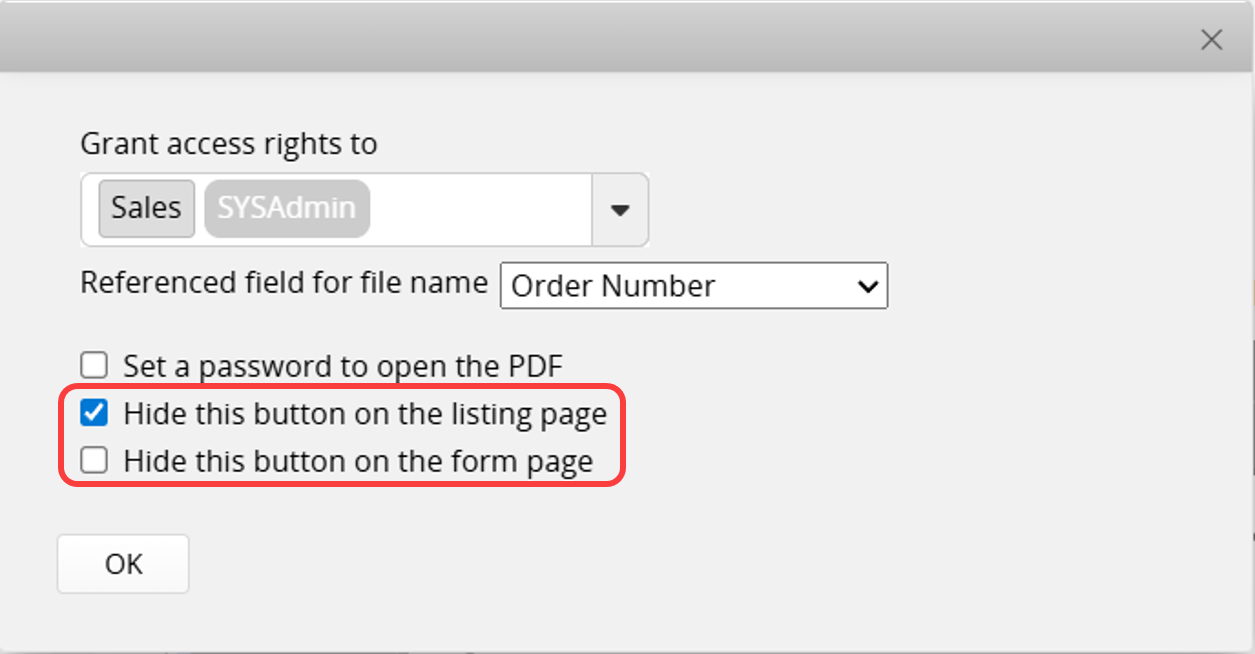
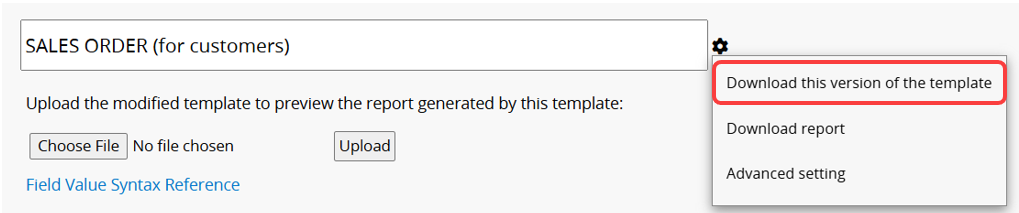
Click the gear icon next to the report name and select Advanced setting to configure the following options.
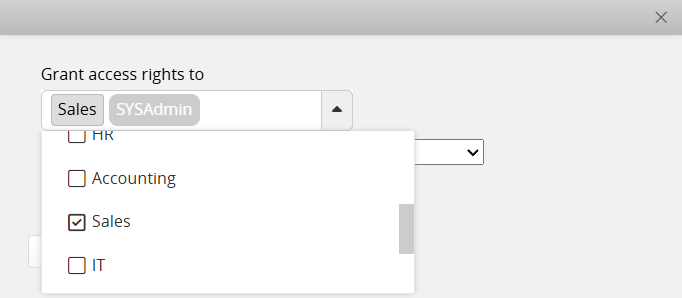
Access Rights: Set which groups can use this report.
Referenced Field for File Name: Specify which field in the sheet should be used to name the downloaded file.
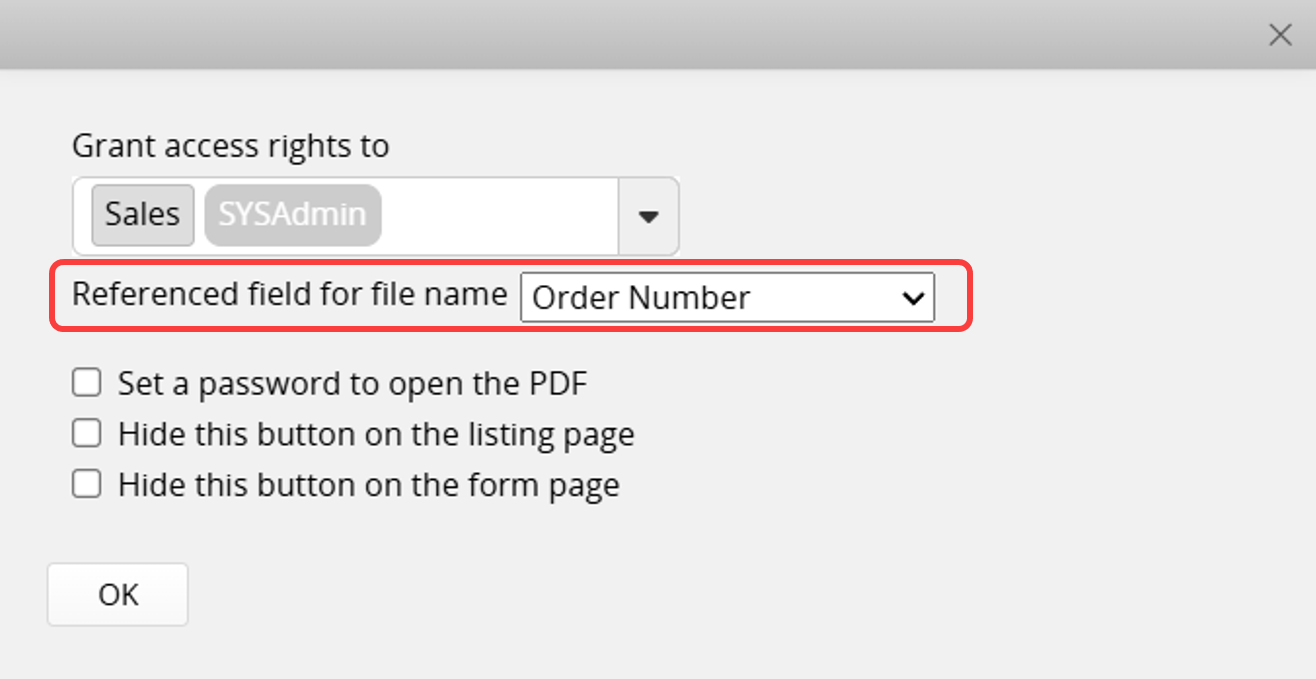
Note: If the field value contains any of the following characters: : / * ? < >, Ragic will replace them with an underscore "_" to ensure the file name can be read correctly by the operating system. Some operating systems may have additional restricted characters.
Hide the button: You can choose to hide the action button on the Listing Page or the Form Page.
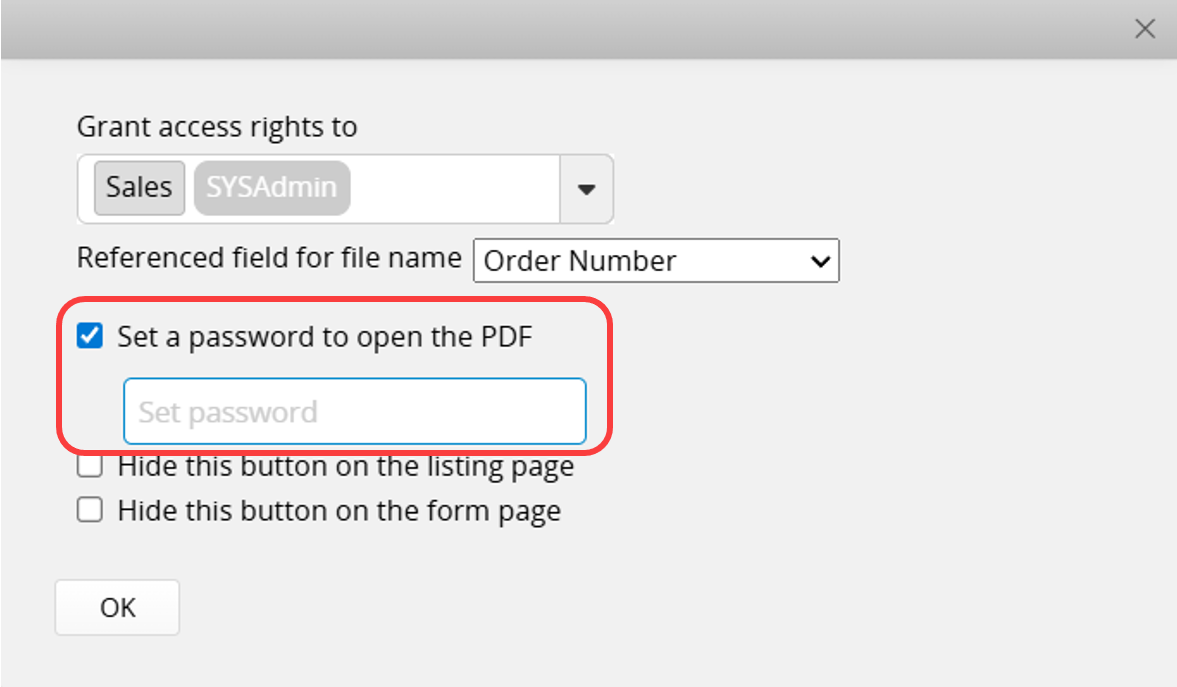
The following options are available only when the File Format is PDF:
Set a password to open the PDF: After enabling this option, you can set a password. The downloaded PDF file will then require that password to be opened.

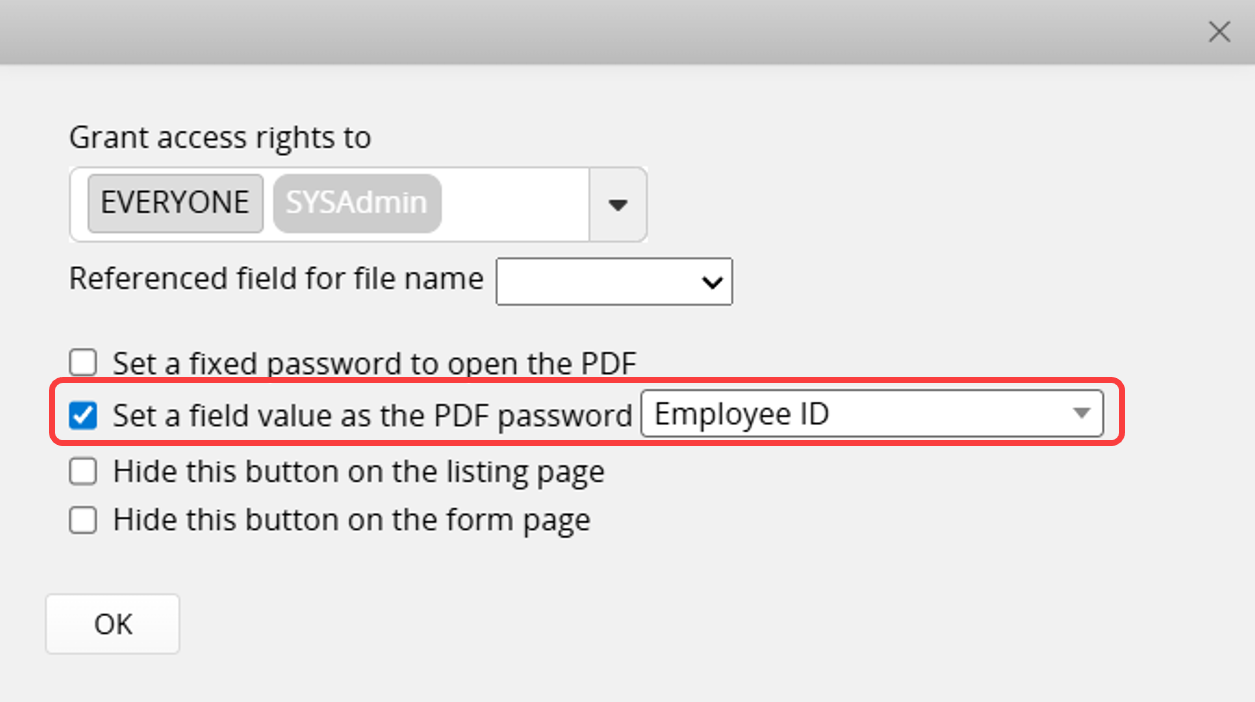
Set a field value as the PDF password: After enabling this option, you can select a field value from the sheet as the password. For example, for an "Employee Pay Slip", you can use the employee's "Employee ID" as the password. The employee must enter their own "Employee ID" to open their pay slip PDF file.
Notes:
1. This setting and the Set a fixed password to open the PDF option cannot be used at the same time.
2. If the specified field value is empty, the downloaded PDF will not be password-encrypted.
3. Downloading multiple records and combining them into a single PDF will result in a PDF that is not password-encrypted.
Use print preview instead of direct download: When enabled, clicking the report button opens a new window with a preview page, allowing you to print without downloading the file. When downloading multiple records, Print Preview is supported only when saving as A single file. Saving as Separated files (compressed into a zip file) or Storing to a File Upload Field is not supported.

Entering the Custom Print Report page again allows you to add a new report or modify an existing one.
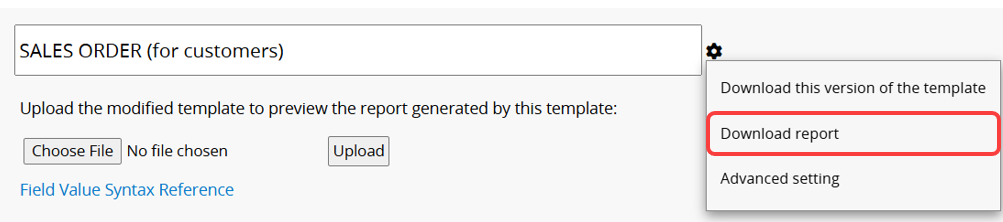
You can also click the gear icon next to the report name to modify the Report Name, configure Advanced setting, or Download the template or report.
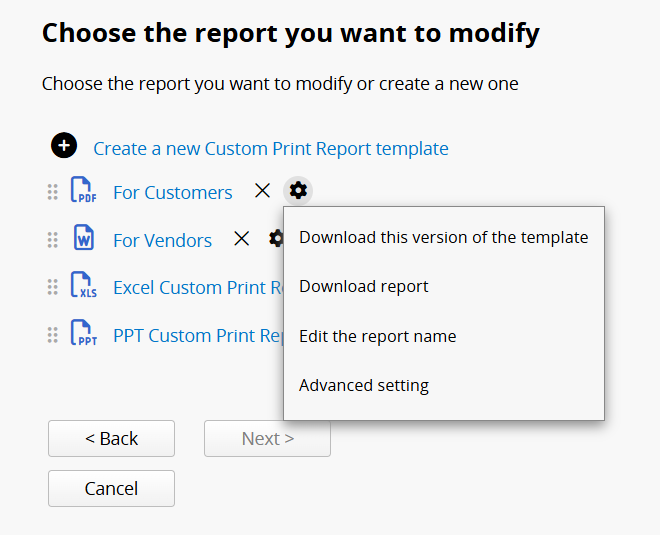
Click on the report you want to modify, and you can upload the revised template again.
You can click the gear icon next to the report name and select Download this version of the template to download the template saved for this report for further modifications.
The addition, modification, and deletion of templates are all recorded in the Previous Versions. Click the template link to download the corresponding version of the file.

You can drag the left side of the report to adjust the report order.
The updated order will also be reflected in the report buttons in the bottom-right corner of the sheet.
You can click the "X" next to the report on this page to delete the saved report.
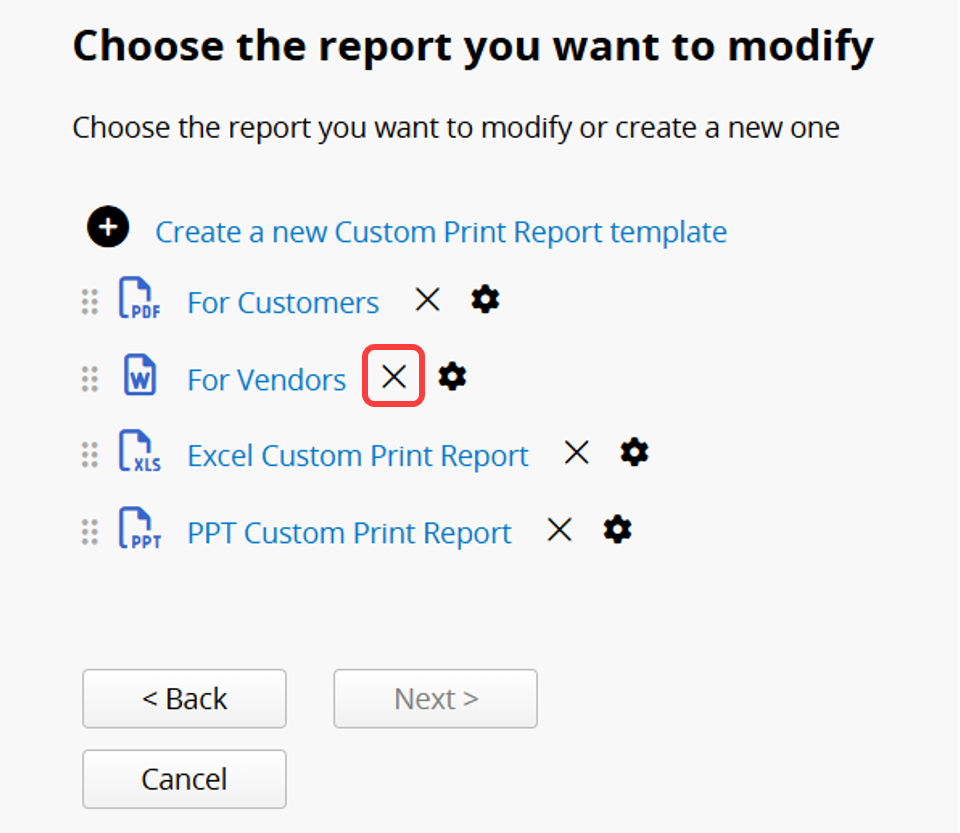
Note: When a report is saved, a corresponding action button is automatically generated. This button cannot be deleted by Removing Action Buttons; it can only be removed by deleting the corresponding report through the Custom Print Report settings page.
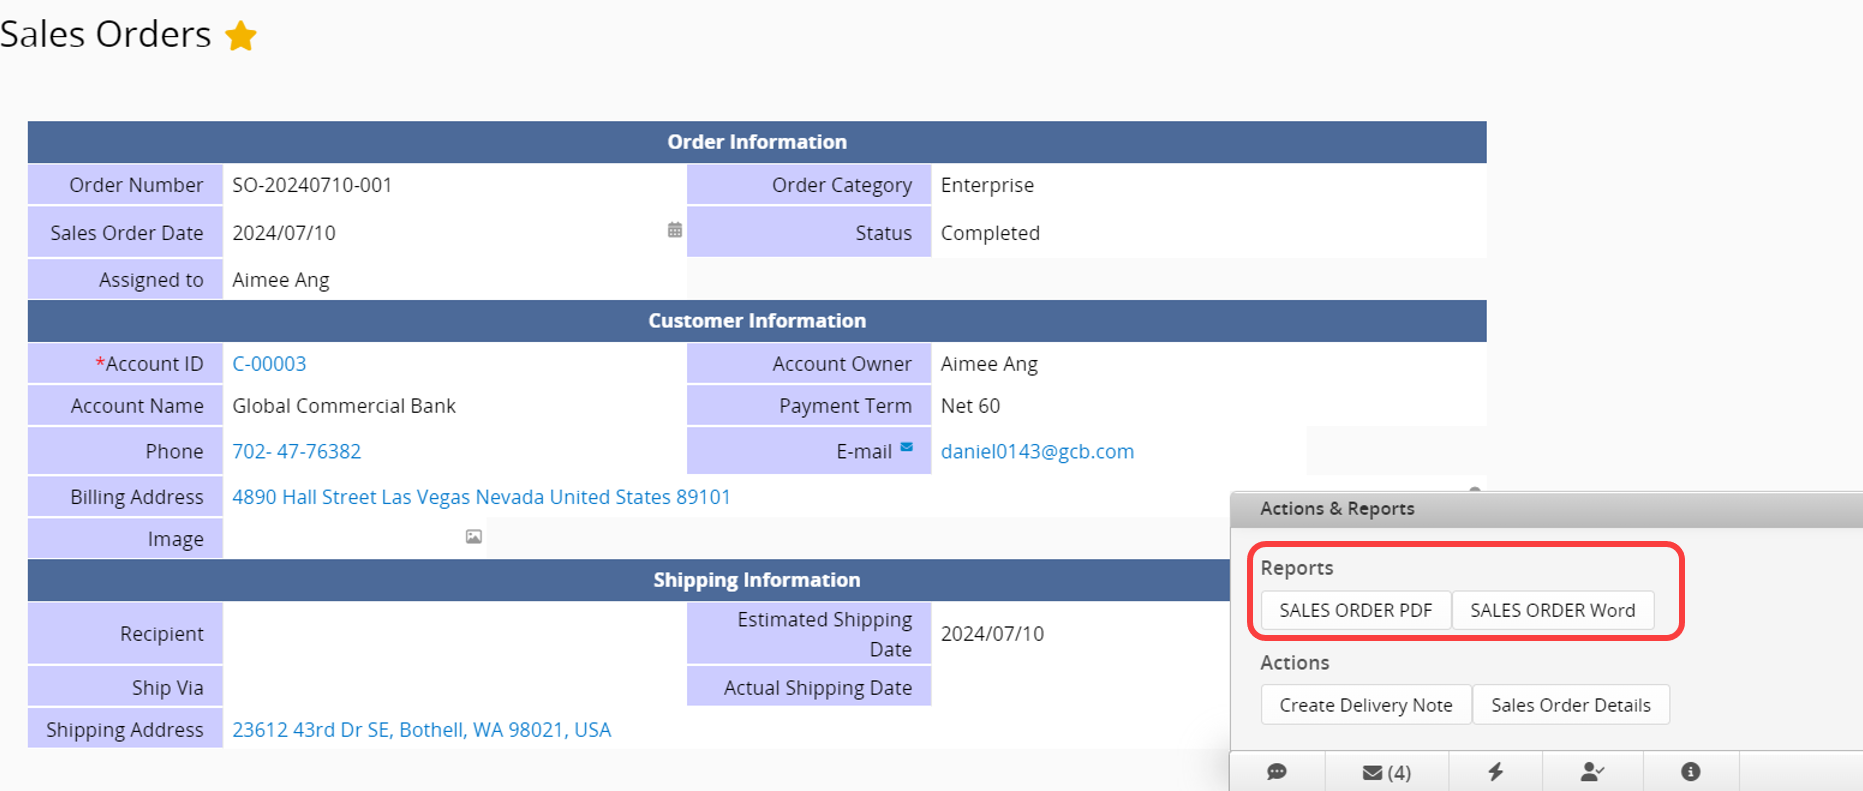
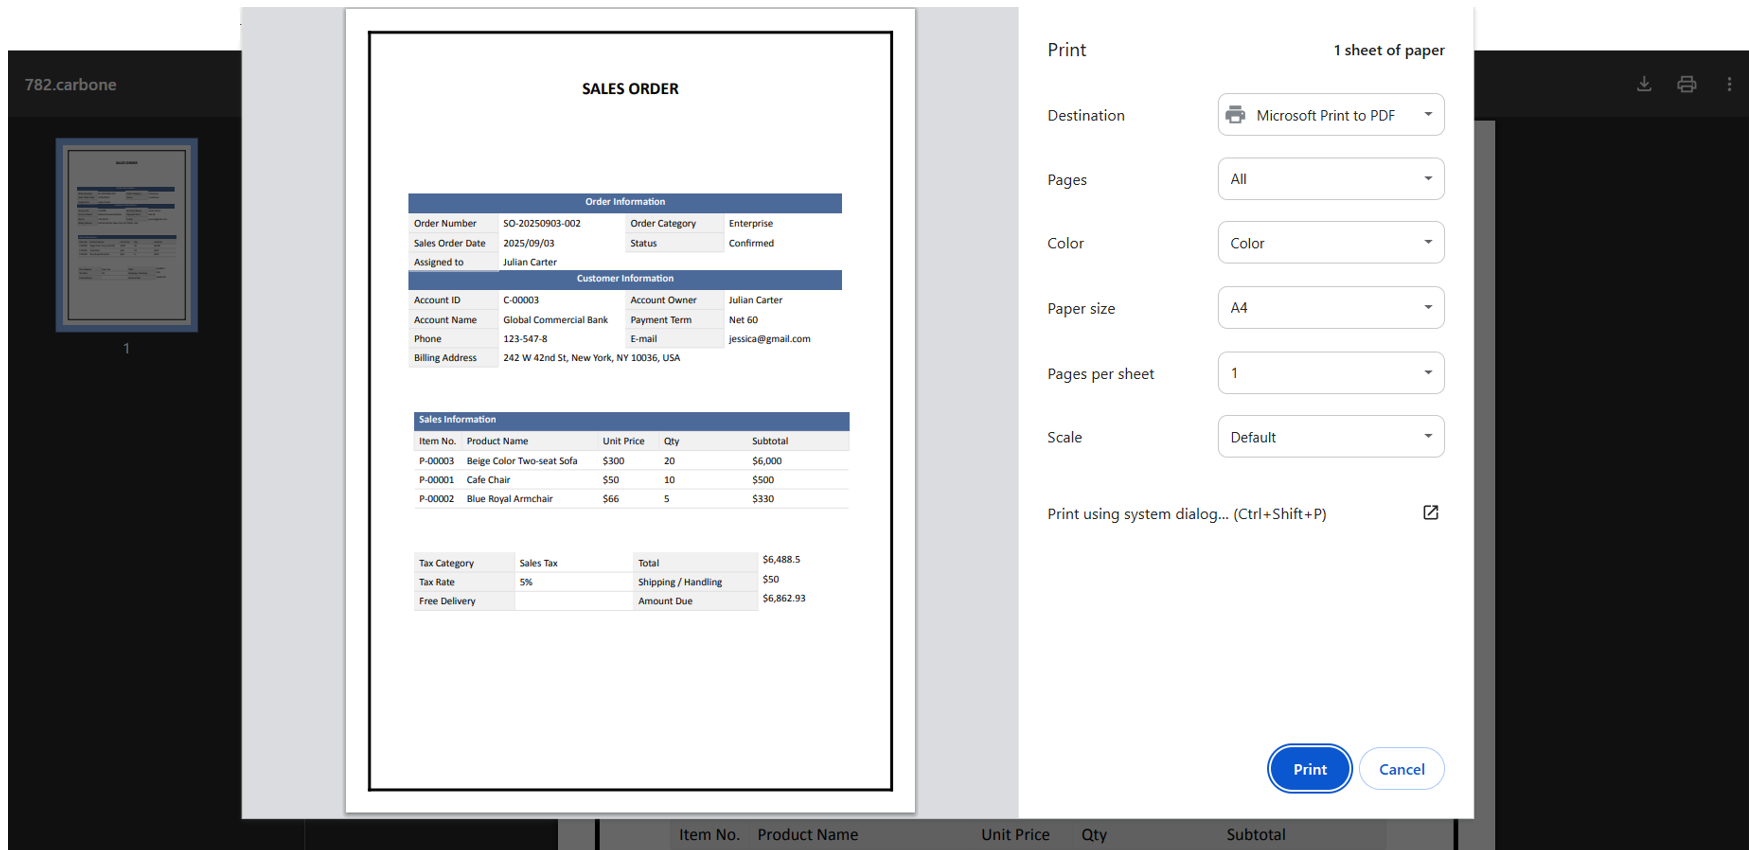
After saving, go to the Form Page of the record you want to print. In the lower right corner, an action button for the saved Custom Print Report will appear. Click the button to start downloading the file.
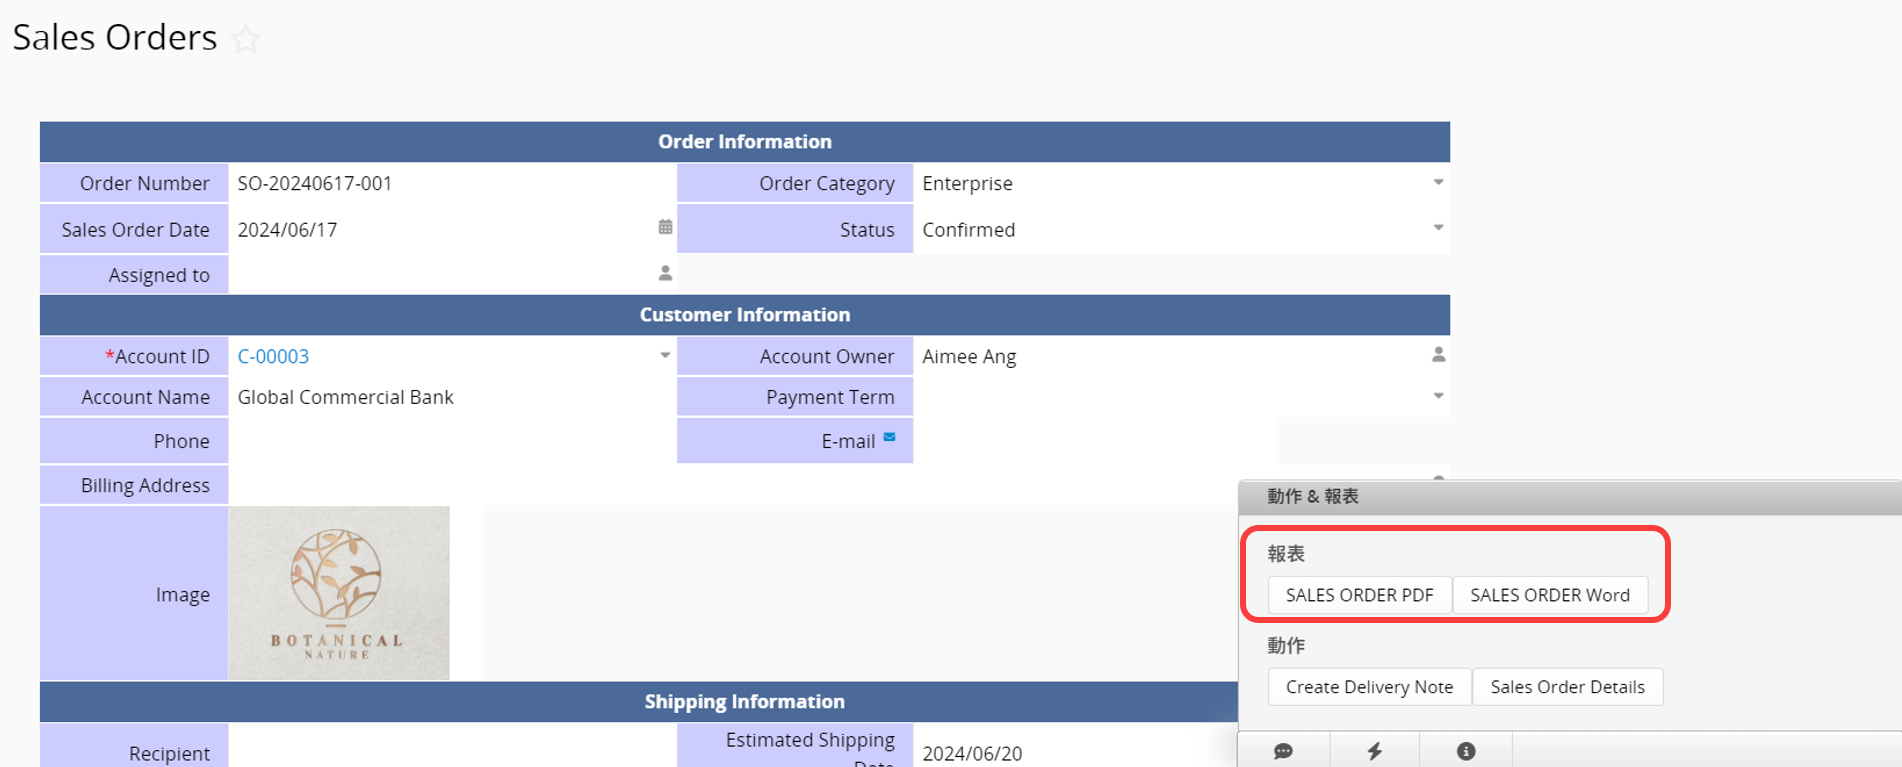
SYSAdmin can also access the Custom Print Report page, select a report, click the gear icon next to the report name, and choose Download report.
Note: If any fields fail to download correctly, please refer to this section.
First, click the lower-right icon on the Listing Page to open the button bar.
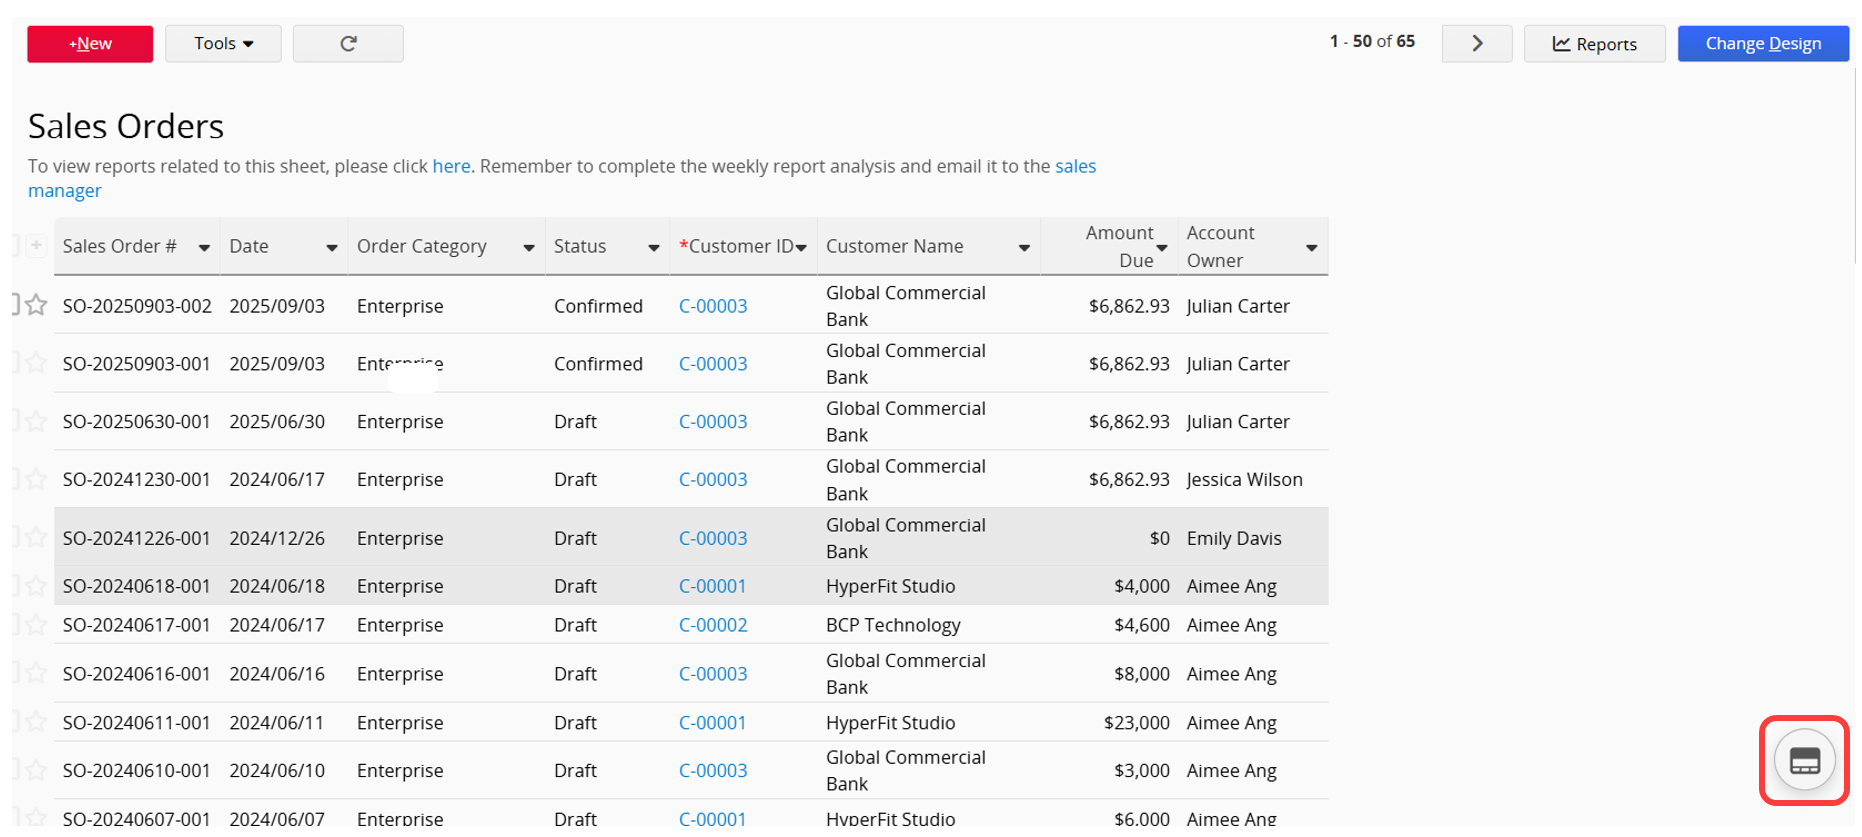
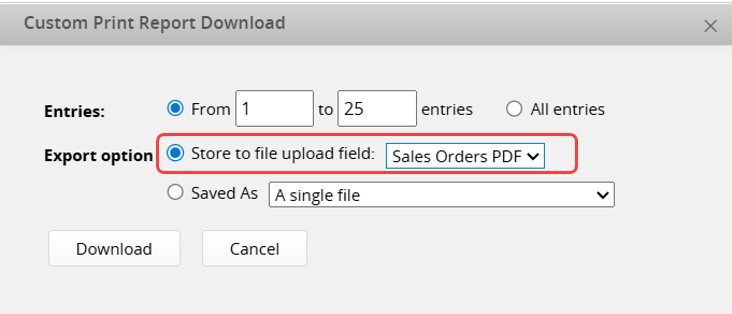
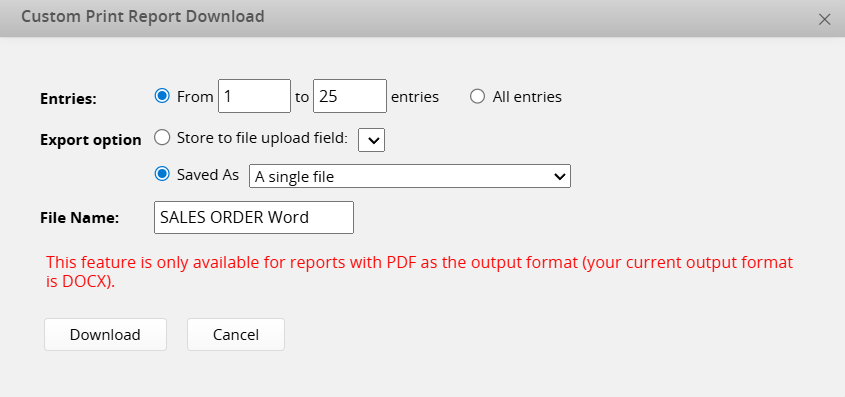
Click the Custom Print Report button to select the record range and export option.
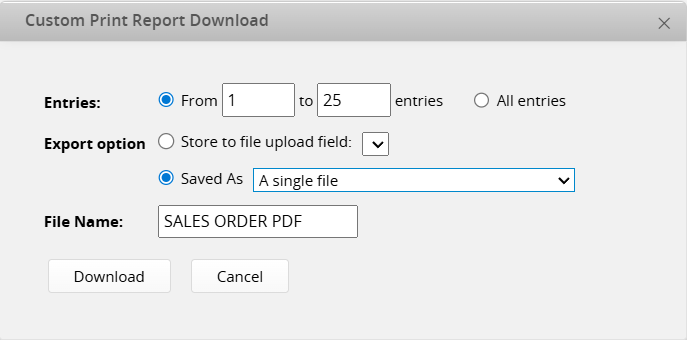
There are two export options:
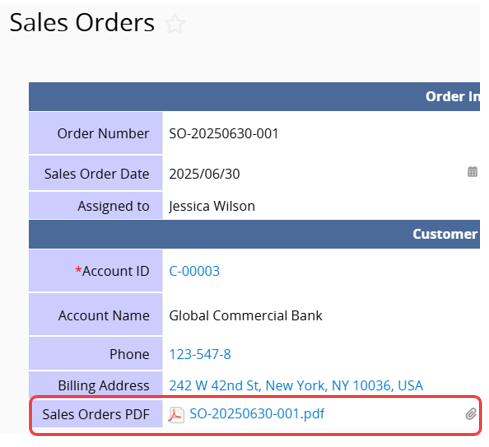
(1) Store to a File Upload Field
If your sheet contains a File Upload field, you can choose this option to upload the exported file to that field for each specific record.
(2) Save as Files
You can choose to save each record as a Separated files (compressed into a zip file) or combine all records into A single file.
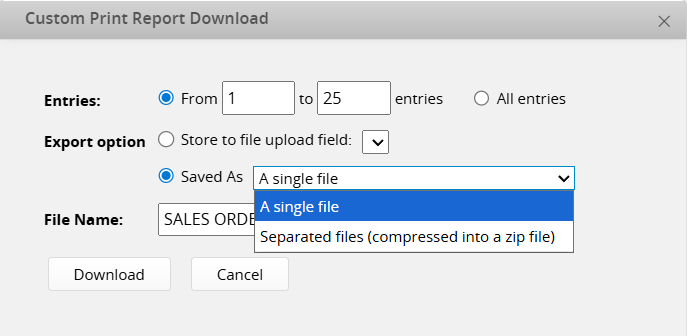
Note: Combining multiple records into a single file is only supported for PDF, XLSX, and PPTX formats.
1. Currently, only the Form Page format is available. To download the Listing Page format, please refer to the Mail Merge.
2. When a sheet has too many fields and the width is excessive, the downloaded template may not show fields that extend beyond the page. Please refer to the Field Value Syntax Reference to add fields to the template.
3. The downloaded template will automatically place Subtable fields at the bottom. If you want to change the location of Subtables, you need to adjust them manually. Please ensure that different Subtables are not placed in the same row, which may cause issues when printing the report.
4. Currently, only PDF files in File Upload fields can be appended to the exported PDF file. Please refer to this section for instructions on adjusting the template.
5. Currently, fields using certain BBCodes in Word templates will not appear in the exported file. For supported BBCodes and instructions on adjusting the template, please refer to this section.
6. If a Signature field or Barcode field does not display correctly, you can download the default template again. If re downloading the default template is inconvenient because you are using a customized template, refer to this documentation
7. If the On-premises Private Server fails to output Image Upload fields correctly, please refer to this section.
8. Currently, Approval Formula fields that return signatures cannot be displayed in the downloaded file, as follows:
(1) APPROVAL.STEP([stepIndex]).SIG([email])
(2) APPROVAL.STEP([stepIndex]).SIGIMG([email], [width], [height]).
9. Excel Template Limitations:
(1) Images cannot be inserted into cells (they can only be placed above cells), and single-image fields in Subtables are not supported.
(2) :html parameters are not supported, so BBCode, Markdown and multiple-image fields cannot be exported.
10. PowerPoint Template Limitations:
(1) Single-image fields in Subtables are not supported.
(2) :html parameters are not supported, so BBCode, Markdown and multiple-image fields cannot be exported.
 Thank you for your valuable feedback!
