Support Ticket Triage & Reply: AI Agent for Suggested Responses and Smart Case Assignment
Customer service teams often need to cross-reference information from multiple sources, including FAQs, product information, service policies, order data, and internal guidelines. Handling this manually for every inquiry can be time-consuming and may lead to missed details.
With the Ragic Agent template, you can build a Support Ticket Triage & Reply workflow. The AI Agent can review customer messages, compare related sheet data, generate suggested replies, and assign the appropriate owner based on issue type or handling rules.
We recommend reviewing the suggested reply before sending it to ensure accuracy and make any necessary adjustments. Once confirmed, the customer service representative can send the reply manually.
If you do not have a Ragic account yet, please complete registration first. After registering, you can start with the Free Plan. To explore more features, you can also apply for a 30-day free Professional Plan trial with no credit card required. No charges will be made without your consent. For more information, please refer to the Pricing Page.
After logging in, click the ![]() icon in the top right corner to open the AI panel, then click AI Agent.
icon in the top right corner to open the AI panel, then click AI Agent.

Before getting started with AI Agent, please note the following:
1. Running an AI Agent consumes AI Usage. The amount used varies depending on the complexity of the task and the selected Model.
2. Each database includes free monthly AI Usage for testing, and the amount varies by plan. Paid Plans include free usage based on the plan and the number of users. A Trial account receives a fixed amount of AI Usage for evaluation, regardless of plan or user count. The Free Plan also includes basic usage for testing. You can use the free AI Usage to explore and test the feature before deciding whether to upgrade your plan or purchase additional AI Usage.
3. When the free AI Usage is used up, the system will not charge you automatically. Instead, AI features will be paused. To continue using AI features, Paid Plans can purchase extra usage as needed. AI Usage is calculated in USD. Trial account cannot purchase additional AI Usage, and users on the Free Plan can continue using AI after monthly usage is refreshed. Charges are incurred only when you actively upgrade your plan or purchase additional AI Usage.
4. You can view the Usage Report for each Agent over the past 30 days, including call counts and usage costs. This helps you understand how AI Usage is being used and adjust Agent settings as needed.
For more information, please refer to this article.
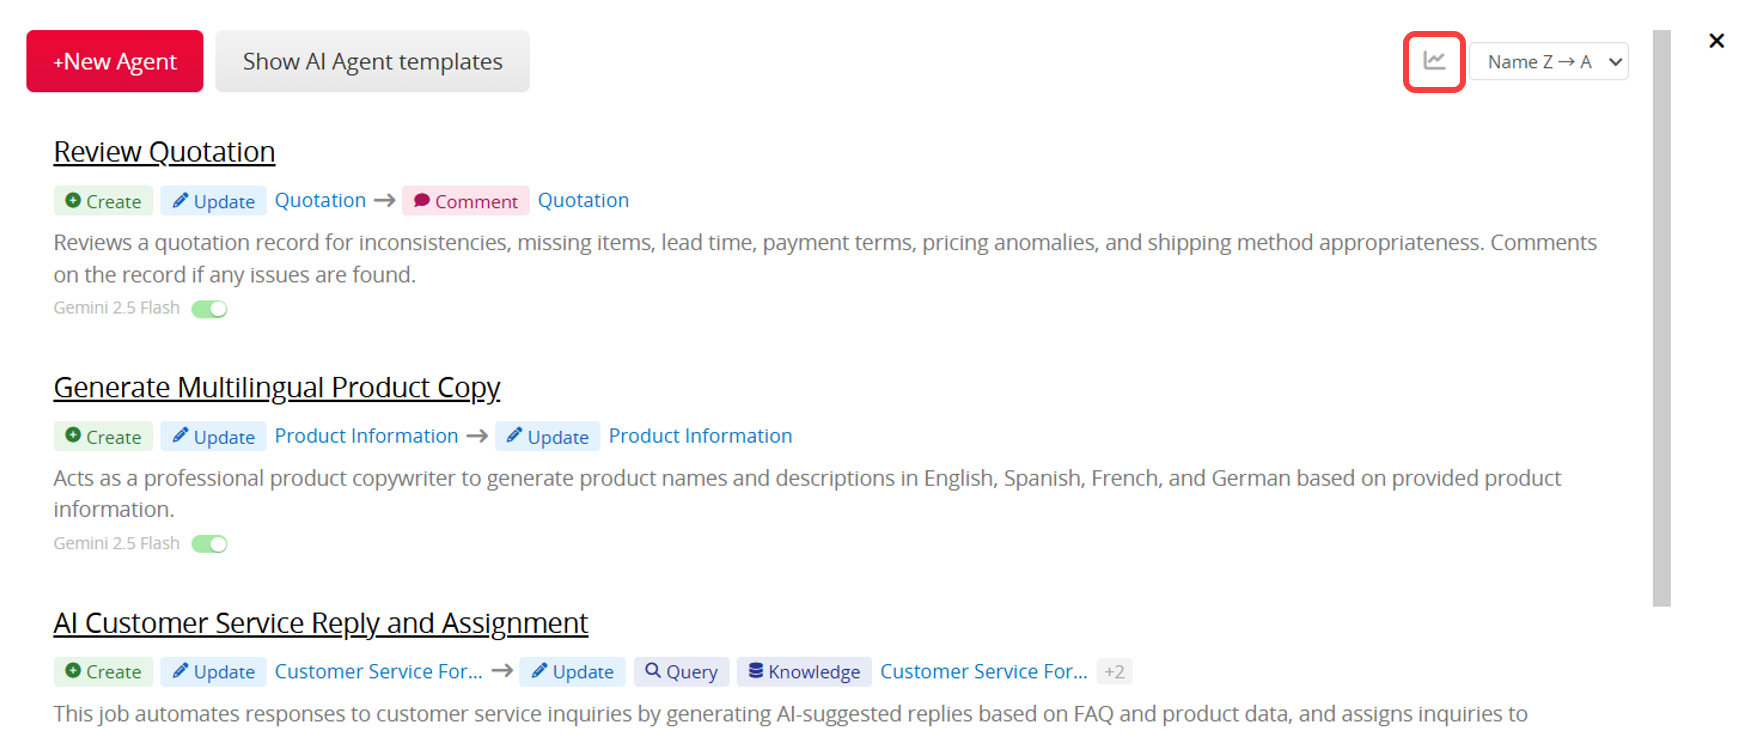
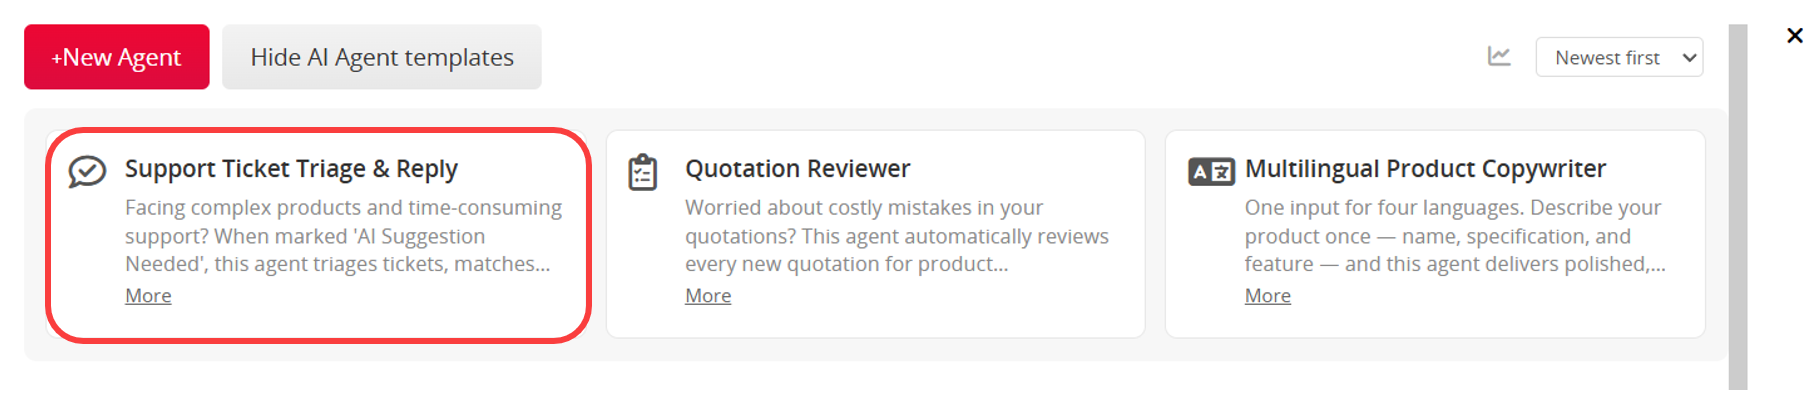
When creating a new AI Agent, you can find and apply the Support Ticket Triage & Reply template at the top of the page.
Depending on your current database needs, you can choose one of the following methods:
Method 1: Use the Template Sheets Directly
If your database is new or you have not yet created sheets for customer service messages, FAQs, or product information, it is recommended to start with the template sheets. After applying the template, you may still need to adjust some AI prompt content based on your actual needs. For more details, please refer to this section.
Once the template is saved, the system will automatically install the related sheets and settings. You can begin testing immediately using the built-in fields and workflows without designing everything from scratch. This is also a quick way to understand how the AI Agent works.

Method 2: Apply the Template to Your Existing Sheets
If you already have customer service case, FAQ, product information, or other knowledge base sheets, you can apply the AI Agent to your own sheets instead.
This option is ideal for teams with an existing customer service workflow, as it allows direct integration into current systems without rebuilding databases. However, after applying the template, you will need to adjust the Agent prompt based on your actual sheet names, field names, and assignment rules. For more details, please refer to this section.
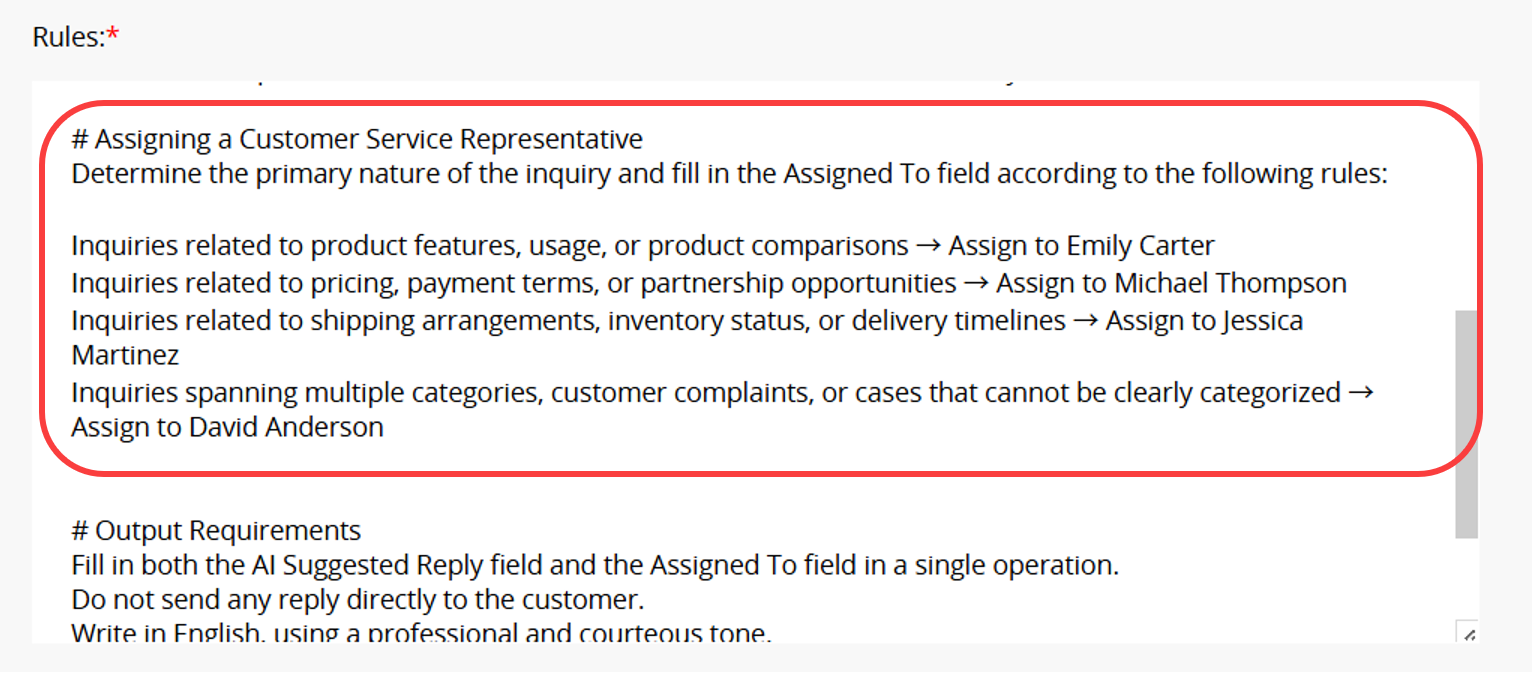
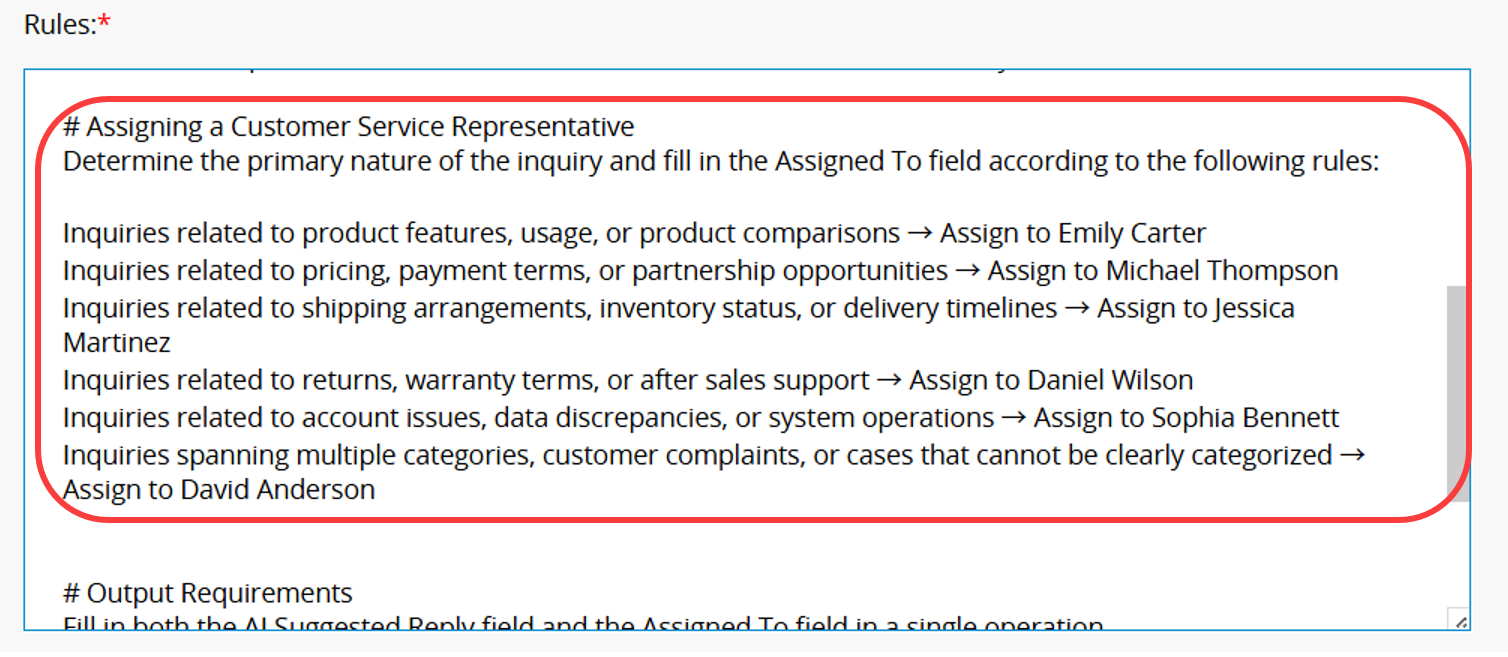
Before using the template sheets, adjust the Assigning a Customer Service Representative settings based on your needs. For example, you can assign different customer service representatives based on product line, issue type, customer tier, or language requirements. Assignment rules and assignees can be adjusted to fit your workflow.
In the current template sheets, the "Assigned To" field is a Free Text field. To manage the owner list more easily, you can change the field type to Select User. This allows assigned users to receive notifications and makes assignment and access management easier to maintain.
After completing the adjustments, you can start using the template. The template installs three sheets: "Product Reference", "FAQ", and "Customer Service Form".
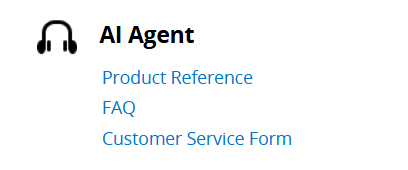
We recommend creating "Product Reference" and "FAQ" records first. When a customer message is received, you can add it to the "Customer Service Form". The AI Agent will compare the message with related sheet data, generate a suggested reply, and help assign a customer service owner.
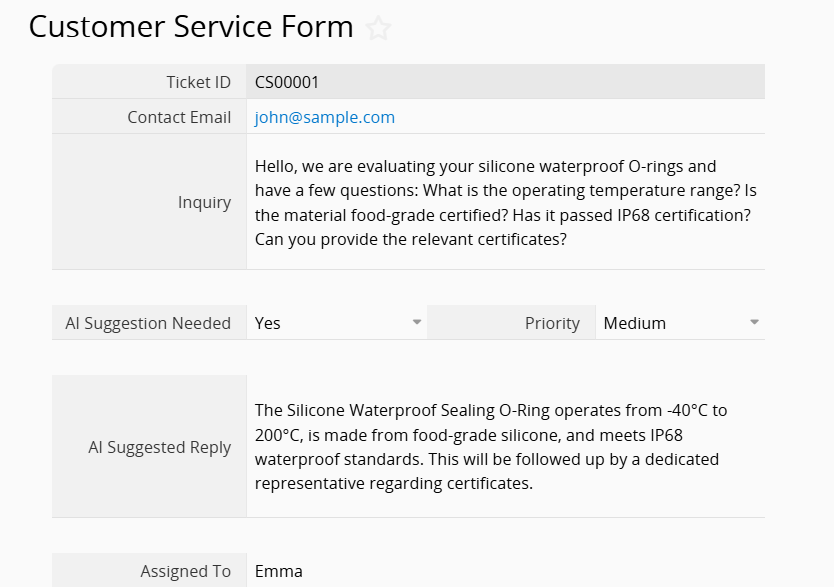
The current template is designed for the AI Agent to compare related data and generate an initial suggested reply. For example, it can search FAQ and Product Reference records based on the customer inquiry, then generate a suggested reply for the customer service team to review. We still recommend confirming the content before sending it, for example, checking accuracy or adding missing details.
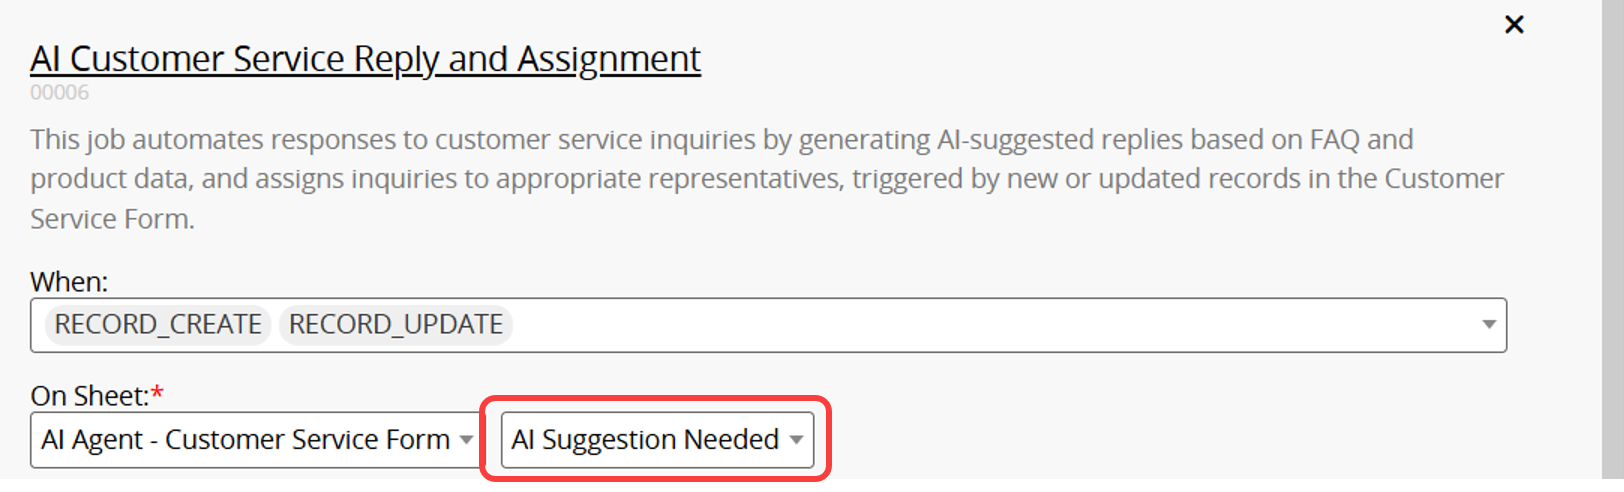
If you do not want AI to regenerate a suggested reply every time a record is updated, you can use the "AI Suggestion Needed" field to control when the AI Agent runs. Since the template sheets already include a Shared View where "AI Suggestion Needed" is set to "Yes", you can configure the AI Agent to run only for records matching this Shared View.
When an email has been sent, the content has been manually adjusted, or you do not want AI to overwrite an existing reply, simply change the "AI Suggestion Needed" field to "No" to prevent the reply from being regenerated after future updates.
The template is only a starting point. You can customize the AI prompt, trigger conditions, assignment rules, and reference sheets to make the AI Agent better fit your customer service workflow.
After applying the Support Ticket Triage & Reply template, if you are using your own customer service message sheet, first review and adjust the AI prompt. The main adjustments include the following three parts:
1. Adjust Sheet Names
Make sure the sheet names in the AI prompt match the actual sheet names in your database, including the Trigger Sheet and any Action Sheets the AI needs to reference.
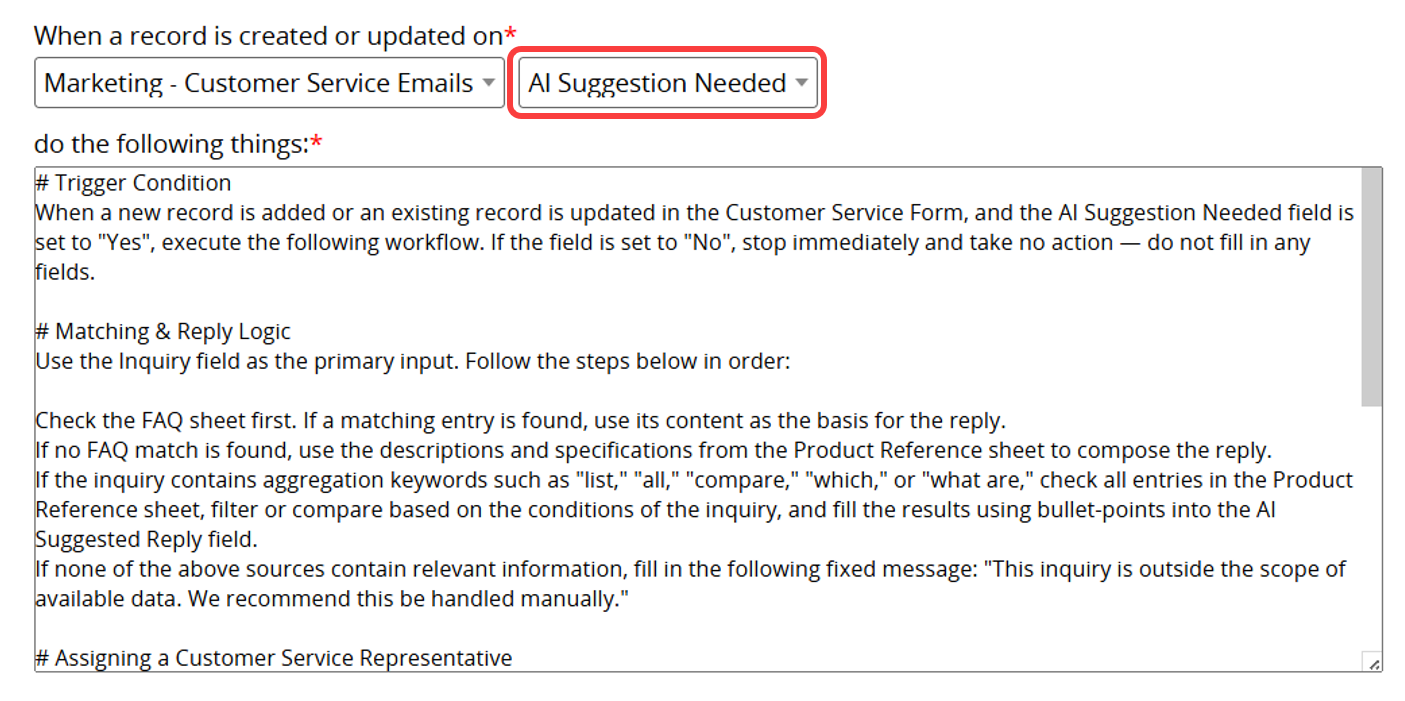
For example, if you want AI to generate suggested replies and assign customer service owners when records are created or updated in the "Customer Service Emails" sheet, while referencing the "FAQs", "Product Reference", and "Internal Knowledge Base" sheets, you should make the following adjustments:
1. Set the Trigger Sheet to the "Customer Service Emails" sheet.
2. In Action Sheets, select the "Customer Service Emails" sheet and add the "FAQs", "Product Reference", and "Internal Knowledge Base" sheets so the AI can reference related data.
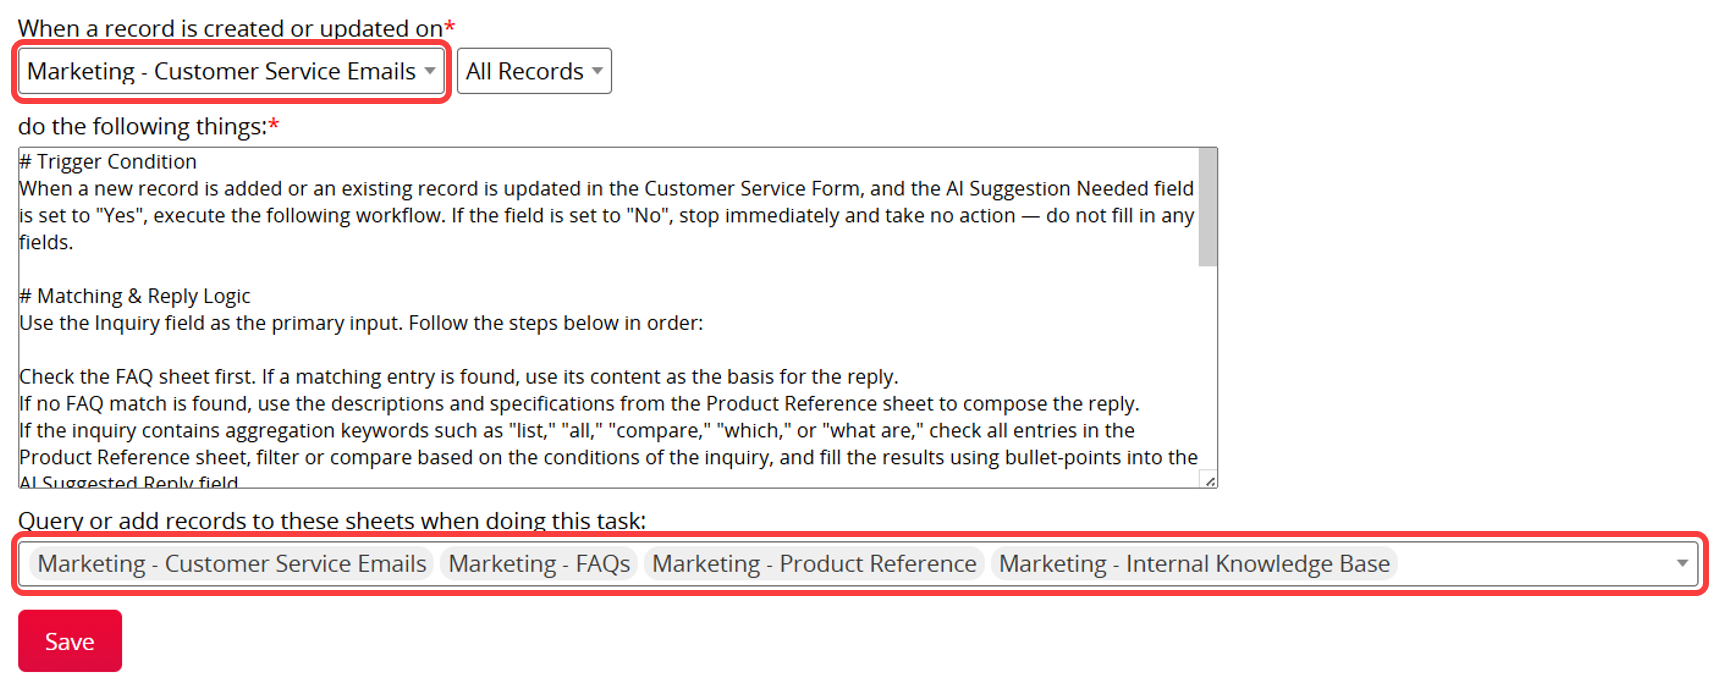
3. Adjust the AI prompt based on your workflow. For example, you can instruct the AI to first reference the "FAQs" and "Product Reference" sheets when replying to customer inquiries. If needed, it can then refer to the "Internal Knowledge Base" sheet and assign the appropriate customer service representative based on the issue type.
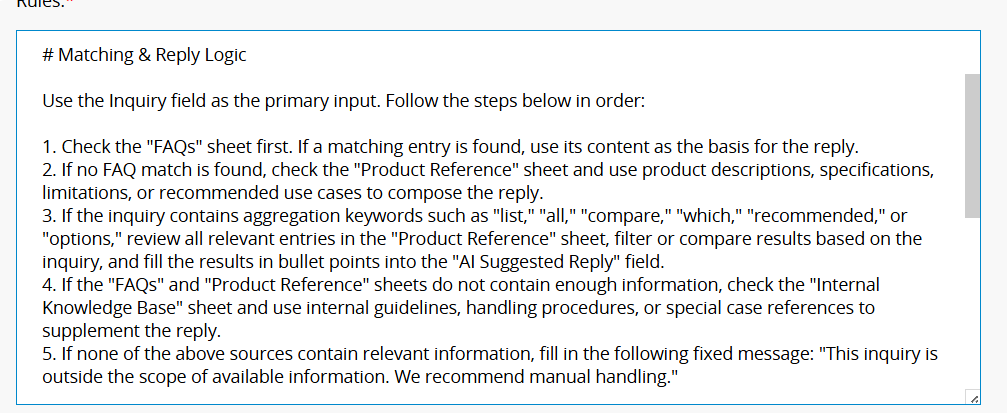
The number of reference sheets can be adjusted based on your needs. If customer inquiries only require the "FAQs" and "Product Reference" sheets, you can keep just these two. If the AI also needs to reference warranty rules, return policies, membership plans, or other internal procedures, simply add the related sheets to the Action Sheets and the AI prompt.
2. Adjust Field Names
Make sure the field names in the AI prompt match the actual fields. We recommend including at least the following three fields:
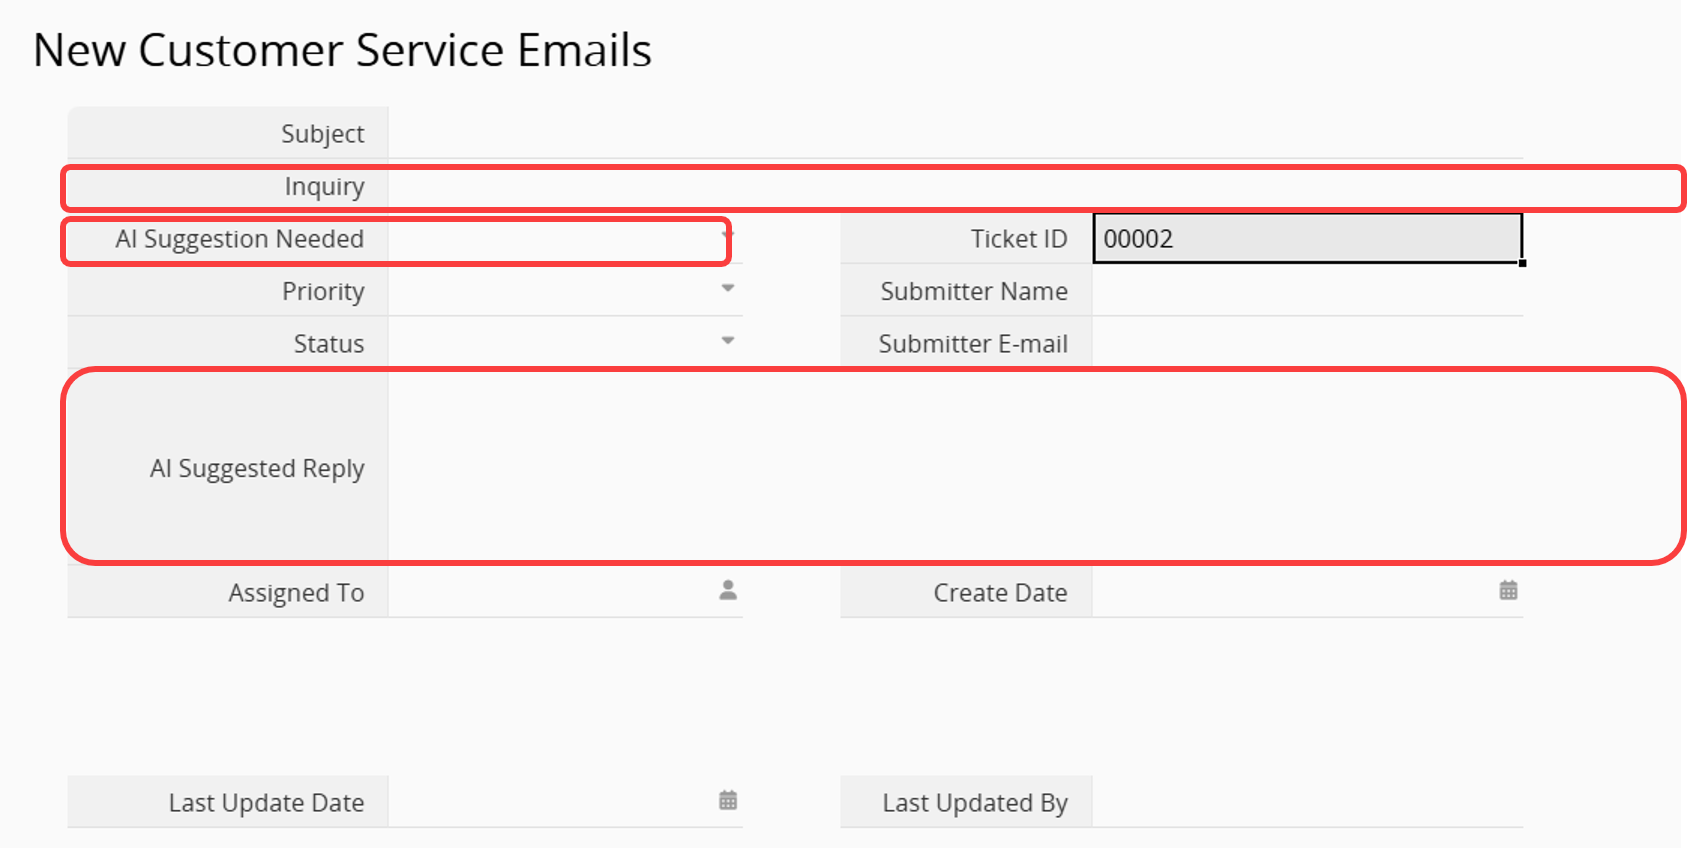
(1) "AI Suggestion Needed"
It is recommended to configure this as a Selection field with "Yes" and "No" as options. You can then create a Shared View where "AI Suggestion Needed" is set to "Yes" and configure the AI Agent to run only for matching records.
When an email has been sent, the content has been manually adjusted, or you do not want AI to overwrite an existing reply, simply change the "AI Suggestion Needed" field to "No" to prevent the suggested reply from being regenerated.
(2) "Inquiry"
Enter the email content in this field so the AI can understand the customer's inquiry.
(3) "AI Suggested Reply"
This field is used for the AI to generate a suggested reply. Customer service representatives can review the content, use it directly to reply to the customer, or adjust the tone and details before sending.
3. Configure Customer Service Assignment
Assignment rules and customer service representatives can be customized based on your customer service workflow. For example, different representatives can be assigned based on product lines, issue types, customer tiers, or language requirements. You can also adjust assignment rules and the number of assignees as needed.
After applying this Agent template, you can further customize and optimize the customer service workflow based on your needs.
1. Use an Embedded Form to Collect Customer Inquiries
You can use an embedded form to provide a user-friendly way for customers to submit inquiries. When a customer submits a record, the AI Agent can generate a suggested reply and help assign a customer service owner.
If there are fields customers should not see, such as "Assigned To" or "AI Suggested Reply", you can adjust Field Level Access Rights and set EVERYONE to No Rights.
Please note that Description Fields do not support Field Level Access Rights. If you have a Description Field, such as "Internal Notes", that customers should not see, consider managing it using Multiple Versions or Hidden fields.
2. Automatically Create Records from Customer Emails
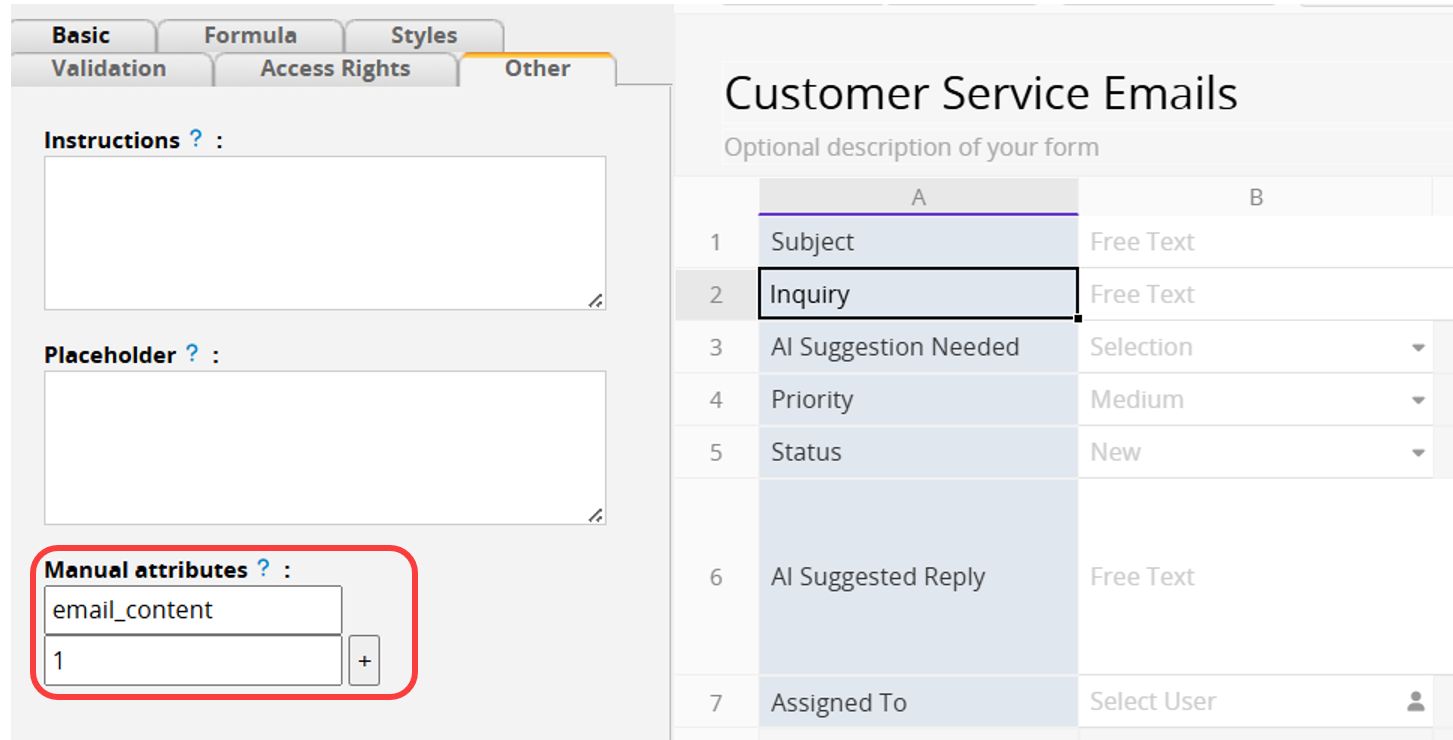
If you want customer emails to be stored directly in your database, you can download the "Customer Service Tickets" template to automatically create incoming customer emails as records in Ragic.
Since the AI needs to read the customer inquiry, make sure to create a field for storing the "Inquiry". Then, use the field's Manual Attributes setting with the parameter email_content and the value 1 so the system can automatically capture the email content. For other settings, please refer to this section.
If you do not want to use the "Customer Service Tickets" template, you can also use your own sheet to automatically convert incoming customer emails into records. For setup details, please refer to this article.
3. Create a Send Custom E-mail Button to Reply to Customers Quickly
To speed up customer replies, you can create a Send Custom Email button that automatically inserts content from the "AI Suggested Reply" field, or a manually adjusted reply field, into an email. Customer service representatives can then review the email and reply to customers with one click.
 Thank you for your valuable feedback!
